background image

13

1

12

SELECTING THE POWER SUPPLY

1

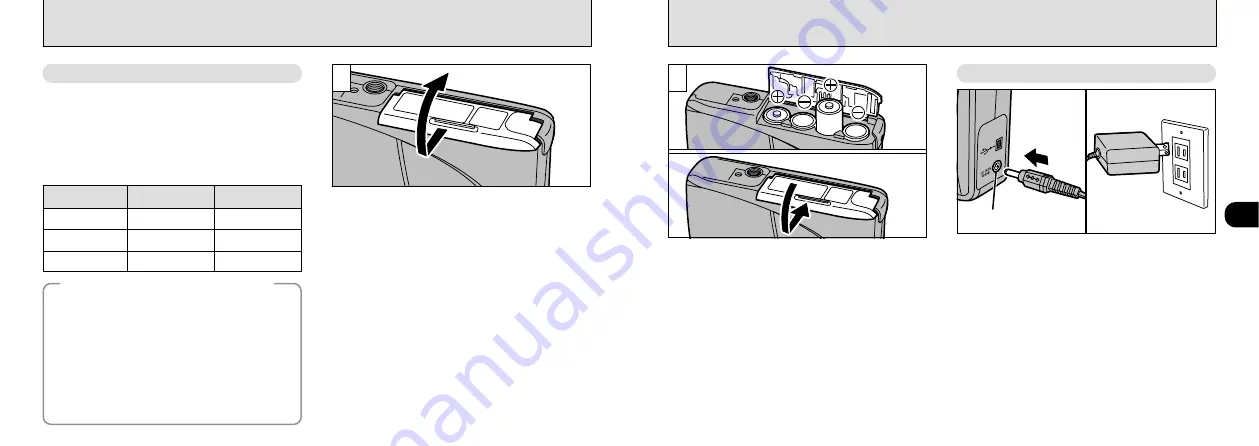
Slide the battery cover in the direction of the
arrow and open the cover.

!

Soiling such as fingerprints on the battery terminals
can markedly reduce the number of available shots
(

P.67).

!

Do not use new and used batteries together.

!

Always switch the camera off when replacing the
batteries. If the camera is left on, the camera
settings may revert to the factory default settings.

!

The Quick Battery Charger (sold separately) is needed
to recharge AA-size Ni-MH or Ni-Cd batteries (

P.62).

!

Once the AC power adapter has been connected or
the batteries have been loaded for 10 minutes or
more, the settings will be retained for roughly 20
minutes even if you remove the batteries and
disconnect the AC power adapter. Check settings such
as the date and time after you replace the batteries.

Install the batteries with the correct polarity as
shown.

Close the battery cover as indicated by the
arrow.

2

Using the AC Power Adapter

(sold separately)

To shoot or play back images without depleting
the battery charge, use the special AC Power
Adapter AC-5V/AC-5VH.
Check that the camera is switched off and then
plug the AC power adapter connector into the
“DC IN 5V socket” on the camera. Then plug the
AC power adapter into the power outlet.

!

You cannot charge the batteries by connecting the
AC power adapter.

!

The shapes of the plug and socket-outlet depends
on the country of use.

!

Using AC power adapters other than the AC-5V/AC-
5VH could damage the camera.

!

See P.67 for more information on the AC power adapter.

DC IN 5V socket

Use 4 AA-size alkaline, Ni-MH or Ni-Cd batteries.
Do not use different types of batteries together.

Number of available shots 

(

with fully charged batteries)

The table below provides a guide to the number of shots that
can be taken at normal temperature with 50% flash use.
Note that these figures may vary depending on the camera’s
ambient temperature and the level of battery charge.

Important Battery Information

Because different brands of alkaline batteries have
different capacities, the life of some batteries (the length
of time for which they can be used) may be considerably
shorter than that of the alkaline batteries supplied with
this camera.

It is a characteristic of alkaline batteries in particular that
the life of the battery is shorter at low temperatures
(+10°C or below).

Do not use lithium or manganese batteries in your
FinePix1300 because the heat generated by the
batteries could damage the camera.

With LCD monitor

OFF

With LCD monitor

ON

Battery type

Ni-MH battery
HR-3UF

Alkaline batteries

Ni-Cd battery
KR-3UF

Approx.300 frames

Approx.260 frames

Approx.180 frames

Approx.800 frames

Approx.800 frames

Approx.500 frames

!

Do not use excessive force on the battery cover.

!

Take care not to drop the batteries when you open
or close the battery cover.

Using Batteries

Summary of Contents for FinePix 1300

Page 1: ......

Page 2: ...ouraged to try to correct the interference by one or more of the following measures Reorient or relocate the receiving antenna Increase the separation between the equipment and receiver Connect the eq...

Page 3: ...the SmartMediaTM 14 Removing the SmartMediaTM 15 SWITCHING ON AND OFF 16 SETTING THE DATE AND TIME 17 E TAKING PICTURES AUTO MODE 19 Number of available frames 23 D VIEWING YOUR IMAGES PLAYBACK 24 D...

Page 4: ...ing of stage performances entertainments and exhibits even when intended purely for personal use Users are also asked to note that the transfer of memory cards containing images or data protected unde...

Page 5: ...lector button P 40 Lens Digital USB socket P 60 DC IN 5V Power input socket P 13 Viewfinder lamp P 22 Viewfinder P 19 LCD monitor P 19 24 31 MENU OK button Tripod mount Battery cover P 12 DISP button...

Page 6: ...splay P 54 The screens in this manual are shown in English Pass the loop of this cord on the end of the strap through the strap mount Then pass the other end of the strap through the loop of the thin...

Page 7: ...ower adapter The shapes of the plug and socket outlet depends on the country of use Using AC power adapters other than the AC 5V AC 5VH could damage the camera See P 67 for more information on the AC...

Page 8: ...artMedia Some 3 3V SmartMedia are labelled as 3V cards Only use 3 3V SmartMedia MG 4S 4MB MG 8S 8MB MG 16S SW 16MB MG 32S SW 32MB MG 64S SW 64MB 2 1 Check that the viewfinder lamp is lit green before...

Page 9: ...op working Replace or recharge the battery If the battery charge is depleted you may not be able to switch the LCD monitor on 2 If you have not set the date the confirmation screen appears every time...

Page 10: ...side hold it so that the shutter button is at the top 18 SETTING THE DATE AND TIME Use the dc button to select the desired item and then use the a and b buttons to correct the setting When you have ma...

Page 11: ...camera will not focus at distances of 70cm 2 3 ft or less even when is displayed If you press the shutter button down fully does not appear 6 To take the picture press the shutter button down fully wi...

Page 12: ...sure and still get excellent results In dimly lit scenes where the subject is difficult to see using the LCD monitor use the viewfinder to take the picture Shooting using the LCD monitor is recommende...

Page 13: ...K 1 Set the mode dial to D When you set the mode dial to D the last image shot is displayed If image on the LCD monitor is difficult to see adjust the LCD monitor brightness P 58 Use the c button to v...

Page 14: ...a and formatting SmartMedia 1 2 MULTI FRAME PLAYBACK Pressing the DISP button twice switches to the multi frame 9 frame display Multi frame playback cannot be used in a menu screen The message shown o...

Page 15: ...nnot be used together ADVANCED PHOTOGRAPHY 3Advanced Features Photography 4 Use the d and c buttons to display the image to be erased Press the MENU OK button to erase the displayed image When erasing...

Page 16: ...fy the settings for f P 32 G P 38 and a P 39 In the C Photography mode pressing the DISP button changes the display status one step in a 3 step cycle from Show text and video to Show video only to Sho...

Page 17: ...eduction flash mode to effectively minimize the likelihood of the red eye effect Take the following measures also to make Red Eye Reduction mode more effective Get the subjects to look at the camera G...

Page 18: ...also use digital zoom photography FLASH PHOTOGRAPHY PHOTOGRAPHY MENU p Suppressed Flash In this mode the flash never fires Use this mode when you are taking pictures in indoor lighting at distances t...

Page 19: ...e subject is roughly in the center of the viewfinder or LCD monitor and then press the shutter button to set the correct exposure for the subject and start the timer running You can also use AE lock i...

Page 20: ...e information on the white balance The Brightness setting is disabled in the following situations When the flash is used in Auto or Red Eye Reduction mode When dark scenes are shot in Forced Flash mod...

Page 21: ...se up shots Effective photography range Approx 8 15 cm If the flash is set to AUTO or o Red eye Reduction mode it is automatically set to pSuppressed Flash mode When shooting in dark conditions use a...

Page 22: ...gs FORMAT ALL FRAMES Erasing all frames FRAME Erasing single frame If the 2 message appears wipe the contact surfaces on the SmartMedia the gold colored area with a soft dry cloth and then re insert i...

Page 23: ...G PLAYBACK MENU A confirmation screen appears If you are erasing all the frames or formatting the card press the MENU OK button to proceed If you are erasing one frame use the d and c buttons to selec...

Page 24: ...elect the image to be protected When the MENU OK button is pressed the image is protected and the h icon appears on the right of the screen To remove the protection press the MENU OK button again SETT...

Page 25: ...layed while you are specifying the prints 7 P 71 You attempted to erase a frame with DPOF settings P 71 If you load a SmartMedia that contains frames specified for printing on another camera those pri...

Page 26: ...n allows you to select whether or not the date of shooting is included on the print Set the Mode dial to D Press the MENU OK button to display the menu on the LCD monitor Press dc button to select DPO...

Page 27: ...ning appears S DPOF SET ALL RESET ALL PLAYBACK MENU 52 4 When you have completed the settings always press the MENU OK button to confirm the settings The total number of prints is displayed on the LCD...

Page 28: ...hanging the combination of file size and compression ratio for image recording P 56 Selects the buzzer volume for camera operation When this is set to OFF the camera buzzer emits no sound Sets the dat...

Page 29: ...icated when images are downloaded to a PC If the SmartMedia already contains image files with file numbers higher than the highest file number on the last SmartMedia images are stored beginning from t...

Page 30: ...de P 19 24 31 the setting cannot be changed PC CARD ADAPTER FinePix 1300 Digital Camera USB Enclosed Interface Set PC card slot Personal Computer commercially available Floppy disk drive Digital Photo...

Page 31: ...n Then click the Eject button in the taskbar Macintosh Check that the viewfinder lamp is green Then drag the Removable drive icon on the desktop to the Trash Switch the camera off and replace the Smar...

Page 32: ...A2 5V 3 3V 2MB to 64MB Accessories Guide eThe optional accessories sold separately can make taking pictures with the FinePix1300 even easier For information on how to attach and use the accessories re...

Page 33: ...s may subject baggage to violent shocks and the camera may be damaged internally even when no external damage is visible eBe sure to read this information in conjunction with Safety Notes P 76 prior t...

Page 34: ...es that the battery has reached the end of its effective life and should be replaced AA size alkaline Ni MH nickel metal hydride or Ni Cd batteries can be used with this camera Do not use AA size mang...

Page 35: ...l cameras Each SmartMedia card contains a built in semiconductor memory chip NAND flash memory which is used for storing digital image data Because the data is stored electronically the stored image d...

Page 36: ...t can be taken but the exposure will not be correct AE Warning Displayed Explanation Remedy The camera battery is low on charge No SmartMedia is loaded or it is loaded incorrectly The SmartMedia is no...

Page 37: ...Remove the battery re insert them and try again Move the Mode dial to the correct setting Load new batteries Move the Mode dial to the correct setting Problem Cause Remedy Troubleshooting eBefore you...

Page 38: ...otice The LCD monitor on your digital camera is manufactured using advanced high precision technology Even so small bright points and anomalous colors particularly around text may appear on the monito...

Page 39: ...mera off and then remove the batteries and disconnect the AC power adapter Continued use of the camera when it is emitting smoke is emitting any unusual odor or is in any other abnormal state can caus...

Page 40: ...or cables and cause a fire or electric shock Do not cover or wrap the camera or the AC power adapter in a cloth or quilt This can cause heat to build up and distort the casing or cause a fire CAUTION...

Page 41: ...Printed in Japan FGS 002108 FG Printed on recycled paper...

Reviews: