32
33
Advanced
Features
3
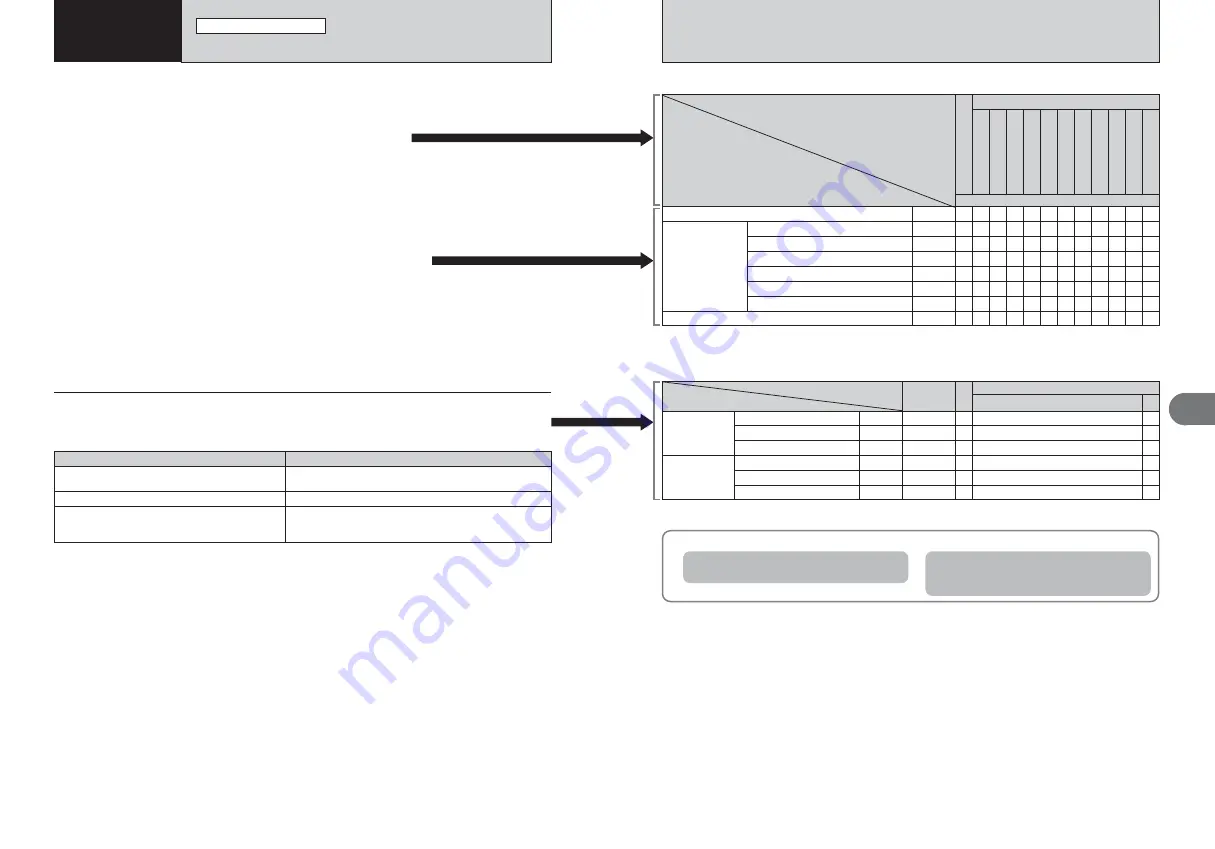
Specify the camera settings for taking pictures to get the best result. A general
guide is given below.
1
Select the Photography mode (
➡
P.34, 35).
B
Auto
Specifies all settings other than Quality, Sensitivity and FinePix
COLOR on the camera.
?
Scene position Selects the best Scene position setting for the scene being
shot.
s
Manual
Sets the “Exposure compensation” and “White balance” to
manual to easily control yourself.
2
Specify the photography settings (
➡
P.36-39).
e
Macro
Used for close-up shots.
d
Flash
Used for shots in dark locations or for backlit subjects, etc.
*
Self-timer
Used in situations such as group shots where the photographer is
included in the shot.
3
Take the pictures (check the exposure and focus
➡
adjust
the shot composition
➡
press the shutter button down fully).
★
You can use the menus for more detailed settings (
➡
P.41-48).
The table below provides a number of sample settings. Use the settings effectively.
When the camera does not obtain the correct exposure.
When the image is too bright
Lower the
û
sensitivity setting.
When the image is too dark
Raise the
û
sensitivity setting.
Use flash.
TAKING PICTURES — SELECTING THE CAMERA SETTINGS
PHOTOGRAPHY FUNCTIONS
3
Advanced
Features
✓
✓
✓
✓
✓
✓
✓
✓
s
MANUAL
✓
—
—
✓
—
Õ
TEXT
✓
✓
—
✓
—
—
—
—
Ù
FLOWER
CLOSE-UP
✓
✓
—
—
—
✓
—
—
Ÿ
PARTY
✓
—
—
✓
—
—
—
—
ÿ
MUSEUM
✓
✓
—
—
—
✓
✓
✓
Ö
SUNSET
✓
✓
✓
—
✓
✓
✓
✓
Ü
BEACH
&
S
NOW
✓
✓
✓
— — — —
✓
—
✓
—
✓
— — —
✓
—
✓
—
✓
— —
✓
m
PORTRAIT
,
LANDSCAPE
.
SPORT
©
NIGHT
✓ ✓ ✓ ✓
?
d
Flash
AUTO Auto flash
b
Red-eye reduction
d
Forced flash
n
Red-eye red Slow synchro
e
Macro
Photography mode
Function
■
List of functions available in each mode
✓
✓
✓
✓
—
B
P.36
P.37
P.37
P.38
P.38
*
Self-timer
✓
✓ ✓ ✓ ✓
v
Suppressed flash
✓
P.38
✓
— —
✓
c
Slow synchro
—
P.38
P.39
P.34
✓
: YES , —: NO
P.41
P.43
P.44
P.47
P.47
m
/
,
/
.
/
©
/
Ü
/
Ö
/
ÿ
/
Ÿ
/
Ù
/
Õ
?
Menu options
FinePix Photo
mode
¨
Exposure compensation
»
White balance
±0
AUTO
5
N
AUTO
STD
˘
Quality
û
ISO
ü
FinePix COLOR
Factory
default
■
List of menu options available in each mode
—
✓
✓
✓
✓
✓
✓
✽
✓
—
—
✓
—
P.48
Å
Continuous shooting
OFF
✓
✓
✓
✓
✓
✓
B
s
✽
p
-CHROME (
➡
P.44) is fixed when selecting “
Ù
” FLOWER CLOSE-UP.
✽
When selecting “
Ù
” FLOWER CLOSE-UP or “
Õ
” TEXT in “
?
” SCENE POSITION, you can shoot in the shooting
distance from close-up shots to distant view.
✓
: YES , —: NO
To achieve this result
Sample settings
To prevent the image from having a red or blue cast
due to the light source
Change the “White balance” setting in the photography menu.
To avoid missing snapshot opportunities
Take pictures in
B
mode (see “Using the Camera”).
To prevent the subject from being overexposed or
underexposed and to show the substance and textures
of the subject clearly
Use exposure compensation.
Select (+) if the background is pale and (–) if the background is
dark.
Summary of Contents for A470
Page 60: ...118 Memo...


