FTE MAX S102E User Manual Download Page 34

PAG. 34

rev 1.0

OSD 72

OSD 73

SYSTEM SETUP

control; the time when you want to start recording. By default, 
when you enter this option, it shows the current time.

-  Length: Settle the length of time you want the receiver to 

record a channel. Once it is fi nished, the receiver will be 
settled in Stand-By.

Note: 

If the date/ start time is prior to the current date/hour, 

a warning message will be shown and you have to change the 
date/start time.

Note: 

If the hard disk is full and there is not enough space for a 

recording, a warning message will be shown on the screen.

Note: 

If during the recording, the hard disk fi lls up, the recording 

stops and will only store the data recorded until that moment 
(without losing the previously stored data).
If the TV is in TV mode, a recording timer will be activated 
and a message will be shown on the screen, asking for a 
confi rmation of the recording or for the timer elimination. After 
some seconds, if it is not confi rmed or deleted, the PVR will 
start the programmed recording. 
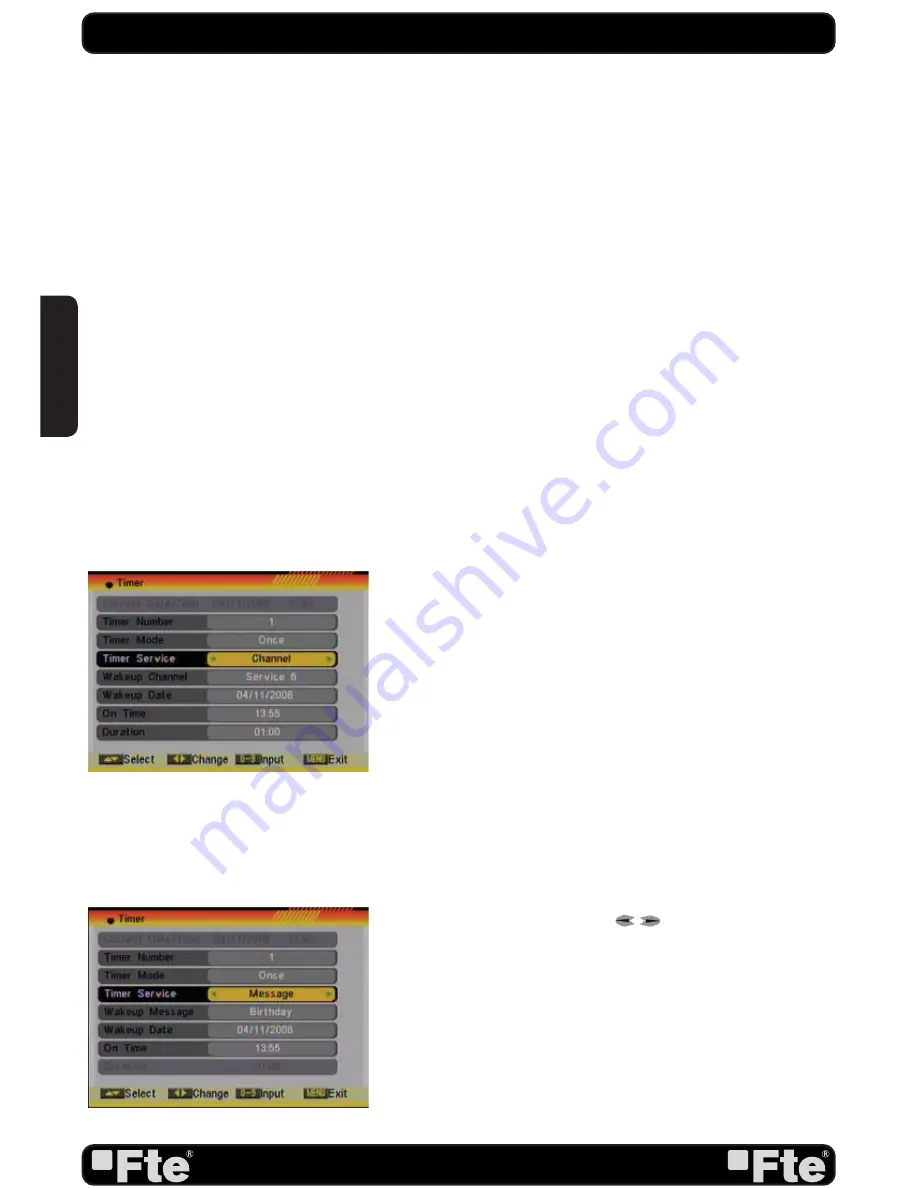
5. “Channel reproduction” / “Radio reproduction” option: if you 
select this option, the following fi elds of the image will be shown 
in order to be confi gured (OSD 72).
-  Start channel: Press [OK] to open the channel list and select 

the channel you want to watch.

-  Start date: Introduce using the numerical keys on the remote 

control the date on which you want to activate the alarm 
service.

-  On time: Introduce using the numerical keys on the remote 

control the time on which you want to activate the alarm 
service. 

-  Length: Settle the length of time you want the receiver to keep 

one channel. Once it is fi nished, the receiver will be settled 
in StandBy. If you do not want the receiver to be settled on 
Stand-By, you have to confi gure the length to 00:00.

Note: 

If the date/ start time is prior to the current date/hour, 

a warning message will be shown and you have to change the 
date/start time.
6. Message option: If you select this option, the following image 
fi elds will be active in order that you can confi gure them (OSD 
73).
-  Start message: Use the keys [

] to select the text you 

want to appear on the screen

-  Start date: Introduce using the numerical keys on the remote 

control the date on which you want to activate the service.

-  On time: Introduce using the numerical keys on the remote 

control the time on which you want to activate the service. 
Automatically, a message will be shown although the receiver 
is ON or in Standby.

Note: 

If the date/ start time is prior to the current date/hour, 

a warning message will be shown and you have to change the 

ENGLISH

Summary of Contents for MAX S102E

Page 1: ...MAX S102E...

Page 2: ...on the connections Do not install the receiver close to strong heat sources and ensure a good aeration if you plan to install the receiver in a small cabinet Before you start operating the receiver ma...

Page 3: ...W NEXT STEPS FOR THE CORRECT INSTALLATION OF THIS RECEIVER STEP 1 CONNECTIONS The coaxial cable with satellite signal must be connected to the IF IN connector The TV SCART connector must be connector...

Page 4: ...preferred audio language for those channels using If a channel offers the same audio language as the First Audio you set the system will play this audio language as default If the channel does not of...

Page 5: ...s of DiSEqC1 1 switches Positioner Press to select between None DiSEqC1 2 USALS Polarity Press to switch between Auto H V Once the LNB is configured press Exit to save the chan ges and go to the previ...

Page 6: ...of all channels or just scanning of free channels If you select Yes it will scan free channels only 3 On Scan Channel item press to select the scanning range from TV Radio Channels only TV channels or...

Page 7: ...If GMT Usage is On the offset respect GMT has to be configured depending on your region or country Use the keys to choose the offset Remember that the offset values are between 12 00 and 12 00 3 Summ...

Page 8: ...backup of the channel list and it will allow restoring the channel list even thought after a factory default Single Search Once the antenna is configured this option allows search for the channels of...

Page 9: ...remote control Information Shows all the technical information for the selected channel Quick Setup The installation assistant will be loaded Game Some games like Tetris Snake and Othello Factory Def...

Page 10: ...CH CH 17 2 7 TV RADIO 17 2 8 Vol Vol 17 2 9 Exit 17 2 10 Menu 17 2 11 Recall 17 2 12 Channel List 18 2 13 EPG 18 2 14 List 19 2 15 Favourites 19 2 16 Audio Track Mode 19 2 17 Information 19 2 18 FAV 1...

Page 11: ...9 4 4 Satellite List 30 4 5 TP List 30 4 6 Satellite Guide 31 5 System Setup 5 1 Language 32 5 2 TV System 32 5 3 Time Timer Setting 33 5 3 1 Timer 33 5 3 2 Local Time setting 35 5 3 3 Sleep Timer 35...

Page 12: ...Edit files and folders 44 7 1 2 2 Addind a new file to the list 45 7 1 2 3 Search for file 46 7 1 2 4 Logo 46 7 1 2 5 Configure the slide show 46 7 1 2 6 Audio MP3 player 46 7 1 2 7 Picture JPG viewer...

Page 13: ...rking on the connections Do not install the receiver close to strong heat sources and ensure a good aeration if you plan to install the receiver in a small cabinet Before you start operating the recei...

Page 14: ...at the same time is only possible with limited channel selection 8 TV SCART Output SCART for the connection to a TV set 9 COAXIAL S PDIF Coaxial output for digital audio AC3 1 2 REAR PANEL DESCRIPTION...

Page 15: ...selected channel 13 EXIT Exit menus or stop operations 14 EPG Shows the EPG information 15 MENU Opens the main menu 16 Adjusts audio volume or controls the cursor in menus 17 Changes channels volume...

Page 16: ...nel you selected has no signal This can be caused by several reasons 1 The channel you selected is not from the satellite to which your dish is pointing Select another channel 2 The signal of current...

Page 17: ...ic starting from the current channel Only the marked preview program is continuously playing 2 Press to change the marked channel among the preview programs 3 With the number buttons 1 9 you can direc...

Page 18: ...hannel list will be reduced to the channels of this group 4 Press Blue button to open the Find window OSD 6 You can use this feature to find channel by their names 5 Press Red button to open the reduc...

Page 19: ...ourite button A No channels have been assigned to a Favourite Group yet You can do this in the channel menu 2 16 AUDIO TRACK MODE 1 In TV mode press the Audio button to open the Audio Mode window OSD...

Page 20: ...l be shown on the screen Please delete some files in order to be able to record again chapter 7 1 1 4 Note If during the recording the hard disk fills up the recording stops and will only store the da...

Page 21: ...you can see the status information of the Hard Disk In order to leave the Time Shift option press the key stop to equal the difference between the reproduction time with the real one When you press S...

Page 22: ...ndow 2 You can enter directly the number of the desired channel with the remote control The selection will select that channel but it will not be previewed until you confirm with OK button 3 Press Pup...

Page 23: ...3 1 4 EDIT 1 After pressing the Yellow button a window for entering the password will open The default password is 0000 2 You can Delete Skip Lock and Edit the channel OSD 26 3 Press Exit to leave th...

Page 24: ...reate Press Green button to open the Create window OSD 33 Press OK button on the Satellite item to display the satelli te list You can select the satellite for which you want to crea te a new channel...

Page 25: ...hoice Press OK again to confirm 3 3 2 CHANNEL PLAY TYPE Press OK to enter Channel Play Type menu OSD 38 1 Here you can select the playing channels as Free Scrambled or All 2 If you select Free then al...

Page 26: ...ter the password The default password is 0000 2 After entering the password correct a safety question will show up where you have to confirm first OSD 42 3 Select Yes to delete all channels or No to c...

Page 27: ...next options can be modified LNB Type Press to switch among Standard User and Universal mode If you select Standard or User the frequency of the LNB can be changed Pressing OK the frequencies will app...

Page 28: ...window like the one beside will open OSD 49 1 On Satellite item press OK to open the satellite list OSD 50 Then press to move the highlight and press OK to mark unmark and EXIT to finish the selectio...

Page 29: ...mber buttons of the RCU The available range are 3000 13450 MHz and 1000 45000KS s Press Green button to delete the current TP A safety ques tion will be displayed for confirmation to delete the curren...

Page 30: ...u sure to delete OSD 58 Select Yes to delete the marked satellite Select No to cancel the operation 4 5 TP LIST When you open the TP List menu you will see a window like the one beside OSD 59 1 Press...

Page 31: ...the Number buttons to input the values of Local Longitude Local Latitude and Satellite Longitude 2 Press buttons to select east or west in Local Longitude and Satellite Longitude or to select north o...

Page 32: ...those channels using If a channel offers the same audio language as the First Audio you set the system will play this audio language as default If the channel does not offer this audio language then t...

Page 33: ...ter the Timer list menu OSD 70 The current time will be displayed in the first column If the current time is incorrect please modify it with the Number buttons at the Time menu 1 Timer Number You can...

Page 34: ...channel Press OK to open the channel list and select the channel you want to watch Start date Introduce using the numerical keys on the remote control the date on which you want to activate the alarm...

Page 35: ...rmation you will see the current time after you entered Time menu If the channel doesn t provide time information you have to input the date and time information manually The most channels support the...

Page 36: ...without entering the password first 3 Channel Lock If set to Yes then you need to enter the password before you can see those channels which have been marked as locked channels in the Channel menu If...

Page 37: ...r rect information You also just can change this setting and check if you still can receive the channels If the LNB Power is off and you still can see all channels then we recommend this setting 2 Pre...

Page 38: ...you can see at OSD 85 1 Language press to select the language that will appear on the menus see point 5 1 2 First Audio Some channels offer more than one audio language This function allows you to set...

Page 39: ...length of the snake If the snake runs against a wall or against itself then it dies Press OK to Pause Play the game Press Exit to quit the game and return to the Game menu 6 3 3 OTHELLO 1 Mark Setup a...

Page 40: ...om 6 5 2 UPGRADING THOUGH USB This option allows updating the software of the receiver with the received data from a USB 2 0 memory device To do it connect a USB 2 0 memory device to the receiver and...

Page 41: ...nd satellite lists 1 Start the SatcoDX application on your PC 2 Select SatcoDX Auto Programming item from the Tools menu and press OK The screen will show the message OK to Proceed OSD 93 3 Press OK a...

Page 42: ...ll as the music pictures and video files that the HDD contains You can manage the contents and to access to the multimedia player In the first screen you will have to select the HDD partition where mu...

Page 43: ...s 7 1 1 3 HOW TO BLOCK A RECORDING With this function it is possible to block a recording so it is necessary to introduce a password to watch it If you want to block a recording select it and press th...

Page 44: ...les of the HDD that you have copied previously from your computer The content is shown organized in the same folders you have created and it can be shown in different manners in the following lists Al...

Page 45: ...sabe the changes when you exit the menu MOVE 1 Press the Yellow button to move the file 2 A mark appears behind the file you want to move OSD 106 3 Go to the folder you want to move and press again th...

Page 46: ...This function allows you to configure the slide show therefore to play the picture playlist 1 Press the Yellow button Config 2 A new window will appear where you should configure some parameters OSD 1...

Page 47: ...D SIZE Reserved Size for the storage of the Time Shifting The available options can vary depending on the capacity of the external Hard Disk 7 2 2 JUMP STEP VALUE With this option you can settle the j...

Page 48: ...o do it connect a USB 2 0 memory device to the receiver and accede to this menu option OSD 116 The last software version to be loaded must be placed at the root path of your USB device 1 Upgrade mode...

Page 49: ...ate Outer code Inner code Energy dispersion QPSK SCPC MCPC RS 204 188 8 ALL DVB rates DVB S recommendation INPUT SIGNAL Frequency Input level Channel bandwidth Input socked 950MHz 2150MHz 65dBm 25dBm...

Page 50: ...PAG 50 rev 1 0 WE FTE MAXIMAL DECLARE THAT THE PRODUCTS MAX S102E IS IN CONFORMITY WITH FOLLOWING DIRECTIVES LOW VOLTAGE DIRECTIVE 2006 95 EC EMC DIRECTIVE 2004 108 EC CONFORMITY DECLARATION ENGLISH...

Reviews: