background image

English - 15

FSN1949 - 4/2014

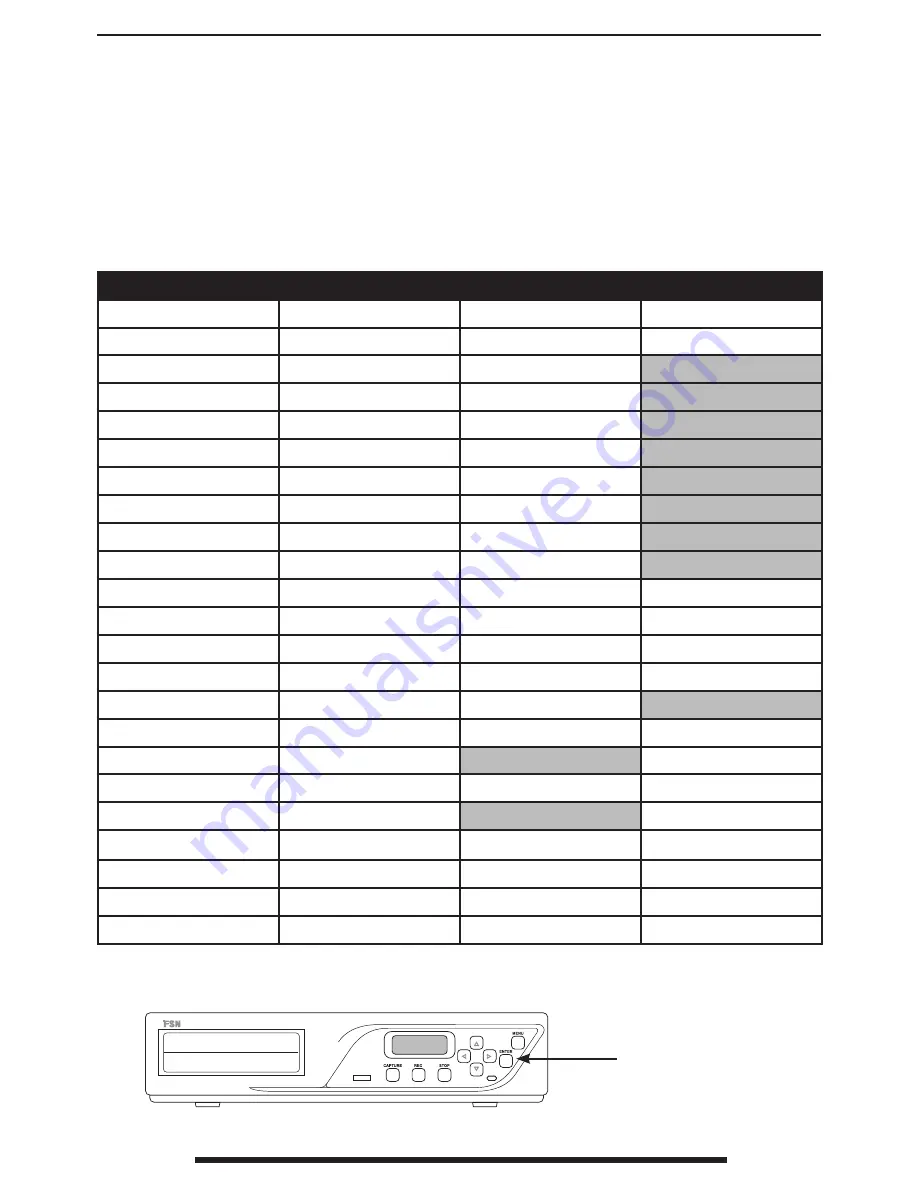
Most features in the MDVR unit are intuitively handled by a remote control device, such as a 

touch screen tablet and interface software. Capture and record functions are designed for easy 

end user operation via the tablet interface. There are a few configuration settings that can only 

be accessed through MDVR’s front keypad and LCD. Following is a list of features found in MDVR, 

followed by the methods that are available for use.

MDVR Feature

Main User

Primary Operation

Secondary Operation

Capture Image

OR Staff

Tablet

Front panel keypad

Record Video

OR Staff

Tablet

Front panel keypad

Enter Patient Info.

OR Staff

Tablet

View Recorded Files

OR Staff

Tablet

Play Recorded Files

OR Staff

Tablet

Send Files to Media

OR Staff

Tablet

Send Files to FTP

OR Staff

Tablet

Convert to DICOM

OR Staff

Tablet

Set File Type

Installer or Admin.

Tablet

File Server Access

Installer or Admin.

Tablet

Set Input Source/Port

Installer or Admin.

Tablet

Front panel keypad

Time & Date Setting

OR Staff

Tablet

Front panel keypad

DHCP Setup

Installer or Admin.

Tablet

Front panel keypad

Select Input Resolution

Installer or Admin.

Tablet

Front panel keypad

Delete Selected Files

OR Staff

Tablet

Delete All Files

Installer or Admin.

Tablet

Front panel keypad

Control Device Setup

Installer or Admin.

Front panel keypad

Network IP Address

Installer or Admin.

Tablet

Front panel keypad

Firmware Version

Installer or Admin.

Front panel keypad

Internal Space Avail.

OR Staff

Tablet

Front panel keypad

DVD Space Available

OR Staff

Tablet

Front panel keypad

USB Space Available

OR Staff

Tablet    

Front panel keypad

System Shutdown

OR Staff

Tablet

Front panel keypad

Please consult the user guide for the remote control device connected to MDVR.

Methods of Operation

Front panel 

control keypad

Summary of Contents for MDVR IPS700A

Page 1: ...MDVR IPS700A Medical Digital Video Recorder Installer User s Guide Before connecting operating or adjusting this product please read this instruction booklet carefully and completely ...

Page 2: ...1 Connect Input Video Sources 12 Connect Output Video Destinations 12 Connect Power 13 Connect a Remote Control Device 14 Methods of Operation 15 Front Panel Control Keypad OSD 16 General Specification 18 Mechanical Drawing 22 Troubleshooting 23 Cleaning Instructions 23 Contacts 24 The specifications and information in this document are subject to change without notice ...

Page 3: ... accompanying control tablet runs the in tuitive user interface and gives quick access to options for setup recording capture file storage patient information play back and data backup functions In addition capture and recording can be controlled through an endoscopic camera head but tons or a foot pedal accessory All recorded files are stored on MDVR s internal hard disk drive These stored files ...

Page 4: ...uropean community Representative in the USA Tested to comply with FCC Class B standard Medical Equipment is in accordance with UL 60601 1 and CAN CSA C22 2 No 601 1 in regards to electric shock fire hazards and mechanical hazard Indicates proof of conformity to applicable European Economic Community Council directives and to harmonized standards published in the official jour nal of the European C...

Page 5: ...connected to a power supply with protective grounding Installation Do not connect any other wires or accessories to this system which do not comply An improper wire may cause electric shock or equipment damage Insert wires firmly so that they do not come loose A bad connection may cause fault Operating environment Be sure to contact this product s supplier when installing your system in a location...

Page 6: ...l safety requirements for a patient vicinity device This device may not be used in connection with life support equipment Underwriters Laboratories UL Classification UL safety Compliance This system is U L Classified WITH RESPECT TO ELECTRIC SHOCK FIRE AND MECHANICAL HAZ ARDS ONLY IN ACCORDANCE WITH UL 60601 1 CAN CSA C22 2 NO 601 1 EEC Safety Compliance This system meets the requirements of EN 60...

Page 7: ...e with other radio communications equipment There is no guarantee that interference will not occur in a particular installation If this equipment is found to cause harmful interference to radio or television reception the user is encouraged to try to correct the interference by carrying out one or more of the following measures 1 Reorient or relocate the receiving antenna 2 Increase the distance b...

Page 8: ...ve fallen into the system If the system has been exposed to rain or moisture If the system has been subjected to excessive shock by being dropped If the enclosure has been damaged If the system seems to be overheated If the system emits smoke or abnormal odor If the system fails to operate in accordance with the operating instructions Accessories Use only accessories specified by the manufacturer ...

Page 9: ...t Medical Grade 1 4 D SUB cable 6ft 1 5 DVI cable 6ft 1 6 BNC cable for Video 6ft 1 7 SVHS cable for Video 6ft 1 Package Contents Verify that you received all components of your respective package Inspect each component and verify that none of the components have been tampered with in any way 1 2 3 4 5 6 7 ...

Page 10: ...mple System Configuration Source Signals VGA DVI D CVBS S Video Audio Saved to Media CD DVD Blu ray USB FTP Server Display Monitor Playback Medical Digital Video Recorder Start and stop with foot pedal or hand switch Control Interface ...

Page 11: ...6 DVI D out 5 Record button 17 VGA out 6 Stop button 18 DVI D in 7 Direction button 19 VGA in 8 Enter button 20 CVBS in 9 Menu button 21 CVBS out 10 Earth Terminal 22 S Video in 11 AC ON OFF SWITCH 23 Audio in out 12 AC in 24 Foot pedal recording capture 1 2 3 4 5 6 7 8 9 10 11 12 13 14 15 16 17 18 19 20 21 22 23 24 ...

Page 12: ...e the type of input signal sources that will be connected to MDVR Never use this system with damaged cords Keep all cords away from areas where they may cause tripping MDVR can play back recorded images and video to a connected display monitor Output connec tion choices are DVI D VGA and CVBS MDVR back panel MDVR back panel Connect input video signals here Connect a video display here ...

Page 13: ...nt damage To avoid the risk of electric shock this equipment must only be connected to a power supply with protective grounding Use the Audio In jack to connect an input sound device such as a media player or microphone This will allow sound to be added to video recordings The Audio Out jack is for hearing playback of recorded sound The Pedal jacks capture and record are for connecting remote swit...

Page 14: ...er to the user guide that accompanies the remote control device that will be connected to MDVR Example Touch screen tablet connection using a wireless router For specific instructions see the user guide for the remote control device that will be connected to MDVR Example Direct wire touch screen tablet con nection For specific instructions see the user guide for the remote control device that will...

Page 15: ...let Convert to DICOM OR Staff Tablet Set File Type Installer or Admin Tablet File Server Access Installer or Admin Tablet Set Input Source Port Installer or Admin Tablet Front panel keypad Time Date Setting OR Staff Tablet Front panel keypad DHCP Setup Installer or Admin Tablet Front panel keypad Select Input Resolution Installer or Admin Tablet Front panel keypad Delete Selected Files OR Staff Ta...

Page 16: ...168 0 1 Home Screen The home screen shows the MDVR part number IPS700A the date in year month day format and the time 24 hr Other screens that are idle for 10 seconds will revert back to displaying the home screen Recording Select CAPTURE to save a still image Select REC to begin video recording red light starts Select STOP to end video recording Status Screens Press the top arrow p to cycle throu...

Page 17: ... down arrow pq to select the first number of the year then select ENTER Continue until the year month day and time 24 hr settings are complete Press ENTER to finish 3 DHCP Setup Press ENTER to begin Press left or right arrow t u to turn DHCP on or off Press ENTER to finish 4 Res Select Press left or right arrow t u to cycle through input resolutions Press ENTER to finish 5 CTRL Device Press left o...

Page 18: ...0601 1 1 2 CE CAN CSA C22 2 NO 601 FCC Part 15 class I medical device RoHS Size H x D x W 382 15 039 x 354 2 13 945 x 80 3 149 mm inch Weight 4 8 10 582 Kg Ibs Item Type Signal Name SupportedResolution Application Signal Input VIDEO BNC SVHS CVBS x 1 SVHS Y C x 1 NTSC PAL Room Camera SD Endoscopy ANALOG DSUB15 DSUB Analog x 1 Up to 1920x1080 60Hz Endoscopic Camera DIGITAL DVI24 Digital DVI D x 1 U...

Page 19: ...gnment 1 T M D S Data2 13 No Connection 2 T M D S Data2 14 5V Power 3 T M D S Data2 Shield 15 GND 4 No Connection 16 Hot Plug Detect 5 No Connection 17 T M D S Data0 6 DDC Clock 18 T M D S Data0 7 DDC Data 19 T M D S Data0 Shield 8 No Connection 20 No Connection 9 T M D S Data1 21 No Connection 10 T M D S Data1 22 T M D S Clock Shield 11 T M D S Data1 Shield 23 T M D S Clock 12 No Connection 24 T ...

Page 20: ... 1024 x 768 60Hz 48 363 60 004 65 000 1024 x 768 75Hz 60 023 75 029 78 750 1152 x 864 60Hz 54 348 60 053 80 000 1152 x 864 75Hz 67 500 75 000 108 000 1280 x 720 60Hz 45 000 60 000 74 250 1280 x 960 60Hz 60 000 60 000 108 000 1280 x 1024 60Hz 63 800 60 000 108 000 1280 x 1024 75Hz 79 976 75 025 135 000 1600 x 1200 60Hz 74 077 59 981 130 375 1920 x 1080 60Hz 67 500 60 000 148 500 DVI VGA input timin...

Page 21: ... Record 35 HDD recording Normal 32 Standby Off 0 Power off Record Backup Device Hours Size Resolution Source Internal disk USB 1 22 Gbyte 1080p Surgical camera 1 12 Gbyte 720p 1 2 Gbyte 480p Blu ray 1 1 25 Gbyte 1080p 2 25 Gbyte 720p 12 25 Gbyte 480p DVD 0 15 4 7 Gbyte 1080p 0 3 4 7 Gbyte 720p 2 3 4 7 Gbyte 480p ...

Page 22: ...22 English FSN1949 4 2014 Mechanical Drawing 355 mm 13 98 in 382 mm 15 04 in 80 mm 3 15 in ...

Page 23: ...ronment Follow your hospital protocol in case MDVR needs to be disin fected prior to installation Cleaning Remove dust with a dry lint free non abrasive soft cotton cloth Remove fingerprints or grease using a lint free non abrasive soft cotton cloth that is lightly moistened with plain water or a mild commercial cleaning product suited for appliance surfaces Gently wipe dry with a dry cloth The fo...

Page 24: ...Pangyoinnovalley B 253 Pangyo ro Bundang gu Seongnam si Gyeonggi do Korea 463 400 Tel 82 31 8018 0780 Fax 82 31 8018 0786 Foreseeson GmbH Industriestrasse 38a 63150 Heusenstamm Germany Tel 49 6104 64398 0 Fax 49 6104 64398 11 Foreseeson UK Ltd Unit 2 Kingsmill Business Park Chapel Mill Road Kingston upon Thames Surrey KT1 3GZ Tel 44 0 208 546 1047 Fax 44 0 208 546 3931 ...

Reviews: