background image

- 31 -

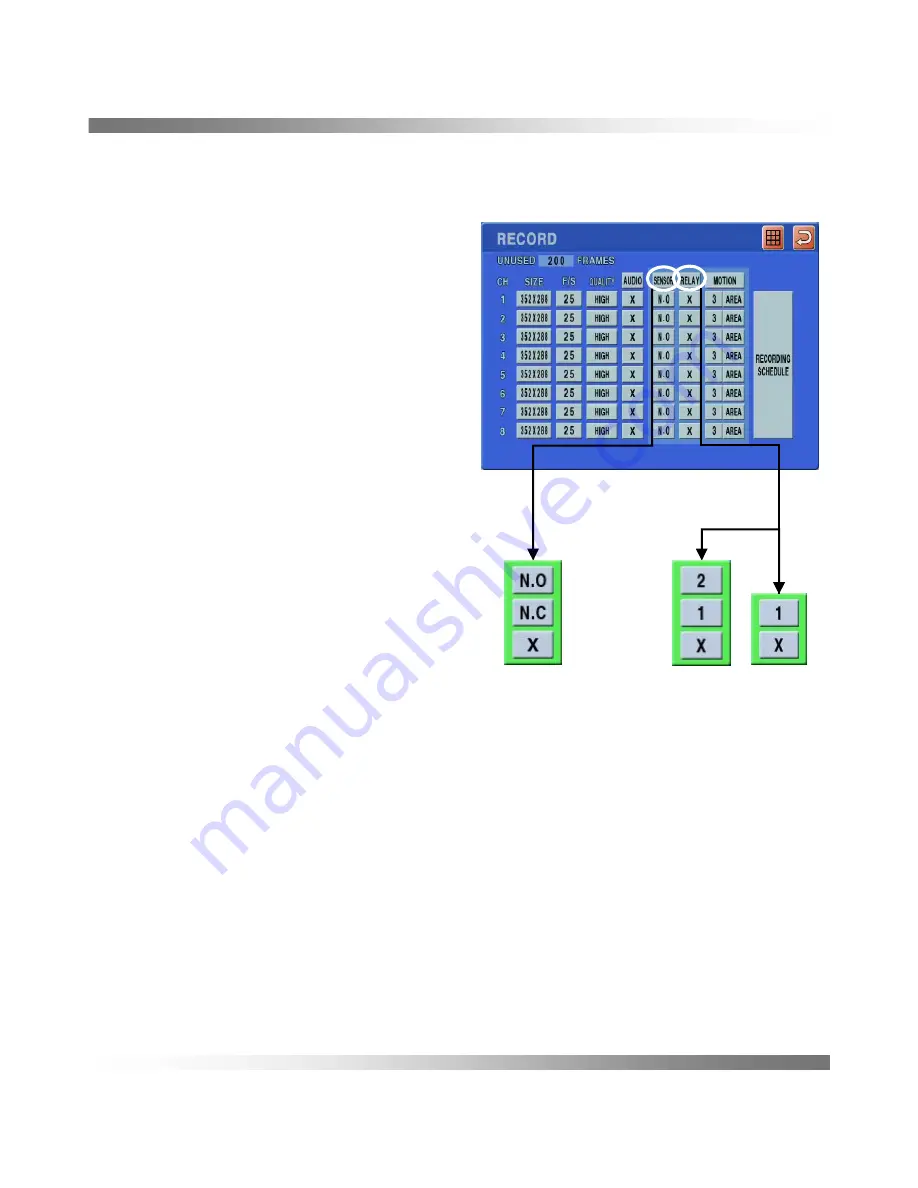
2.2 Setting the event

You can set recording options for sensor, Relay and Motion.

Sensor Detection

You can set the sensor’s operating condition.
Using the mouse may help easy setup.

SENSOR

: Sets the operation mode of

sensors. There are modes 

[NO], [NC], [X]

- N.O

(Normal Open) : Sensor is opened.

If the sensor is closed, it generates alarm.

- N.C

(Normal Close) : Sensor is closed.

If the sensor is open by interruption,
it generates alarm.

- X

: Sensor does not operate.

Operation Sequence

MENU 

è

RECORD 

è

SENSOR

Relay Detection 

You can set the relay operating condition.

Operation Sequence

MENU 

è

RECORD 

è

RELAY

• The settings of all channels are changed when pressing the bars for 

<AUDIO>

,

<SENSOR>

and 

<RELAY>

.

2. RECORD

<“RECORD” menu>

<8CH >    <4CH>

Summary of Contents for Colibri Grande PRO

Page 1: ...Colibri Grande PRO User s manual 09 05 2011 ...

Page 2: ...ough high speed USB2 0 and eSATA 4 8CH Composite Input through RJ45 or BNC connectors Mobile viewer for Smartphone Talk function for two way communication Triplex Recording Playback Networking Supplying DC12V power for camera Spot monitor for Public view support Web monitoring Remote client SW Remote setup Easy to control of the PTZ camera USB Mouse operation E mail notification Abnormal shutdown ...

Page 3: ...rnet Physical Mac Layer eSATA USB interfaced storage Network Watermarking AVI Format Device Format Backup RS 485 Signal type PTZ Recording Relay out E mail notification Log file Remote Buzzer output Pop Up Action Sensor In Motion detection Video Loss HDD Event Source Event 44X30 Grid 5 Steps Resolution Sensitivity Motion detect Write once Overwriting Mode HDD S ATA No limited Type Capacity Storage...

Page 4: ...ation of instructions mentioned in this manual The following cases are not covered by the warranty and payment is required for repairs Malfunction due to negligence in handling by the user Deliberate disassembly and replacement by the user Connection of an improper power supply Malfunction caused by natural disasters fire flood etc Warranty only refers to the warranty covering products that have b...

Page 5: ...nder humid conditions or space Use only a properly grounded plug and receptacle An improper ground may cause electric shock or equipment damage Make sure the POWER is OFF before installation Do not overload multiple wall outlets extension cords or adaptors beyond their capacity since this can result in fire or electric shock Do not touch the power plug with wet hand and conductor materials etc Doi...

Page 6: ...erating Do not connect the jacks or cables while your product is turned on Do not allow children to hang onto the product If this apparatus does not operate normally in particular if there are any unusual sounds or smells coming from it unplug it immediately and contact an authorized dealer or service center When you install two batteries of remote controller make sure to match the polarity of the...

Page 7: ...ation Note This equipment has been tested and found to comply with the limits for a Class A digital device pursuant to part 15 of the FCC Rules These limits are designed to provide reasonable protection against harmful interference when the equipment is operated in a commercial environment This equipment generates uses and can radiate radio frequency energy and if not installed and used in accorda...

Page 8: ...recautions Cautions 6 FCC Compliance Statement 7 9 Package Contents 10 Optional Cable Adapter 11 Parts name and Functions 12 8 Channel Front Back and Bottom 13 4 Channel Front Back and Bottom 14 Exterior Names and Functions 15 Connecting to the 8 channel 16 Connecting to the 4 channel 17 Connecting to the RS 485 Sensor 18 Cam Input Pin Assignment 19 20 Starting the System Power off the System Scre...

Page 9: ...ress etc 30 Setting the Record 31 Setting the event 32 Motion Detection 34 Recording Schedule 36 Camera Setting 37 PTZ Camera Setting 38 Search 39 Event Search 39 Replay 40 Event Log 41 Display 42 Sound 43 Backup 44 Network Configuration 45 DDNS 46 E Mail notification 47 Setting HDD 48 Controlling a PTZ device 49 HELP 50 Installing the SMART VIEWER 51 DVR LIST SETUP 57 What is Web Viewer 58 Connec...

Page 10: ...t on a flat place or in the place to be installed Please check the following contents are included in addition to the main unit Package Contents 9 Users Manual Battery AAA x 2 DC Power Adapter Remote Client CD Power Cord Mouse USB Remote Controller ...

Page 11: ...ories 10 Optional Cable Adapter GC N50 GC N40 GC C40 GC C30 GC C20 GC C10 RJ45 M to BNC F RCA F PWR F RJ45 F to BNC M RCA M PWR M RJ45 F to BNC M RCA M RS485 RJ45 M to BNC F PWR F RJ45 M to BNC F RCA F RJ45 M to BNC F ...

Page 12: ...n left right 10 Pause Used to pause 11 Backward Backward play 12 Forward Forward play 13 PAN TIL T Sets PTZ Mode ON OFF 14 ZOOM FOCUS Set zoom and focus of PTZ camera 15 PRESET Displays the Preset Setup 16 Numbers Used as the numeric input keys or displays a single channel Change ID of Remote control Select ID numbers and pressing over 3seconds The system ID of DVR and ID of the Remote controller ...

Page 13: ...erior 12 8 Channel Front Back and Bottom Bottom 1 6 5 2 3 4 RECORD ALARM Front 5 1 2 3 4 5 6 4 CVBS OUT SPOT OUT 1 2 3 4 5 6 7 8 CAM D D RS 485 1 2 3 4 GND 6 7 8 9 GND NO C1 NC NO C2 NC SENSOR RELAY OUT 3 1 2 Back ...

Page 14: ... 13 Product exterior 4 Channel Front Back and Bottom RECORD ALARM Front 5 1 2 3 4 Back 5 6 4 CVBS OUT SPOT OUT 1 2 3 4 CAM D D RS 485 1 2 3 4 GND NO C1 NC SENSOR RELAY OUT 3 1 2 Bottom 1 5 2 3 4 ...

Page 15: ... port Relay out Composite Video Signal Input Port BNC type connector Video in 3 Out port composite BNC CVBS out 1 B A C K 4 2 Used for RS 485 communication D D RS 485 Out port Live image BNC Spot out Alarm Input port Sensor In Output Port Separated Video signal S Video 6 DC12V Power input Power input 5 Connection terminal for external eSATA HDD or HDD for backup eSATA 4 Used to Network with other ...

Page 16: ... eSATA USB Devices RJ 45 Camera In X 8 PC NETWORK Monitor Power Adaptor DC 12V Connecting to the Back CVBS Spot out Composite Alarm Sensor 1 8 CVBS OUT SPOT OUT 1 2 3 4 5 6 7 8 CAM D D RS 485 1 2 3 4 GND 6 7 8 9 GND NO C1 NC NO C2 NC SENSOR RELAY OUT BNC Camera Input X 8 ...

Page 17: ...ack CVBS Spot out Composite BNC Camera Input X 4 Alarm Sensor 1 4 CVBS OUT SPOT OUT 1 2 3 4 CAM D D RS 485 1 2 3 4 GND NO C1 NC SENSOR RELAY OUT eSATA USB Devices RJ 45 Camera In X 4 PC NETWORK Power Adaptor DC 12V Connecting to the Bottom for 4 channel ...

Page 18: ...M OUT 0 5A 125VDC 1 0A 24VDC D D RS 485 1 2 3 4 GND NO C1 NC SENSOR IN RELAY OUT R R T T D D RS 485 Connecting the 8Channel Sensor in Relay out RS 485 NO NC C2 NC C1 NO ALARM OUT 0 5A 125VDC 1 0A 24VDC 4 G 9 8 7 6 G 3 2 1 SENSOR IN ALARM IN D D RS 485 1 2 3 4 GND 6 7 8 9 GND NO C1 NC NO C2 NC SENSOR IN RELAY OUT R R T T D D RS 485 ...

Page 19: ... is 300mA per camera from the DVR If you want to use over 300mA of camera you must use separate power sources TALK VIDEO IN GND GND AUDIO IN DC 12V D D GND AUDIO INPUT DC 12V OUTPUT under 300 RS 485 D RS 485 D NAME TALK OUTPUT VIDEO INPUT GND FUNCTION CAM IN DVR side PLUG CAM side ...

Page 20: ...om a damaged HDD The HDD also may be damaged if the DVR is stopped by a power off during the HDD Operation Installation the HDD There are many factor that cause an electric shock and a fault inside the DVR You can contact the retailer to get information including the compatibility list before installation the HDD You must check the brand and Model name that is in the compatibility list before Inst...

Page 21: ...have logged in to the DVR You should have the POWER OFF permission to shut down the system if you are not an admin 2 Press the POWER button on the remote control or the Power button of the front panel more than 2 seconds 3 The POWER OFF confirmation window appears 4 Use Mouse or remote control or the front panel to move to press and or click YES The system will be Power off Screen ON OFF Press the...

Page 22: ...ntext sensitive menu as in the right figure 2 The login dialog will also appear if you press a menu button on the remote control or mouse when the corresponding menu requires logging in 3 Select user input password and press OK ADMIN Permitted all DVR function The default password of ADMIN is 1234 USER1 USER8 Limited permission by preset of ADMIN Login Window ...

Page 23: ...if activated Alarm Go to main menu Main menu Indicates Camera number Camera number Show live menu bar Show Launcher Rotate split screen 4 8 split or sequence dwell Hide live menu bar Hide Launcher Display AUDIO ON MUTE Sound Option Transferred Sound by MIC Talk Indicates current used capacity HDD HDD On or off camera number on the live status Recording process and canceled Screen Mode Indicates cu...

Page 24: ...of the remote control in live screen Some menus are protected depending on the user right that assigned by ADMIN You can return to the live screen by the right clicking quickly Designated numbers mean sequence of operation manual Setting the Menu 1 12 1 2 3 4 5 6 7 8 9 10 11 12 ...

Page 25: ...ge See Network setting mode 44 46 page See Backup setting mode 43 page See Sound setting mode 42 page See Display setting mode 41 page See Record setting mode 30 35 page See Replay setting mode 38 39 page See Camera setting mode 36 37 page See Event setting mode 40 page See System setting mode 25 29 page 1 2 3 4 5 6 7 8 9 10 11 12 ...

Page 26: ...n appears virtual keyboard You can set and change DVR name You can finish virtual keyboard by clicking the right mouse button or enter key Operation Sequence MENU è SYSTEM è SYSTEM NAME 1 SYSTEM Using Virtual Keyboard For alphanumeric inputs the virtual keyboard window appears Click the mouse a desired character You can easily input a small letter a capital and special characters close the keyboar...

Page 27: ...ger can set restricted access for all general users Checked Accessible Not checked Restricted Setting the user s Name and Password Manager can set or change manager s and user s password including name By default the password of ADMIN is 1234 Operation sequence MENU è SYSTEM è PASSWORD 1 SYSTEM PASSWORD menu NEW PASSWORD menu ...

Page 28: ...ve Delete the DVR settings by using a storage media SYSTEM USB SYSTEM CONFIG Load or Save settings data to a storage device Storage Display Storage media there are USB and SYSTEM Save Save configuration to storage media Load Fetch configuration from storage media Delete Delete the configuration FACTORY DEFAULT If Factory Default is pressed a confirmation dialog for System will be restarted window ...

Page 29: ...lect the time format NETWORK TIME SERVER Enter an IP or URL address of the time server SYNC You can set the DVR s current time from selected Time Server TIME ZONE Sets the time zone of your area based on the Greenwich Mean Time GMT SUMMER TIME Set up Daylight Saving Time Operation Sequence MENU è SYSTEM è TIME DATE è CHANGE 1 SYSTEM TIME DATE menu ...

Page 30: ...s bar Click SEARCH if the firmware does not recognize When the updating is done it automatically restarts Do not turn the power off until it finishes restarting If UPDATE FAIL appears retry but continued failure consult the service center for assistance Operation Sequence MENU è SYSTEM è F W UPDATE è SEARCH è UPDATE 1 7 Hardware IP MAC Address etc You can check some information about Firmware Hard...

Page 31: ...s you want size F S and quality SIZE Sets the resolution of the recorded screen F S It means the frames recorded per a second that is record rate QUALITY Sets the recording quality AUDIO Sets the sound recording 2 RECORD Samples each half of horizontal and vertical screen 352 X 240 NTSC 352 X 288 PAL CIF S Samples original screen size 704 X 480 NTSC 704 X 576 PAL Full D1 L Samples half of the hori...

Page 32: ...O Normal Open Sensor is opened If the sensor is closed it generates alarm N C Normal Close Sensor is closed If the sensor is open by interruption it generates alarm X Sensor does not operate Operation Sequence MENU è RECORD è SENSOR Relay Detection You can set the relay operating condition Operation Sequence MENU è RECORD è RELAY The settings of all channels are changed when pressing the bars for ...

Page 33: ...REA When AREA window appears select the area of motion detection ALL SET All cells are set to be motion detection area ALL CLEAR All cells are removed from the motion detection area WINDOW SET Using the mouse drag selected cells are set to be the motion detection area WINDOW CLEAR Using the mouse drag selected cells are removed from the motion detection area EACH CELL You can set or clear the cell...

Page 34: ... 33 Setting display of the Motion Area 2 RECORD ...

Page 35: ...o 5 seconds the recording begins from 5seconds before the event POST EVENT The recording will be kept to the point of set post event time after than the actual end of an event If it is set to 5 seconds the recording ends in 5seconds after an event HOLIDAY You can set specific dates to Holidays according to your preferences Use to mouse SETUP move to virtual calendar and click any day ALL If ALL ar...

Page 36: ...Setting the recording 2 RECORD 35 ...

Page 37: ...to your preferences Select a channel and press SET You can adjust the Brightness Contrast and Color of the selected channel and EXIT to return the camera menu In case of the remote controller Brightness Contrast Color COVERT Shows nothing but an empty screen while the recording continues for privacy protection it does not display the video while the recording continues RELAY You can set relay oper...

Page 38: ...ngs ON OFF ID Set a same ID of the connected camera of each channel VENDOR Select the name of the camera manufacturers MODEL Select the camera model BAUDRATE Baudrate settings of the DVR PTZ camera and system keyboard should be matched for proper operations You can check the camera s ID and protocol if you turn the camera off and on after connecting it to the DVR Please check detail information wi...

Page 39: ...lay bar is different color according to the data type RECORD START Start time of the recording RECORD END End time of the recording REPLAY START Enter a time to perform the search or use mouse click Choose a date using the calendar to search you will see that the date of the recording data START Replay will be start from selected time You can search the video data more easily with the calendar Ope...

Page 40: ...ted to the DVR Operation Sequence MENU è REPLAY è Timer or Motion or Sensor è START 4 4 Replay You can replay the data stored in the HDD USB and eSATA All channel will be displayed at same time Day Time Displays the time and date of the current video Speed Supports various speed options of x1 1 x2 2 x4 4 x8 8 x16 16 x32 32 and x64 64 x128 128 x256 256 x512 512 Slow Support x1 1 x1 2 1 2 If you pre...

Page 41: ...ery system startup system shutdown and changes on system record camera motion sensor and remote detections It also shows the log and its timestamp START Starting search day END Ending search day SEARCH Start search BACKUP Backup to USB the logs The file format of the backup data is txt Operation Sequence MENU è EVENT LOG 5 EVENT LOG EVENT LOG menu ...

Page 42: ...t icon in live screen ALARM POP UP Pop up display time of the CH after event occurs MOTION POP UP Pop up display time of the CH after a motion event SPOT OUT You can select the channel for the spot monitor SEQUENCE Select channels that will be displayed sequentially SEQUENCE DWELL Sets the dwell time Operation Sequence MENU è DISPLAY 6 DISPLAY 8CH 4CH DISPLAY menu ...

Page 43: ...ER Buzzer can be set followings REMOTE CONTROL Buzzer will beep when pressing Remote control SENSOR MOTION VIDEO LOSS Sensor Motion Video loss can beep the buzzer DURATION it means beeping time MODE beeping mode Latched beeping is activated based on setup duration Transparent beeping is activated during event period Operation Sequence MENU è SOUND 7 SOUND SOUND menu ...

Page 44: ...he end time for the backup CHANNEL the channels to be backup You can select multiple channels VIDEO Video backup AUDIO Audio backup AVI DVR Select the backup data format AVI file format that can be played back by using external viewers such as Windows Media Player on a PC DVR file format that can be played back by the DVR or the DVR viewer USB eSATA Select the backup device START Backup start Oper...

Page 45: ...ectly input IP address Gateway Subnet Mask DYNAMIC IP IP address Gateway and Subnet Mask are set automatically IP ADDRESS GATEWAY SUBNET MASK When you use the remote controller use CH11 CH16 keys in order to input PORT Set the communication port WEBPORT Set the web server port MAC ADDRESS Physical address of the DVR DDNS On or Off DDNS E MAIL NOTIFICATION the function that send information to assi...

Page 46: ...dress with the DDNS server so that the domain name can be routed to the IP address even if the IP is changed in a dynamic IP system DDNS Select ON or OFF SERVER The server name that support DDNS service provider http www no ip com You must register the USER ID and the PASSWORD before using the DDNS function HOST NAME Enter the HOST NAME that is registered to the DDNS service provider ex dvr no ip ...

Page 47: ...ess INTERVAL TIME Set the event interval If a series of events occurs the e mail will be sent at the specified interval not on each event SMTP SERVER Enter a server to connect to PORT Sets the communication port AUTHENTICATION Setup authentication on off If the Mail server users user authentication setup authentication on USER ID Enter a user to use authentication when connecting to the mail serve...

Page 48: ... the used capacity of the HDD is reached setting value HDD FAIL FULL RELAY OUT Relay out when HDD event occurred BUZZER ON OFF Buzzer ON when HDD event occurred DISPLAY ON OFF Alert display ON when HDD event occurred FORMAT If press YES after conformation window formatting will be start All data will be cleared after formatting so you must backup the data before format CAPACITY USED Shows the capa...

Page 49: ...mera Click the ZOOM FOCUS IRIS button on the control panel or press the Direction button U D L R FF REW after pressing Z F button on the Remote control ZOOM è FOCUS è IRIS è PRESET A preset is a set of specific target points of a PTZ camera The number of preset is depended on maker and model SET You can save the preset number GO You can run a number of preset settings PRESET setup è 1 0 10 è SET P...

Page 50: ...12 HELP 49 ...

Page 51: ...reen and Exit Changes full screen or spilt screen Controls audio output and microphone input level Connection Information System name IP Address Displays current time and date The screen of connected DVR Controls PTZ camera Connect Disconnect DVR List Terminal mode Live mode Backup Replay Event Log DVR Setup Menu Explanation NO 1 2 3 4 5 6 7 8 9 13 REMOTE CONTROL 2 3 4 1 5 9 6 8 7 ...

Page 52: ...rd ID Port URL IP Name DVR List Name Saved current setting and exit the setup window Cancel all changed data and exit Delete DVR List Input ID of connecting DVR ADMIN or User Save modified data of the DVR List Add new DVR List after input new DVR information Input DVR name Listed Registered URL IP Input user s password of DVR Input Port number of DVR Input DVR IP URL Address Explanation NO 1 2 3 4...

Page 53: ...Connect Disconnect icon to connect 4 Live screen of the DVR will be display on monitor 5 You can control the DVR with several function 6 Click Connect Disconnect icon to disconnect Changing the live screen You can select several split mode sequence mode and full screen Click mouse on the tool bar Audio output and MIC input Audio output and MIC input are controlled by and Click the number that mean...

Page 54: ...ith the same method as DVR You can zoom in or out the image by using and You can adjust the focus by using and You can adjust the entering light amount by using and Connection Information When connect DVR connection information of DVR appears 13 REMOTE CONTROL ...

Page 55: ...de Live mode is displayed inputted video only Backup 1 Click BAKCUP button BAKCUP window appears 2 Select the channel to be backup You can select multiple channels 3 Set Start time and End time for backup 4 Click Backup Start button to start backup While saving the data it shows the progress bar The AVI files will save the AVI files folder SmartViewer bakcup avi 13 REMOTE CONTROL ...

Page 56: ... in search bar that you want to playback 3 You can control replay via replay controller 13 REMOTE CONTROL 2 3 4 1 5 6 7 Calendar Controls screen mode Search bar Search indicate camera recording situation by time bar The screen of replay Controls volume Replay controller Replay time date Explanation NO 1 2 3 4 5 6 7 ...

Page 57: ...t and End time for search 3 Select event for search 4 Click Search button event log is displayed 5 If you want to save the event log click Backup button The Event log files will save in the elog files folder SmartViewer bakcup elog The file format of the backup data is txt 13 REMOTE CONTROL ...

Page 58: ...d input DVR IP to address window then Enter The login screen displays on the web browser 2 Input DVR s ID and Password then click LOGIN button The DVR screen will be displayed on the web browser 3 If you click one channel the channel will be displayed as full screen The split screen will be displayed after one more click 4 You can control the refresh time by using the F S control If communication ...

Page 59: ...lick LOGIN button The DVR screen will be displayed on the web browser 2 If you click one channel the channel will be displayed as full screen The split screen will be displayed after one more click 3 You can control the refresh time by using the F S control If communication speed is slow reduce the F S in order to get images steadily If communication speed is good increase the F S for smooth image...

Reviews: