background image

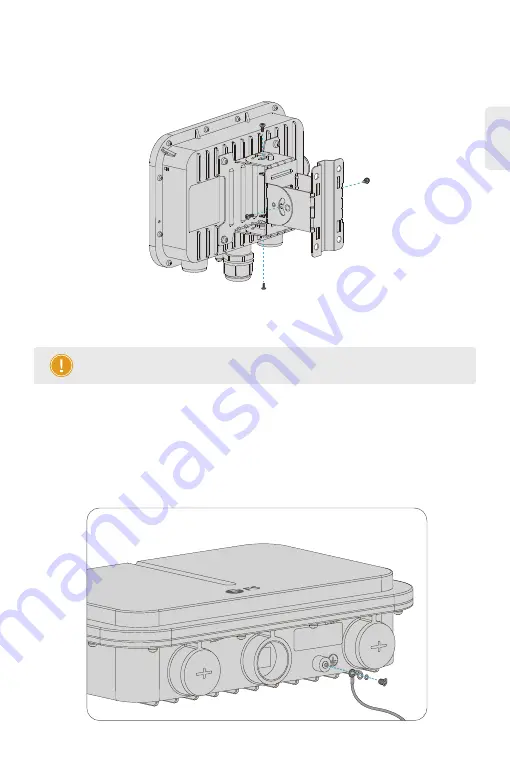
Grounding the Access Point

3. Insert the host bracket components into the bracket and screw it with four M6 screws. (This step in 
wall mounting is the same as below. )

Connect one end of the grounding cable to the grounding hole on the access point and the other end 
to a proper ground site.

10

NOTE:


1. After installation, check that the AP is securely fastened.

2. Carefully choose matched screws in different steps.

AP-T565/AP-T567

EN

Summary of Contents for AP-T565

Page 1: ...ENTERPRISE WI FI 6 ACCESS POINT ENTERPRISE WI FI 6 ACCESS POINT POINT D ACC S WI FI 6 D ENTREPRISE Quick Start Guide Quick Start Anleitung Guide de D marrage Rapide V1 0...

Page 2: ...d to familiarize you with the layout of the access point and describes how to deploy the access point in your network AP T565 AP T567 1 AP T565 Anchor ears x2 Anchor x1 Transverse bracket Bottom plate...

Page 3: ...ears x2 Bracket components x1 Bracket x1 Dust cover x3 Waterproof Joint for PoE Power ports x2 M5 Screws x4 M6 Screws x2 2 AP T567 Waterproof Joint for LC fiber optic cable x1 Grounding Cable x1 M6 s...

Page 4: ...T567 Ports Button Ports ETH PoE Console SFP Power Ethernet cable power supply An RJ45 console port for serial management SFP ports for 1 2 5G connection 48V DC power port Description 3 Reset EN 1 2 3...

Page 5: ...estart Press the Reset button for less than 2 seconds Restore to Factory Default Settings Press the Reset button for more than 3 seconds Description Signal strength 70dBm 50dBm LEDs SYS Signal strengt...

Page 6: ...or on the ceiling with four M6 screws 2 Remove screws of the bottom plate and vertically insert the transverse bracket into the bottom plate then screw it with two M6 screws Ceiling Mount 5 transverse...

Page 7: ...3 Fix the bottom plate and transverse bracket on the back of the access point with four M5 screws 4 Fix the anchor on the ceiling with the transverse bracket with two M8 screws 6 EN...

Page 8: ...and transverse bracket on the back of the access point with M5 screws 2 Fix the anchor onto a mast with 2 anchor ears Masting Mount 7 NOTE The logo TOP should be on the upper part of the anchor anchor...

Page 9: ...1 Fix the host bracket components on the back of the access point with four M5 screws AP T567 3 Fix the anchor on the rod with the transverse bracket with M8 screws 8 EN...

Page 10: ...2 Masting Mount Fix the bracket on a rod with two anchor ears Wall Mount Fix the bracket on the wall with four M6 screws 9 EN...

Page 11: ...s This step in wall mounting is the same as below Connect one end of the grounding cable to the grounding hole on the access point and the other end to a proper ground site 10 NOTE 1 After installatio...

Page 12: ...ead through the waterproof joints in sequence as shown in the following figure 2 Fix a crystal head on the Ethernet cable and bind waterproof materials between B and C 3 Insert the crystal head into t...

Page 13: ...K Cancel General IP address Subnet mask Default gateway You can get IP settings assigned automatically if your network supports this capability Otherwise you need to ask your network administrator for...

Page 14: ...inal 9600 bits per second 8 data bits no parity 1 stop bit and no flow control Step 4 Click Login to display the web based configuration page Step 5 Click System Mode Switch to switch the FIT FAP work...

Page 15: ...ease refer to the Configuration Guide on the website EN x Quick Connect Protocol Serial Flow Control DTR DSR RTS CTS XON XOFF Save session Show quick connect on startup The port may be manually entere...

Page 16: ...er source is IEEE 802 11af at compliant or whether the Ethernet cable is properly connected 2 For DC adapter power supply check whether the adapter is connected to an active power outlet or whether th...

Page 17: ...sources Download Help Center Contact Us Product Warranty Warranty This product enjoys 3 years limited warranty against defect in materials or workmanship For more details about warranty please check a...

Page 18: ...iese Anleitung soll Sie mit dem Aufbau des Access Points vertraut machen und beschreibt wie Sie ihn in Ihrem Netzwerk einsetzen AP T565 AP T567 AP T565 Anker se x2 Anker x1 Quertr ger Bodenplatte x1 S...

Page 19: ...Quertr ger Bodenplatte x1 Anker x1 Staubschutzh lle x3 Wasserdichte Verbindung f r PoE Strom Ports x2 M5 Schraube x4 M6 Screws x2 AP T567 Wasserdichte Muffe f r LC Glasfaserkabel x1 Erdungskabel x1 M6...

Page 20: ...ts ETH PoE Console SFP Power Ethernet Kabel zur Stromversorgung RJ45 Konsolenport f r die serielle Verwaltung SFP Ports f r 1 2 5G Verbindung 48V DC Stromanschluss Beschreibung AP T565 AP T567 DE Rese...

Page 21: ...sauber und staubfrei Taste Reset Neustart Dr cken Sie die Reset Taste f r weniger als 2 Sekunden Die Werkseinstellungen zur cksetzen Dr cken Sie die Reset Taste f r mehr als 3 Sekunden Beschreibung Si...

Page 22: ...t vier M6 Schrauben an der Decke 2 Entfernen Sie die Schrauben der Bodenplatte und setzen Sie den Quertr ger senkrecht in die Bodenplatte ein dann verschrauben Sie ihn mit zwei M6 Schrauben Deckenmont...

Page 23: ...3 Befestigen Sie die Bodenplatte und den Quertr ger mit vier M5 Schrauben an der R ckseite des Access Points 4 Befestigen Sie den Anker mit dem Quertr ger mit zwei M8 Schrauben an der Decke 22 DE...

Page 24: ...rb gel mit M5 Schrauben an der R ckseite des Zugangspunkts 2 Befestigen Sie den Anker mit 2 Anker sen an einem Mast Masthalterung HINWEIS Die Aufschrift TOP sollte sich auf dem oberen Teil des Ankers...

Page 25: ...1 Befestigen Sie die Komponenten der Host Halterung mit vier M5 Schrauben an der R ckseite des Access Points AP T567 3 Befestigen Sie den Anker mit dem Quertr ger mit M8 Schrauben an der Stange 24 DE...

Page 26: ...2 Masthalterung Befestigen Sie die Halterung an einer Stange mit zwei Anker sen Wandmontage Befestigen Sie die Halterung mit vier M6 Schrauben an der Wand 25 DE...

Page 27: ...bei der Wandmontage ist derselbe wie unten Verbinden Sie ein Ende des Erdungskabels mit der Erdungsbohrung am Access Point und das andere Ende mit einer geeigneten Erdungsstelle HINWEIS 1 berpr fen Si...

Page 28: ...asserdichten Verbindungen wie in der folgenden Abbildung gezeigt 2 Befestigen Sie einen Modularstecker auf dem Ethernet Kabel und verbinden Sie wasserfeste Materialien zwischen B und C 3 F hren Sie de...

Page 29: ...das Standard Passwort ein beide sind admin x OK Cancel General IP address Subnet mask Default gateway You can get IP settings assigned automatically if your network supports this capability Otherwise...

Page 30: ...00 Bits pro Sekunde 8 Datenbits keine Parit t 1 Stoppbit und keine Flusskontrolle Schritt 4 Klicken Sie auf Login um die webbasierte Konfigurationsseite anzuzeigen Schritt 5 Klicken Sie auf System Mod...

Page 31: ...S Weitere Einzelheiten entnehmen Sie bitte dem Konfigurationshandbuch auf der Website 30 DE x Quick Connect Protocol Serial Flow Control DTR DSR RTS CTS XON XOFF Save session Show quick connect on sta...

Page 32: ...romquelle IEEE 802 11af at konform ist oder ob das Ethernet Kabel richtig angeschlossen ist 2 Pr fen Sie bei der Stromversorgung ber den Gleichstromadapter ob der Adapter an eine aktive Steckdose ange...

Page 33: ...lfecenter Kontakt Produktgarantie Garantie F r dieses Produkt gilt eine beschr nkte Garantie von 3 Jahren auf Material und Verarbeitungsfehler Weitere Einzelheiten zur Garantie finden Sie unter https...

Page 34: ...issiez vous familiariser avec la configuration du point d acc s et d crit comment proc der son d ploie ment AP T565 AP T567 AP T565 Joint tanche pour les ports PoE Power x2 Support transversal et plaq...

Page 35: ...ports PoE Power x2 C ble de mise la terre x1 x1 AP T567 Joint tanche pour c ble fibre optique LCx1 Couverture anti poussi re x3 Boulons vis M6 x4 Vis M5 x4 Anneaux d ancrage x2 C ble de mise la terre...

Page 36: ...Console SFP Power Connexion pour c ble Ethernet Alimentation Internet Port console RJ45 pour la gestion en s rie Ports SFP pour connexion 1 2 5G Port d alimentation 48V CC Description 35 AP T565 AP T5...

Page 37: ...outon de r initialisation pendant moins de 2 secondes Restaurer les Param tres d Usine par D faut Appuyez sur le bouton de r initialisation pendant plus de 3 secondes Description Puissance du Signal 7...

Page 38: ...plafond avec quatre vis M6 2 Retirez les vis de la plaque inf rieure et ins rez verticalement le support transversal dans la plaque inf rieure puis vissez avec deux vis M6 Montage au Plafond AP T565 a...

Page 39: ...3 Fixez la plaque inf rieure et le support transversal l arri re du point d acc s l aide de quatre vis M5 4 Fixer l ancrage au plafond ave c le support transversal l aide de deux vis M8 38 FR...

Page 40: ...transversal l arri re du point d acc s avec des vis M5 2 Fixez l ancre sur le support l aide de 2 anneaux d ancrage Montage du Support NOTE Le logo TOP doit se trouver sur la partie sup rieure de l an...

Page 41: ...1 Fixez les composants du support l arri re du point d acc s l aide de quatre vis M5 AP T567 3 Fixez l ancrage sur la tige avec le support transversal l aide de vis M8 40 FR...

Page 42: ...2 Montage du Support Fixez le support sur la tige avec deux anneaux d ancrage Montage Mural Fixez le support au mur l aide de quatre vis M6 41 FR...

Page 43: ...ral est la m me que ci dessous Connectez une extr mit du c ble de mise la terre l orifice de mise la terre du point d acc s et l autre extr mit un site de mise la terre appropri NOTE 1 Apr s l install...

Page 44: ...sans la fiche dans les joints tanches dans l ordre indiqu dans la figure suivante 2 Fixez la fiche sur le c ble Ethernet et fixez joints tanches entre B et C 3 Ins rez la fiche dans le port ETH PoE e...

Page 45: ...sont admin x OK Cancel General IP address Subnet mask Default gateway You can get IP settings assigned automatically if your network supports this capability Otherwise you need to ask your network adm...

Page 46: ...es pas de parit 1 bit d arr t et pas de contr le de flux tape 4 Cliquez sur Login pour afficher la page de configuration bas e sur le Web tape 5 Cliquez sur System Mode Switch pour changer le mode de...

Page 47: ...s veuillez consulter le Guide de Configuration sur le site web 46 FR x Quick Connect Protocol Serial Flow Control DTR DSR RTS CTS XON XOFF Save session Show quick connect on startup The port may be ma...

Page 48: ...ntation est conforme la norme IEEE 802 11af at ou si le c ble Ethernet est correctement connect 2 Pour l alimentation de l adaptateur CC v rifiez si l adaptateur est connect une prise de courant activ...

Page 49: ...arantie du Produit Garantie Ce produit b n ficie d une garantie limit e de 3 ans contre tout d faut mat riel ou de fabrication Pour plus de d tails sur la garantie veuillez consulter la page https www...

Page 50: ...Copyright 2022 FS COM All Rights Reserved Q C PASSED...

Reviews: