15
Install the Ceiling Sensor (cont.)
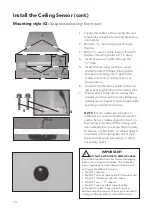
Mounting style #3:
Sheetrock ceiling mount
1. Remove pre-installed tile bridge mount.
2. Remove the plastic ceiling cover from the
sensor by removing the (4) push pins and
(4) rivets by hand.
3.
Place the ceiling sensor metal chassis
against the ceiling and mark the mounting
holes (2 largest holes in chassis).
4a. If mounting holes are directly under a wood
beam, drill two pilot holes
1
/
16
” by 1
1
/
4
” deep.
4b. If mounting holes are in bare sheetrock,
install plastic sheet rock anchors (anchors
not provided).
5.
Using the two wood mounting screws
(2 x M3.5 x 32 mm Phillips head wood screws),
mount the ceiling sensor chassis to the ceiling.
6.
Reinstall the ceiling sensor plastic cover
with the four push pins/plastic rivets.
7.
Connect the IR wall sensor cable to the
pigtail on the sensor.
8.
Route sensor cable along ceiling toward
your receiver location, following guidelines
in chapter 4 and all applicable building
and electrical codes.
2
3
5
6
NOTE:
Ensure cables are installed in adher-
ence to local and national electric codes.
Sensor cables should not rest on the ceil-
ing. Lift them off the ceiling and use cable/
zip ties to secure them loosely to beams,
anchor bolts, or other support structures
in the ceiling (do not attach them to duct
work, plumbing, or other secondary work).
IMPORTANT!
DO NOT ALTER THE IR SENSOR CABLE
Read the FrontRow Installer Guide thoroughly
before installing sensor cable. The cable has
been rigorously tested and qualified to work
with your FrontRow IR sensors.
• Do NOT shorten
• Do NOT alter or replace the RCA connectors
• Do NOT "splice" or split the cable
• Do NOT use a "Y" adaptor
• Do NOT use any other type of cable
Altering the cable in any way will result in
decreased performance of your system and will
void your Manufacturer's Limited Warranty.
!
1


