background image

9

10

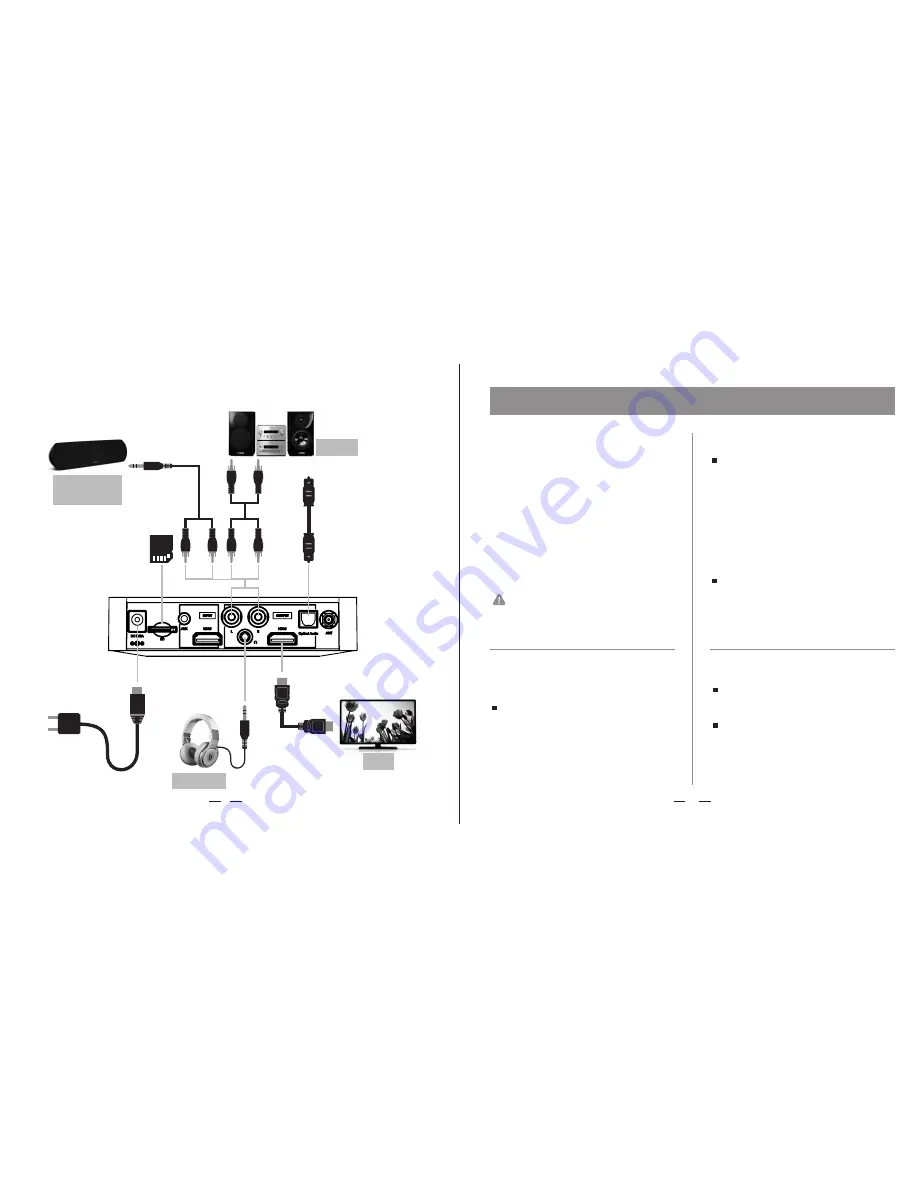
2.3 Connecting to Output Devices

3.1 Basic Operation

DO follow PART 2 Connecting Setup to connect 
the necessary devices before using KM210. As 
soon as the setup completed and the input
source is ready, follow up the procedures 
sequentially.

1.   Turn the device ON with remote 

control. Speaker confirms with 
a beep.


    The device will turn ON directly as 

soon as AC power adapter plugs in.

2.   Select one of the following input 

sources with remote control.

     AUX:

This is wired audio input by using Ø3.5mm 
connectors to connect KM210 AUX audio 
jack and input source

s headphone jack.

     Bluetooth

The device will receive wireless audio input 
by using Bluetooth. Press Bluetooth button 
and then speaker will make a beep sound 
that stands for waiting device match. Enable 
your player

s Bluetooth and choose

KM210

device , speaker will confirm with beep while 
devices matching completed.

     HDMI

After TV displays the video input from HDMI 
source device, press HDMI button to receive 
audio input from HDMI source too.

3.    Now start to playback songs & sing.


 AUX and Bluetooth are used for audio 
input only


 Input sources support smart phones, 
tablets, TV Dongles/boxes, STB Set 
top box, laptops, game players, DVD 
players, and other smart devices.

PART 3   Using KM210

RCA 

Connector

S/PDIF Optical

Connector

Micro SD card

Gold-Plate 

Side Down

Portable Active 
Speakers

Amplifier

HDTV

Headphone

AC Power

Adapter

3.5mm 

Connector

3.5mm 

Connector

HDMI Type A Connector

Summary of Contents for Karaoke Master HD KM210

Page 1: ...KM210 User Guide FRONTIER TECHNOLOGY INC www frontier com tw 5F No 69 8 Sec 2 Chung Cheng E Rd TamShui Dist New Taipei City 251 Taiwan Tel 886 2 2809 6300 Fax 886 2 2809 6225 Email frontier frontier c...

Page 2: ...high temperatures or place it near a fire or heat source so to avoid damaging the battery This devise is NOT waterproof Do NOT use or store the device in a place near water raindrops juice coffee per...

Page 3: ...2 Jacks Front View Microphone Jacks Panel Opened Microphone Input Jacks MIC A and MIC B IR Receiving Area LED Indication Blue Active Blue Blinking Waiting for Bluetooth Connection Red On Recording Re...

Page 4: ...o provide stronger effect Vocal Multiplexing and Vocal Reduce Switch between right track or left track on karaoke vocal multiplexing The device will reduce about 80 original vocal of MP3 Movie Video o...

Page 5: ...4GHz wireless microphone you need to install the receiver module onto the designated slot and fasten the 2 4GHz Antenna on the rear side of KM210 2 2 Connecting input devices Input sources Smart phone...

Page 6: ...eless audio input by using Bluetooth Press Bluetooth button and then speaker will make a beep sound that stands for waiting device match Enable your player s Bluetooth and choose KM210 device speaker...

Page 7: ...ltiplexing and Vocal Reduce User can switch between LEFT RIGHT or STEREO tracks for karaoke vocal multiplexing otherwise to press Reduce Vocal button to remove the original vocal from MP3 MV movie vid...

Page 8: ......

Page 9: ...1 2 3 1 1 1 2 1 3 7 2 1 2 2 2 3 10 3 1 3 2 12...

Page 10: ...V1 5A out IR W1 2 4GHz Magic Control myCAST HD HDMI 1 4a TypeA 6 3mm 600 30 RCA 3 5mm 3 5mm 1 2 MIC A MIC B IR LED 5V1 5A SD Micro SD 32GB AUX 3 5mm HMDI TYPE A L R RCA 3 5mm HMDI TYPE A Optical Audio...

Page 11: ...MI 3 Music 2 4GHz 2 4GHz 0 9 5 0 9 6 Key 12 12 0 Key Reverb 8 0 OFF OK Left Right MP3 MV Reduce Vocal 80 Reduce Vocal Stereo Stereo Reduce Vocal 80 REC ON OFF Micro SD LED Micro SD 48KHz 16 4 45MB OFF...

Page 12: ...7 8 2 1 1 MIC A MIC B 2 MIC A MIC B 6 3mm 600 30 2 2 2 Bluetooth DVD RCA 3 5mm HDMI Type A...

Page 13: ...9 10 2 3 3 1 HDMI 1 2 AUX 3 5mm BT KM210 HDMI 2 2 2 3 HDMI 3 AUX BT DVD RCA S PDIF Micro SD AMP HDTV 3 5mm 3 5mm HDMI Type A...

Page 14: ...11 12 3 2 8 80 key key 12 12 8 key 0 Reverb 8 OK MP3 MV REC ON OFF CE FCC BSMI...

Reviews: