background image


4.    INSTALLATION 


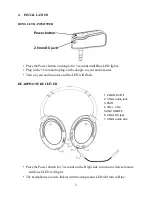
DONGLE TRANSMITTER


Press the Power button on dongle for 3 seconds until Blue LED lights. 


Plug in the 3.5mm audio plug on the dongle to your audio source. 


Turn on your audio source and the LED will flash. 


HEADPHONE RECEIVER 


Press the Power button for 3 seconds on the Right side to turn on wireless feature 

and Green LED will light. 


The headphones are now linked with the dongle and LED will turn to Blue. 

1. 2.4GHz On/Off 

2. 3.5mm audio jack 

3. PAIR 

4. VOL+, VOL- 

5. ANC ON/OFF 

6. 2.5mm DC jack 

7. 3.5mm audio wire 

Power button 

2.5mm DC jack 

Summary of Contents for 43321

Page 1: ...Wireless Noise Canceling Headphones Item 43321 Instruction Manual Carefully read manual before using these headphones ...

Page 2: ...o sound that is virtually interference free Transmission is not restricted solely to line of sight Noise Cancelation Technology Digital Pairing System Headphone Transmitter Electronic Volume Control on Headphone Built in Rechargeable Lithium Battery packs in Dongle and Headphone Auto Shut off on Headphone Auto On Off RF function on transmitter 3 5mm Line in feature for corded headphone application...

Page 3: ...rn on your audio source and the LED will flash HEADPHONE RECEIVER Press the Power button for 3 seconds on the Right side to turn on wireless feature and Green LED will light The headphones are now linked with the dongle and LED will turn to Blue 1 2 4GHz On Off 2 3 5mm audio jack 3 PAIR 4 VOL VOL 5 ANC ON OFF 6 2 5mm DC jack 7 3 5mm audio wire Power button 2 5mm DC jack ...

Page 4: ...re on headphone by moving the On Off switch on the left side to Off Pairing If the headphones do not work after following the processes above start the pairing process over by pressing the Power button for 12 seconds in the dongle in shutdown state After that press the headphone pair button until the blue LEDs flash The LEDs will change to solid blue when pairing process is finished NOTE In order ...

Page 5: ...e to charge new batteries for 5 hours before using them for the first time in the dongle and headphone The red indicator light LED will be lit continuously during battery charging When charging is finished the dongle LED will turn green and headphone red LED will be off Reset The headphones dongle can be reset by connecting them with charging cable and power adapter Corded Headphone Application Th...

Page 6: ... been tested and found to comply with the limits for a Class B digital device pursuant to Part 15 of the FCC Rules These limits are designed to provide reasonable protection against harmful interference in a residential installation This equipment generates uses and can radiate radio frequency energy and if not installed and used in accordance with the instructions may cause harmful interference t...

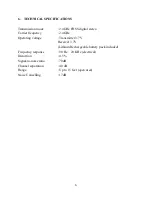
Page 7: ...arrier frequency 2 4GHz Operating voltage Transmitter 3 7V Receiver 3 7V Lithium Rechargeable battery pack included Frequency response 90 Hz 20 KHz electrical Distortion 0 5 Signal to noise ratio 70dB Channel separation 40 dB Range Up to 15 feet open area Noise Cancelling 17dB ...

Page 8: ...t The headphone output level is set too low Adjust the volume to a suitable level DISTORTION Restart the Pairing process Pressing the Power button for 12 seconds in dongle shutdown state Then pressing the headphone pair until the blue LEDs flash The LEDs will change to solid blue when pairing process is finished The headphone dongle battery pack charge level may be too low Recharge the battery pac...

Reviews: