RRAC029_REV_C01
© COPYRIGHT 2016 FRONT RUNNER VEHICLE OUTFITTERS
4
2
AWNING BRACKET INSTALLATION - SLIMLINE RACK
3
10MM
10MM
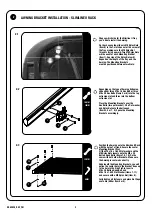
Drill a 6.5mm hole on the marked positions.
Place the three Mounting Brackets on the
Rack so the holes in the bracket line up
with the holes you drilled. Insert three
M6 x 16 Hex Bolts (Item 1) and secure with
M6 x 12 x 1SS Flat Washers and M6 Nyloc
Nuts (Items 3, 4).
3.1
3.2
3.2
Choose which side for the Slimline II Tray
you'd like to install the Awning.
On the chosen side, place the Mounting
Brackets (Item 2) between two slats, starting
at either end of the side profile of the Rack.
Place the third Mounting Bracket in the
center. Make sure the two holes on the
bracket are facing upward. Using a white
marking pen, mark the three center holes
in each Mounting Bracket.
Remove the three Mounting Brackets.
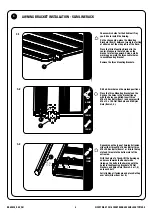
With the help of a friend, lift the Awning up
and move towards the Basket while
lining-up the bolts in the Awning with the
holes in the Mounting Brackets. Fit Flat
Washers and Nyloc Nuts (Items 3,4 or 7, 8)
onto each bolt.
Fully tighten all fasteners and place Nut Caps
over nuts (Either Item 5 or 9).
6.5MM
Depending on the type of Awning Extrusion,
slide either three M6 x 16 Hex Bolt or three
M8 x 20 Hex Bolts (Items 1 or 6) into the top
slot and three into the bottom slot of the
extrusion.
4
3
2
1
1
4
3
10MM
13MM


