5
4
4
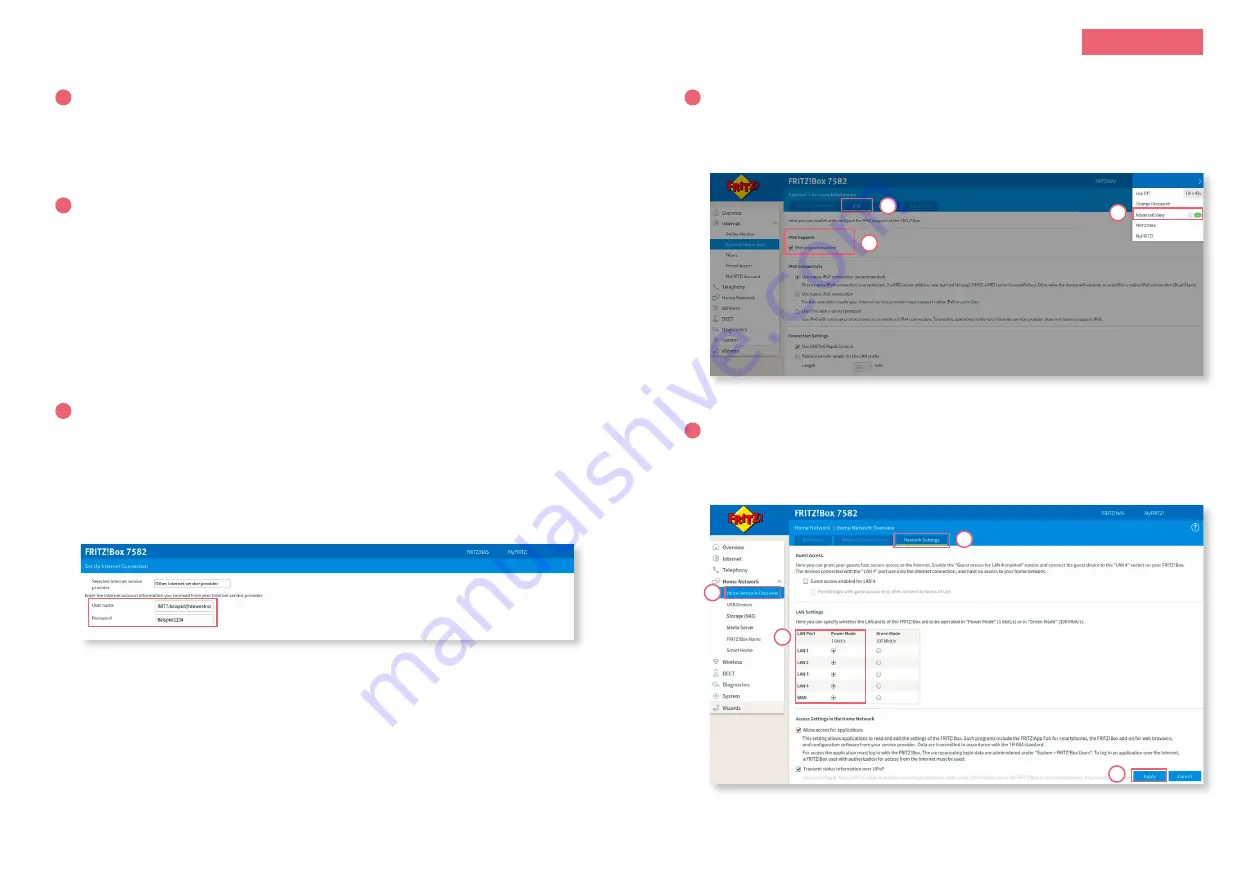
IPv6 settings
1. In the upper right corner of the window, enable «Advanced View».
2. Now switch over to the «IPv6» tab.
3. Turn on IPv6 as illustrated below.
4. The IPv6 address is now obtained. This process can take 1–2 minutes.
5
Home network
1. Switch over to the tab «Home network» → «Home Network Overview».
2. Click on «Network Settings» and enable «Power Mode» for all LAN connections.
3. Save the settings via «Apply».
Installation is now complete. Happy surfing!
English
FRITZ!Box 7582 Installation Guide – Copper7
FRITZ!Box 7582 Installation Guide
1
Connecting the components
1. Connect the enclosed RJ11 cable to the telephone socket.
You may need the enclosed adapter to connect the cable.
2. Now connect the FRITZ!Box with the power supply.
3. Connect your computer to the FRITZ!Box using the enclosed Ethernet cable.
2
FRITZ!Box basic configuration
1. Now open a web browser and type «http://fritz.box» into the address bar.
2. A language selection dialogue appears. Select the desired language.
3. You are then prompted to enter the password for your FRITZ!Box. This is
found on the back of the router.
4. Now select «Switzerland» as the country.
5. Select «Annex A» in the Annex setting.
6. The FRITZ!Box now takes over the settings and restarts.
Restarting takes about 2 minutes. You are then automatically redirected to the
web interface.
3
Configure internet settings
1. Log in again to the web interface.
2. The FRITZ!Box Set-Up Assistant now launches.
3. Under Internet Access, select «DSL Connection».
4. Under Internet Provider, click on «Other Internet Service Provider» and type
in the name «Init7».
5. Now enter the user name and password stated on your data sheet.
6. The page that opens shows a summary of the settings. Click «Continue» to
connect to the internet.
FRITZ!Box 7582 Installation Guide – Copper7
.
1
.
3
.
2
.
2
.
1
.
2
.
3


