Frigidaire FGQ332E Use And Care Manual Download Page 4

4

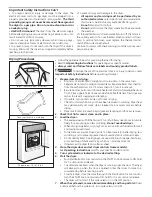
Drying Procedures

Follow fabric care label instructions.

Place small items in a mesh bag.

Fill dryer drum 1/3 to 1/2 full.

Follow the guidelines below for preparing the load for drying.

Read the 

Operating Instructions

 for operating your specific model.

• Always read and follow fabric care labels and laundry product labels.

   To reduce the risk of fire, electrical shock, or injury to persons, read

Important Safety Instructions

 before operating this dryer.

1.

Prepare items for drying.

Dry items of similar fabric, weight and construction in the same load.

Separate dark items from light-colored items. Separate items that shed lint
from those that attract lint. If an item sheds lint, turn it inside out.

Be sure buckles, buttons and trim are heatproof and won't damage the drum
finish. Close zippers, fasten hooks and Velcro®-like fasteners. Tie strings and
sashes to prevent snagging and tangling.

If possible, turn pockets inside out for even drying.

Check for stains which may not have been removed in washing. Dryer heat
may permanently set some stains. Repeat stain removal process before
drying.

Place small items in a mesh bag to prevent tangling and for easy removal.

2.

Check that lint screen is clean and in place.

3.

Load the dryer.

The average load will fill the drum 1/3 to 1/2 full. Items need room to tumble
freely for even drying and less wrinkling. 

Do not overload dryer.

When drying large items, dry only 2 or 3 at a time. Fill out the load with small
and medium sized items.

For delicate or very small loads, add 2 lint-free towels for better drying, less
wrinkling, and to prevent grease stains caused by fabric softener sheets.

Do not overdry items. Overdrying can cause wrinkling, shrinkage, harshness,
and a build-up of static electricity, which can produce more lint.

If desired, add a dryer fabric softener sheet.

4.

Close the dryer door and set dryer controls (some models).

See 

Operating Instructions

 card for your specific model controls.

5.

 Turn cycle selector clockwise to the desired setting.

6.

Start the dryer.

Push Start Button for 2 seconds or turn the START knob clockwise to ON, hold
for 1-2 seconds and release.

To add or remove items when the dryer is running, open the door. The dryer
will always stop when the door is opened. Allow the drum to come to a
complete stop before reaching inside.

To restart dryer, close the door then push the Start Button for 2 seconds or
turn the START knob clockwise to ON, hold for 1-2 seconds and release.

The dryer will not start if the cycle selector is in the OFF position.

7.

When the cycle ends, remove items immediately and hang or fold.

 If load

is removed before the cycle ends, turn cycle selector to OFF.

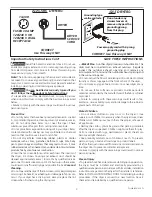
Important Safety Instructions Con't

• 

To prevent personal injury or damage to the dryer, the

electrical power cord of a gas dryer must be plugged into a
properly grounded and polarized 3-prong outlet. 

The third

grounding prong must never be removed. Never ground
the dryer to a gas pipe. Do not use an extension cord or
an adaptor plug.
• ALWAYS disconnect 

the dryer from the electrical supply

before attempting any service or cleaning. Failure to do so can
result in electrical shock or injury.

 Do not use any type spray cleanser when cleaning dryer

interior. Hazardous fumes or electrical shock could occur.

• 

To prevent injury, do not reach into the dryer if the drum is

moving. Wait until the dryer has stopped completely before
reaching into the drum.

• 

To prevent injury and damage to the dryer:

-

All repairs and servicing must be performed by an
authorized servicer 

unless specifically recommended in

this Owner's Guide. Use only authorized factory parts.

-

Do not

 tamper with controls.

-

Do not 

install or store the dryer where it will be exposed to

the weather.

 A thermal limiter switch automatically turns off the motor in

the unlikely event of an overheated situation (electric dryers
only). A service technician must replace the thermal limiter
switch after correcting the fault.

 Failure to comply with these warnings could result in serious

personal injuries.

Summary of Contents for FGQ332E

Page 1: ...1 www frigidaire com P N 137103100 0806 Use Care Guide Gas Electric Dryer Manual de Uso y Cuido Sécheuse à Gaz ou Électrique GuidedeL Utilisateur Secadora a Gas y Eléctrica ...

Page 2: ...jury or loss of life Do not store or use gasoline or other flammable vapors and liquids in the vicinity of this or any other appliance WHAT TO DO IF YOU SMELL GAS Do not try to light any appliance Do not touch any electrical switch do not use any phone in your building Clear the room building or area of all occupants Immediately call your gas supplier from a neighbor s phone Follow the gas supplie...

Page 3: ...CT Use this way ONLY ELECTRIC DRYERS DRYER FUSED 30 AMP 120 240 V OR 120 208 V WALL RECEPTACLE DRYER SERVICE CORD 14 30R GAS DRYERS Important Safety Instructions Con t CORRECT Use this way ONLY Groundingtype wallreceptacle Power supply cord with 3 prong grounding plug Do not under any circumstances cut removeorbypassthe groundingprong from this plug RiskofFire Aclothesdryerproducescombustiblelint ...

Page 4: ...r your specific model controls 5 Turn cycle selector clockwise to the desired setting 6 Start the dryer PushStartButtonfor2secondsorturntheSTARTknobclockwisetoON hold for 1 2 seconds and release To add or remove items when the dryer is running open the door The dryer will always stop when the door is opened Allow the drum to come to a complete stop before reaching inside To restart dryer close the...

Page 5: ... cause damage to the dryer Care and Cleaning To reduce risk of fire or serious injury to persons or property comply with the basic warnings listed in Important Safety Instructions and those listed below Before cleaning the dryer interior unplug the electrical power cord to avoid electrical shock hazards Do not use any type spray cleanser when cleaning dryer interior Hazardous fumes or electrical s...

Page 6: ... and cling to fabric Shrinking Wrinkling POSSIBLECAUSES Fabric softener sheet Overloading Overdrying causes static electricity Lint screen not clean when cycle began Lint is attached to pills Pilling is normal with synthetic and permanent press fabrics This is due to abrasion from normal wear Overdrying Overloading Leaving items in dryer after cycle ends SOLUTIONS Rub fabric softener stains with b...

Page 7: ...ts or permanently attached items is not covered by the warranty Electrical power cord is not securely plugged in or plug may be loose House fuse blown or circuit breaker tripped Thermal limiter tripped There are 2 house fuses in the dryer circuit If 1of the 2 fuses is blown the drum may turn but the heater will not operate Gas supply valve is not open gas models Dryer does not have anough air supp...

Page 8: ...ce companies or external causes such as abuse misuse inadequate power supply accidents fires or acts of God DISCLAIMER OF IMPLIED WARRANTIES LIMITATION OF REMEDIES CUSTOMER S SOLE AND EXCLUSIVE REMEDY UNDER THIS LIMITED WARRANTY SHALL BE PRODUCT REPAIR OR REPLACEMENT AS PROVIDED HEREIN CLAIMS BASED ON IMPLIED WARRANTIES INCLUDING WARRANTIES OF MERCHANTABILITY OR FITNESS FOR A PARTICULAR PURPOSE AR...

Page 9: ...EMENT L utilisateur peut être tué ou gravement blessé s il ne suit pas ces directives Tous les messages relatifs à la sécurité indiquent le risque comment réduire le risque de blessure et ce qui peut survenir si on ne suit pas les directives AVERTISSEMENT ADVERTISSEMENT Pourvotresécurité suivrelesdirectivesdonnéesdansleprésentguidepourminimiserlesrisquesd incendie d explosion de dommages matériels...

Page 10: ...e à charpie est engorgé endommagé ou manquant Cela présenterait des risques d incendie de surchauffes ou de dommages pour les tissus Si la sécheuse est pourvue d une grille de séchage replacer le filtre à charpie après chaque utilisation de cette grille CONSERVER CES DIRECTIVES SÉCHEUSE Risque d incendie Une sécheuse à linge produit de la charpie combustible La sécheuse doit être connectée à une b...

Page 11: ...oche en filet pour les empêcher de s emmêler et faciliter leur manipulation 2 S assurer que le filtre à charpie est propre et en place 3 Placer les vêtements dans la sécheuse Une charge moyenne devrait remplir le tambour au tiers ou à la moitié Les articles ontbesoind espacepourbasculerlibrement sansquoiilsnesèchentpasuniformément et ils se froissent plus qu à la normale Ne pas surcharger la séche...

Page 12: ...aérosol pour nettoyer l intérieurdelasécheuse Cesproduitspeuventdégagerdesvapeursdangereuses ou causer des chocs électriques Intérieur Nettoyerlefiltreàcharpiedelasécheuseaprèschaqueséchage L accumulations de charpie dans le filtre restreint la circulation de l air et ralentit le séchage Le filtreestsituédanslebasdel ouverturedelaporte Retirerlefiltreenlesoulevant bien droit Retirer la charpie et ...

Page 13: ...usé par l abrasion qui accompagne l usure normale des tissus synthétiques et sans repassage Séchageexcessif Charge trop volumineuse Articles laissés dans la sécheuse après la fin du cycle Taches de graisseou d huile Charpie Boulochage des fibres se détachent et forment de petites boules bouloches qui adhèrent au tissu Rétrécissement Froissement Extérieur Nettoyerlacarrosseriedelasécheuseàl eauetau...

Page 14: ...ambour puis redémarrer la sécheuse Il pourrait s avérer nécessaire de faufiler une pièce de tissu autour des ornements avant de sécher les vêtements Les dommages causés au tambour par des corps étrangers ou des objets fixés en permanence aux vêtements ne sont pas couverts par la garantie Guide de dépannage Avant de faire appel aux services d un technicien consulter le guide qui suit Cela peut épar...

Page 15: ...teur autorisé ou les causes étrangères comme l abus l alimentation électrique inadéquate ou les cas de force majeure AVIS DE NON RESPONSABILITÉ SUR LES GARANTIES IMPLICITES LIMITATIONS DES RECOURS L UNIQUE RECOURS DU CLIENT EN VERTU DE CETTE GARANTIE LIMITÉE EST LA RÉPARATION OU LE REMPLACEMENT DU PRODUIT COMME DÉCRIT PRÉCÉDEMMENT LES DEMANDES BASÉES SUR DES GARANTIES IMPLICITES Y COMPRIS LES GARA...

Page 16: ...ntes Hemos proporcionado muchos mensajes importantes para la seguridad en las Instrucciones de Operación del Manual de Uso y Mantenimiento las Instrucciones de Instalación y en el mismo aparato Siempre lea y obedezca todos los mensajes para seguridad Este símbolo significa alerta Este símbolo lo alerta acerca de peligros que pueden matar o lesionar tanto a usted como a otras personas Todos los men...

Page 17: ... Power supply cord with 3 prong grounding plug Do not under any circumstances cut remove or bypass the grounding prong from this plug Cable de alimentación eléctrica con enchufe de toma de tierra con 3 clavijas Receptáculo mural con tomade tierra SECADORAS A GAS MANERACORRECTA UseseasíSOLAMENTE No corte saque ni cortocircuite bajo nin guna circunstancia la clavija de toma de tierra de este enchufe...

Page 18: ...aco de malla para evitar que se enreden y para sacarlas con más facilidad 2 Compruebequelarejillaparapelusasestélimpiaycolocadaensulugar 3 Llene la secadora La carga promedio llenará el tambor a un tercio o la mitad Las prendas necesitan espacio para moverse libremente para obtener un secado uniforme y menos arrugas No sobrecargue la secadora Cuando seque prendas grandes seque sólo 2 ó 3 a la vez ...

Page 19: ...o use ningún limpiador en vaporizador cuando limpie el interior de la secadora Pueden desprenderse vapores peligrosos o producirse descargas eléctricas Interior Limpie la rejilla para pelusas después de cada carga La acumulación de pelusas en la rejilla limita el paso de aire lo que hace que los tiempos de secado sean más largos La rejilla se encuentra en la parte inferior de la abertura de la pue...

Page 20: ...e telas en cuellos y puños De vuelta las prendas para reducir la abrasión Observe las indicaciones para el cuidado en las etiquetas de cada prenda Si el encogido es una preocupación controle el secado a menudo Remueva las prendas estando ligeramente húmedas Extienda las prendas tejidas a la forma original Colóquelas acostadas para completar el secado No sobrecargue la secadora Remueva las prendas ...

Page 21: ...orios permanentes no están cubiertos por la garantía El cable eléctrico no está bien enchufado o el enchufe puede estar flojo El fusible de la casa se ha fundido o el disyuntor se ha disparado El disyuntor de seguridad para la temperatura se ha disparado Hay 2 fusibles domésticos en el circuito de la secadora Si 1 de los 2 fusibles se ha fundido el tambor puede girar pero el calentador no funciona...

Page 22: ...orizado o causas externas como abuso mal uso suministro eléctrico inadecuado accidentes incendios hechos fortuitos or desastres naturales RENUNCIA DE RESPONSABILIDAD DE GARANTÍAS IMPLÍCITAS LIMITACIÓN DE ACCIONES LEGALES LA ÚNICA Y EXCLUSIVA OPCIÓN DEL CLIENTE BAJO ESTA GARANTÍA LIMITADA ES LA REPARACIÓN O REEMPLAZO DEL PRODUCTO SEGÚN SE INDICA LOS RECLAMOS BASADOS EN GARANTÍAS IMPLÍCITAS INCLUYEN...

Page 23: ...__________ ______________________________________________________________ ______________________________________________________________ ______________________________________________________________ ______________________________________________________________ ______________________________________________________________ ______________________________________________________________ ___________...

Page 24: ...Way Mississauga Ontario Canada L5R 4C2 Electrolux Major Appliances North America Or O Ou Visit Frigidaire s Web Site at Visite la página de Frigidaire en Internet Visitez le site Internet de Frigidaire au http www frigidaire com The Electrolux Group is the world s largest producer of powered appliances for kitchen cleaning and outdoor use combined More than 55 million Electrolux Group products suc...

Reviews: