background image

5

Wash Cycle Selections

Cycle times are approximate and will vary with 

the options selected. Hot water is neces-

sary to activate the detergent and melt fatty 

food soils. An automatic sensor will check the 

incoming water temperature. If it is not at the 

appropriate temperature the timer will delay 

the cycle to allow automatic water heating 

during the main wash. When the 

High Temp


wash is selected an even higher temperature 

will be assured to handle heavier soil loads.

OPERATING INSTRUCTIONS

Wash Cycles

Heavy Wash 

Recommended for pots, pans, casseroles and 

dinnerware having light to heavily soiled loads.

Normal Wash 

Recommended for lightly to heavily soiled 

loads.

1 Hour Wash


A shorter wash recommended for lightly soiled 

loads that do not need drying.

China Crystal 

Recommended for lightly soiled China and 

Crystal.

Energy Saver 

Recommended for lightly soiled and pre-rinsed 

dishes and silverware.

Rinse Only 

Recommended for pre-rinsing dishes or 

glasses. This is only a rinse that keeps food 

from drying on your dishes and reduces odor 

buildup in your dishwasher until you are ready 

to wash a full load. Do not use detergent.

Wash Cycles

Wash Options

Functions

Cycle Indicator

WARNING

The

 Sanitize

 option is only available with 

Heavy Wash

 and 

Normal Wash

 cycles.

Wash Options

Press the 

Options

 button to scroll through the 

options. The indicator light will illuminate when 

the option has been selected. 

Sanitize


When 

Sanitize

 is selected, the temperature 

of water will be maintained at 156.2°F (69°C) 

max. The max temperature may not be reached 

High Temp


When 

High Temp 

is selected, the temperature 

of the water will be maintained at 140°F  

(60°C) max.

Heat Dry


When 

Heat Dry

 is selected, the heater will 

work during the drying process.

Functions

START/Cancel


Press 

START/Cancel 

to start a wash cycle. 

Press 

START/Cancel 

and hold for 

3 seconds 

to cancel a cycle that is already in progress. 

Delay 

The Delay option allows you to automatically 

delay starting your dishwasher from 1-24 

hours. To start 1-24 hour delay, press the 

Delay 

button until the desired delay time 

shows in the display window (1h-24h) and 

press the 

START/Cancel

 button. A light will 

come on indicating the delay start has been 

activated and will remain on until the cycle 

starts. To cancel the Delay option and begin 

the cycle before the delay period is over, press 

the 

Start/Cancel 

button and hold for 

seconds.
Control Lock 

Use to lock all controls and prevent children 

from accidently changing the dishwasher cycle 

or starting the dishwasher. Press and hold both 

Option

 and 

Delay

, at the same time, for 

seconds

 to lock. After the function is selected 

the control lock icon will illuminate. Press and 

hold both 

Option

 and 

Delay

 again for 

3  

seconds 

to unlock.

if the incoming water temperature is not cor-

rect. Certified residential dishwashers are not 

intended for licensed food establishments.

Summary of Contents for FFBD2420UB

Page 1: ...bout the Use Care of your Dishwasher A15930701 RevA November 2018 Important Safety Instructions 2 Product Registration 3 Features at a Glance 4 Operating Instructions 5 Preparing and Loading Dishes 7 Detergent and Rinse Aid Dispenser 9 Care and Cleaning 11 Before You Call 13 Major Appliance Warranty 16 ...

Page 2: ... appliance and packing material properly The dishwasher must be properly grounded or it can result in a risk of electric shock See Installation Instructions for details If there is any damage to the dishwasher please contact to your Dealer do not attempt to repair or replace any part by yourself Do not operate your dishwasher unless all enclosure panels are properly in place Do not touch the heati...

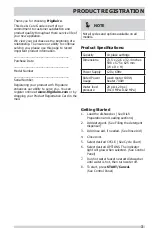
Page 3: ...www frigidaire com or by dropping your Product Registration Card in the mail Getting Started 1 Load the dishwasher See Dish Preparation and Loading sections 2 Add detergent See Filling the detergent dispenser 3 Add rinse aid if needed See Rinse Aid 4 Close door 5 Select desired CYCLE See Cycle Chart 6 Select desired OPTIONS The indicator light will glow when selected See Control Panel 7 Run hot wa...

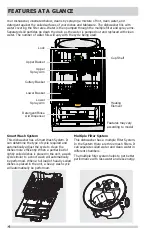
Page 4: ...ters It can separate soiled water and clean water in different chambers The multiple filter system helps to get better performance with less water and less energy Smart Wash System This dishwasher has a Smart Wash System It can determine the type of cycle required and automatically adjust the cycle to clean the dishes more efficiently When a partial load of lightly soiled dishes is placed in the u...

Page 5: ... options The indicator light will illuminate when the option has been selected Sanitize When Sanitize is selected the temperature of water will be maintained at 156 2 F 69 C max The max temperature may not be reached High Temp When High Temp is selected the temperature of the water will be maintained at 140 F 60 C max Heat Dry When Heat Dry is selected the heater will work during the drying proces...

Page 6: ...ized light will illuminate after the cycle has ended NOTE The remaining time could suddenly increase or drop several minutes This means the Smart Sensor has checked the soil level and adjusted the number of fill cycles Display window This LED screen displays minutes remaining in a running cycle hours of delay before the unit is set to start error codes etc If the machine is in operation the remain...

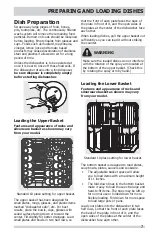
Page 7: ...he upper basket has been designed for small plates mugs glasses and plastic items marked dishwasher safe etc For best results place the bowls cups glasses with soiled surface facing down or toward the center Tilt slightly for better drainage Load small plates and bowls in two half rows so The bottom basket is designed to load plates soup bowls plates saucers and cookware The adjustable basket spac...

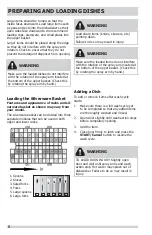
Page 8: ...the wash cycle Adding a Dish WARNING Make sure the loaded items do not interfere with the rotation of the spray arm located at the bottom of the upper basket Check this by rotating the spray arm by hand WARNING TO AVOID BURN INJURY Slightly open door and wait until spray arms and wash action stop Hot water may splash out of dishwasher Failure to do so may result in injury WARNING Load sharp items ...

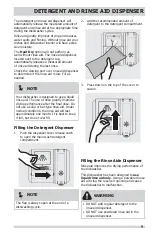
Page 9: ...eservoir opening and cause the dishwasher to malfunction WARNING DO NOT add regular detergent to the rinse aid dispenser DO NOT use powdered rinse aid in the rinse aid dispenser 2 Add the recommended amount of detergent to the detergent compartment 3 Press down on the top of the cover to secure The detergent and rinse aid dispenser will automatically release the measured amount of detergent and ri...

Page 10: ...ly to close 1 Lift up the end tab of rinse aid cover to open NOTE Use the viewing port when filling the rinse aid reservoir WARNING Do not fill the reservoir above the full level indicator Excess rinse aid can overflow during the wash cycle To refill the rinse aid dispenser NOTE Visually check viewing port to determine if rinse aid is low Fill as needed ...

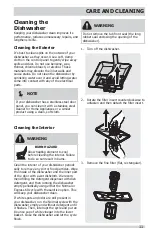
Page 11: ...iances or a similar product using a clean soft cloth Cleaning the Interior WARNING Do not remove the tub front seal the long rubber seal enclosing the opening of the dishwasher Clean the interior of your dishwasher periodi cally to remove any dirt or food particles Wipe the inside of the dishwasher and the inner part of the door with a wet dishcloth We recom mend filling the detergent dispenser wi...

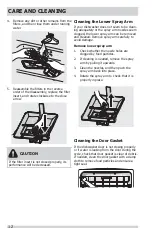
Page 12: ...ng it upwards 3 Clean the nozzles and then push the spray arm back into place 4 Rotate the spray arm to check that it is properly in place CARE AND CLEANING 4 Remove any dirt or other remains from the filters and then rinse them under running water 5 Reassemble the filters in the reverse order of the disassembly replace the filter insert and rotate clockwise to the close arrow Cleaning the Door Ga...

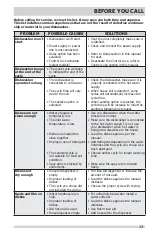
Page 13: ...roper use of detergent The selected cycle is not suitable for food soil condition Spay arms is blocked by some items Use you dishwasher when the water pressure is normal Make sure the dishwasher is connected to the hot water supply Try not use your dishwasher when hot water is being used elsewhere in the house Load the dishes again as per the manual Add detergent depending on the water hardness an...

Page 14: ... sure the drain hose is properly connected to the sink Suds in the tub Improper detergent is used Make sure to use only the automatic dishwasher detergent Dishwasher leaks Excessive suds caused by using the improper detergent Dishwasher is not level Make sure to use only the proper dishwasher detergent Level the dishwasher Black or gray marks on dishes Aluminum utensils have rubbed against dishes ...

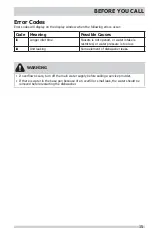
Page 15: ...ot opened or water intake is restricted or water pressure is too low i4 Unit leaking Some element of dishwasher leaks BEFORE YOU CALL WARNING If overflow occurs turn off the main water supply before calling a service provider If there is water in the base pan because of an overfill or small leak the water should be removed before restarting the dishwasher ...

Page 16: ...ectrolux parts or parts obtained from persons other than authorized service companies or external causes such as abuse misuse inadequate power supply accidents fires or acts of God DISCLAIMER OF IMPLIED WARRANTIES LIMITATION OF REMEDIES CUSTOMER S SOLE AND EXCLUSIVE REMEDY UNDER THIS LIMITED WARRANTY SHALL BE PRODUCT REPAIR OR REPLACEMENT AS PROVIDED HEREIN CLAIMS BASED ON IMPLIED WARRANTIES INCLU...

Reviews: