background image

4

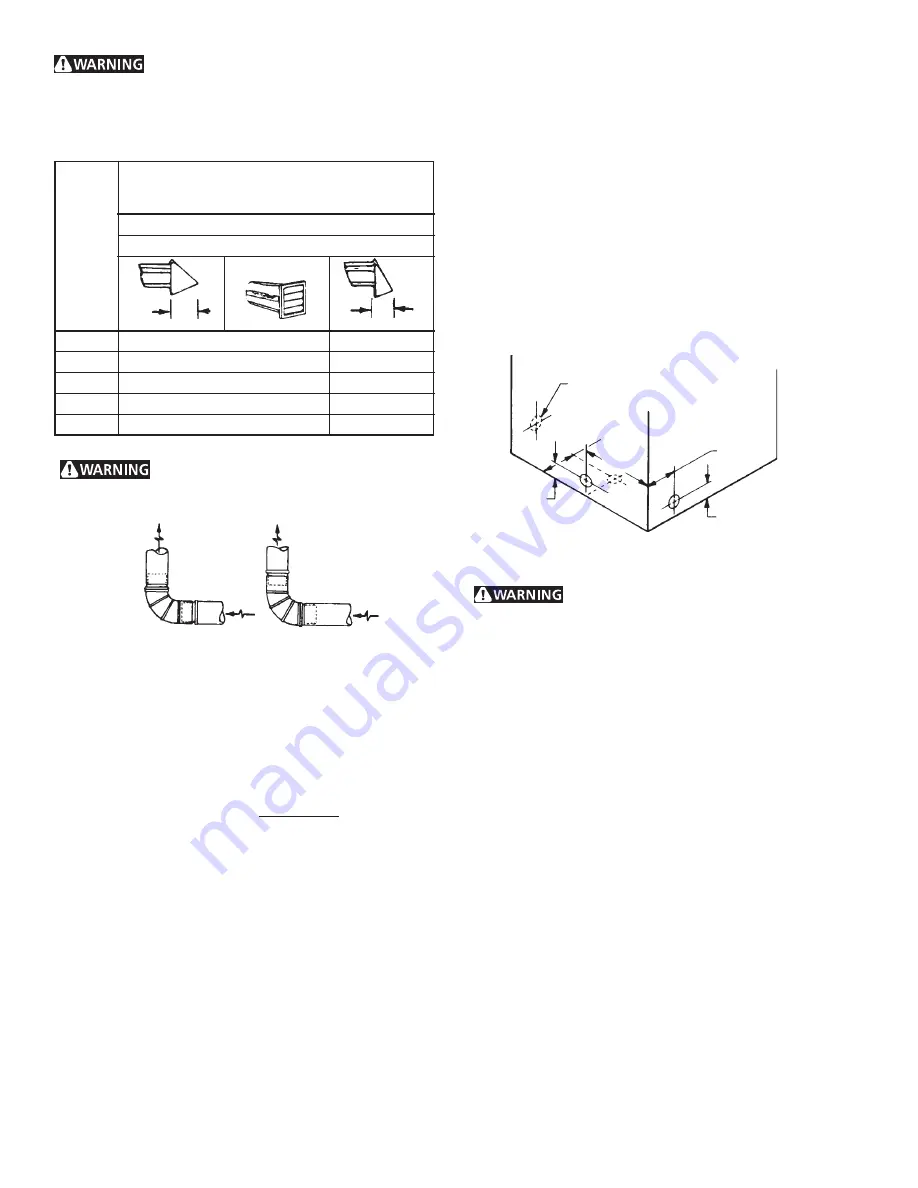
INSTALL MALE FITTINGS IN CORRECT DIRECTION

CORRECT

CORRECT

CORRECT

CORRECT

CORRECT

INCORRECT

INCORRECT

INCORRECT

INCORRECT

INCORRECT

SAME AS OTHER SIDE

SAME AS OTHER SIDE

SAME AS OTHER SIDE

SAME AS OTHER SIDE

SAME AS OTHER SIDE

(9.5 cm)

(9.5 cm)

(9.5 cm)

(9.5 cm)

(9.5 cm)

4 3/8"

4 3/8"

4 3/8"

4 3/8"

4 3/8"

(11 cm)

(11 cm)

(11 cm)

(11 cm)

(11 cm)

5 7/8"

5 7/8"

5 7/8"

5 7/8"

5 7/8"

(15 cm)

(15 cm)

(15 cm)

(15 cm)

(15 cm)

13 1/2"

13 1/2"

13 1/2"

13 1/2"

13 1/2"
(34 cm)

(34 cm)

(34 cm)

(34 cm)

(34 cm)

3 3/4"

3 3/4"

3 3/4"

3 3/4"

3 3/4"

(9.5 cm)

(9.5 cm)

(9.5 cm)

(9.5 cm)

(9.5 cm)

3 3/4"

3 3/4"

3 3/4"

3 3/4"

3 3/4"

(9.5 cm)

(9.5 cm)

(9.5 cm)

(9.5 cm)

(9.5 cm)

In installations where the exhaust system is not described in the
charts, the following method must be used to determine if the
exhaust system is acceptable:
1.

Connect an inclined or digital manometer between the
dryer and the point the exhaust connects to the dryer.

2.

Set the dryer timer and temperature to air fluff (cool
down) and start the dryer.

3.

Read the measurement on the manometer.

4.

The system back pressure 

MUST NOT

 be higher than

0.75 inches of water column.  If the system back
pressure is less than 0.75 inches of water column, the
system is acceptable.  If the manometer reading is
higher than 0.75 inches of water column, the system is
too restrictive and the installation is unacceptable.

Although vertical orientation of the exhaust system is
acceptable, certain extenuating circumstances could affect the
performance of the dryer:

Only the rigid metal duct work should be used.

Venting vertical through a roof may expose the exhaust
system to down drafts causing an increase in vent
restriction.

Running the exhaust system through an uninsulated area
may cause condensation and faster accumulation of lint.

Compression or crimping of the exhaust system will cause
an increase in vent restriction.

The exhaust system should be inspected and cleaned a
minimum of 

every 6 months 

with normal usage.  The more

the dryer is used, the more often you should check the
exhaust system and vent hood for proper operation.

EXHAUST DIRECTION

All dryers shipped from the factory are set up for rear exhausting.
However, on electric dryers, exhausting can be to the right or
left side of the cabinet or the bottom of the dryer. On gas dryers
exhausting can be to the right side of the cabinet or the bottom
of the dryer. Directional exhausting can be accomplished by
installing Exhaust Kit, P/N 131456800, available through your
parts distributor. Follow the instructions supplied with the kit.

EXHAUST DUCT LOCATING DIMENSIONS

GAS SUPPLY REQUIREMENTS

 Replace copper connecting pipe that is not

plastic-coated. Stainless steel or plastic-coated brass MUST
be used.

Note:  See rough-in dimensions on the following page
(Figure 1).

1. Installation 

MUST

 conform with local codes, or in the absence

of local codes, with the National Fuel Gas Code, ANSI Z223.1
(latest edition).

2. The gas supply line should be of 1/2 inch (1.27 cm) pipe.
3. If codes allow, flexible metal tubing may be used to connect

your dryer to the gas supply line. The tubing 

MUST

 be

constructed of stainless steel or plastic-coated brass.

4. The gas supply line 

MUST 

have an individual shutoff valve.

5. A 1/8 inch (0.32 cm) N.P.T. plugged tapping, accessible for

test gauge connection, 

MUST

 be installed immediately

upstream of the gas supply connection to the dryer.

6. The dryer 

MUST

 be disconnected from the gas supply piping

system during any pressure testing of the gas supply piping
system at test pressures in excess of 1/2 psig (3.45 kPa).

7. The dryer 

MUST

 be isolated from the gas supply piping

system during any pressure testing of the gas supply piping
system at test pressures equal to or less than 1/2 psig (3.45
kPa).

0

60 ft.

(18.28 m)

     48 ft.(14.63 m)

1

52 ft.

(15.84 m)

     40 ft.(12.19 m)

2

44 ft.

(13.41 m)

     32 ft.  (9.75 m)

3

32 ft.

  (9.75 m)

     24 ft.  (7.31 m)

4

28 ft.

  (8.53 m)

    16 ft.   (4.87 m)

VENT HOOD TYPE

(Preferred)

Number

 of

90°

 Turns

MAXIMUM LENGTH

of 4” (10.2 cm) Dia. Rigid Metal Duct

4”

(10.2 cm)

Louvered

(6.35 cm)

2½"

 Exceeding the length of duct pipe or

number of elbows allowed in the "MAXIMUM LENGTH"
charts 

can cause an accumulation of lint in the exhaust system.

Plugging the system could create a fire hazard, as well as
increase drying times.


Do not install flexible plastic or flexible foil

venting material.  If installing semi-rigid venting, do not exceed
8 ft. (2.4m) duct length.

Summary of Contents for FCGD3000ES - 27 Inch Coin Operated Gas Dryer

Page 1: ...ts 3 Exhaust System Requirements 3 4 Gas Supply Requirements 4 Rough In Dimensions 5 Unpacking 5 Reversing Door Swing 5 Location of Your Dryer 6 Electrical Installation 7 Grounding Requirements 7 Electrical Connections 3 wire 8 Electrical Connections 4 wire 8 Installation 9 Lint Blade Retaining Pin Location 9 Meter case instructions 9 12 Replacement Parts 12 Parts lists 13 14 Warranty 15 Back Cove...

Page 2: ... not install a clothes dryer with flexible plastic venting materials Flexible venting materials are known to collapse be easily crushed and trap lint These conditions will obstruct clothes dryer airflow and increase the risk of fire Your safety and the safety of others is very important We have provided many important safety messages in the Installation Instructions Use Care Guide and on your appl...

Page 3: ...imum of 12 inches 30 5 cm clearance between the vent hood and the ground or any other obstruction FIRE HAZARD The following are specific requirements for proper and safe operation of your dryer Failure to follow these instructions can create excessive drying times and fire hazards Do not install a clothes dryer with flexible plastic venting materials If your present system is made up of plastic du...

Page 4: ...ed from the factory are set up for rear exhausting However on electric dryers exhausting can be to the right or left side of the cabinet or the bottom of the dryer On gas dryers exhausting can be to the right side of the cabinet or the bottom of the dryer Directional exhausting can be accomplished by installing Exhaust Kit P N 131456800 available through your parts distributor Follow the instructi...

Page 5: ...PAD REVERSING DOOR SWING Your dryer is designed so the door swing may be reversed at any time without additional parts Conversion is accomplished by transferring hinges to the opposite side of the cabinet To change the direction of the door opening 1 Open the dryer door Remove the four hinge hole plugs from the left side of the door opening Place nearby for future installation NOTE You may need a ...

Page 6: ...e exhausted outdoors 2 No other fuel burning appliance shall be installed in the same closet as the Gas dryer 3 Your dryer needs the space around it for proper ventilation DO NOT INSTALL YOUR DRYER IN A CLOSET WITH A SOLID DOOR 4 A minimum of 120 square inches 774 2 square cm of opening equally divided at the top and bottom of the door is required Air openings are required to be unobstructed when ...

Page 7: ...n cause electrical shorts The proper wiring and receptacle is a copper wired power cord with a copper wired receptacle NOTE Dryers operating on 208 volt power supply will have longer drying times than operating on 240 volt power supply GROUNDING REQUIREMENTS ELECTRIC Dryer DANGER Improper connection of the equipment grounding conductor can result in a risk of electrical shock Check with a licensed...

Page 8: ...tors to the outer brass colored terminals on the terminal block Do not make a sharp bend or crimp wiring conductor at the connections 8 Tighten the screws securing the cord restraint firmly against the power cord 9 Tighten the strain relief nut securely so the strain relief does not turn 10 Reinstall the terminal block access cover ELECTRICAL CONNECTIONS FOR 3 WIRE SYSTEM ELECTRIC Dryer 1 Remove t...

Page 9: ...utoff valve in the gas supply line d Test all connections by brushing on a soapy water solution NEVER TEST FOR GAS LEAKS WITH AN OPEN FLAME 2 Connect the exhaust duct to outside exhaust system Use duct tape to seal all joints 3 With the dryer in its final position adjust one or more of the legs until the dryer is resting solid on all four legs Place a level on top of the dryer THE DRYER MUST BE LE...

Page 10: ...ING CAMS ON ACCUMULATOR MECHANISM Electrical Shock Hazard Disconnect both power supply cords from the electric power supply before making these changes Change timing cams before completing electrical connection Failure to do so could result in electrical shock or personal injury A Remove meter case service door 1 Loosen two screws securing timer bracket to meter case and lift timer assembly out Se...

Page 11: ... of coin chute see FIGURE 4 STEP 4 Turn coin slide upside down and remove screw that holds coin receiver block see FIGURE 5 STEP 5 Remove coin receiver block from coin slide see FIGURE 6 Turn coin slide right side up Keep coin receiver block in place with your fingers Carefully lift coin slide from coin receiver block If necessary shake coin slide gently to loosen block FIGURE 7 VEND PRICE COIN SL...

Page 12: ...screws be sure spacers are in place STEP 10 Replace coin slide mechanism in meter case Replace and tighten coin slide mounting bolt NOTE It may be easier to insert coin slide mounting bolt if you remove the timer from the mounting screws temporarily REPLACEMENT PARTS If replacement parts are needed for your dryer contact the source where you purchased your dryer or call Frigidaire at 1 866 738 164...

Page 13: ...61 2 Timing cam 2 PIN 90 Minutes 51 161 3 Timing cam 3 PIN 60 Minutes 51 161 5 Timing cam 5 PIN 36 Minutes 51 161 6 Timing cam 6 PIN 30 Minutes 51 161 7 Timing cam 7 PIN 25 7 Minutes 51 161 8 Timing cam 8 PIN 22 5 Minutes 51 161 9 Timing cam 9 PIN 20 Minutes 51 161 10 Timing cam 10 PIN 18 Minutes 51 161 11 Timing cam 11 PIN 16 3 Minutes 51 161 12 Timing cam 12 PIN 15 Minutes 50 61 13 2 Timing moto...

Page 14: ... 18 RACK 1 20 2023 20 2005 19 SCREW METRIC 2 00 7931 00 7931 20 10 INSERT varies 20 3023 20 5001 21 SCREW METRIC 2 00 7923 00 7929 22 SLIDE STOP 1 20 2039 20 2004 23 RATCHET DOG SPRING 1 00 8123 00 8123 24 BLOCKOUT KEY varies 20 5002 20 2010 25 SLIDE RATCHET DOG 1 20 2041 20 2008 26 STORAGE COMP COVER 20 2037 20 2003 27 SCREW METRIC 2 00 7935 28 BUFFER 1 20 2034 29 RATCHET DOG POST 1 20 4005 30 CO...

Page 15: ...________ _________________________________________________________________ NEW VEND PRICE ____________________________________________________________ Order Form To change vend price detach and mail the lower portion to Customer Service Department Greenwald Industries Inc 212 Middlesex Ave Chester CT 06412 ____________________________________________________ The coin chute has been pre set at the ...

Page 16: ...operated by a concessionaire or vendor in a trailer or other motorized vehicle or at varying locations DISCLAIMER OF IMPLIED WARRANTIES LIMITATION OF REMEDIES CUSTOMER S SOLE AND EXCLUSIVE REMEDY UNDER THIS LIMITED WARRANTY SHALL BE PRODUCT REPAIR OR REPLACEMENTAS PROVIDED HEREIN CLAIMS BASED ON IMPLIED WARRANTIES INCLUDING WARRANTIES OF MERCHANTABILITY OR FITNESSFOR A PARTICULAR PUR POSE ARE LIMI...

Reviews: