background image

5

Grounding Instructions

(electric ignition models only)

 Avoid fire hazard or electrical shock. Do not use

an adapter plug, an extension cord, or remove grounding prong

from  electrical  power  cord.  Failure  to  follow  this  warning  can

cause serious injury, fire or death.

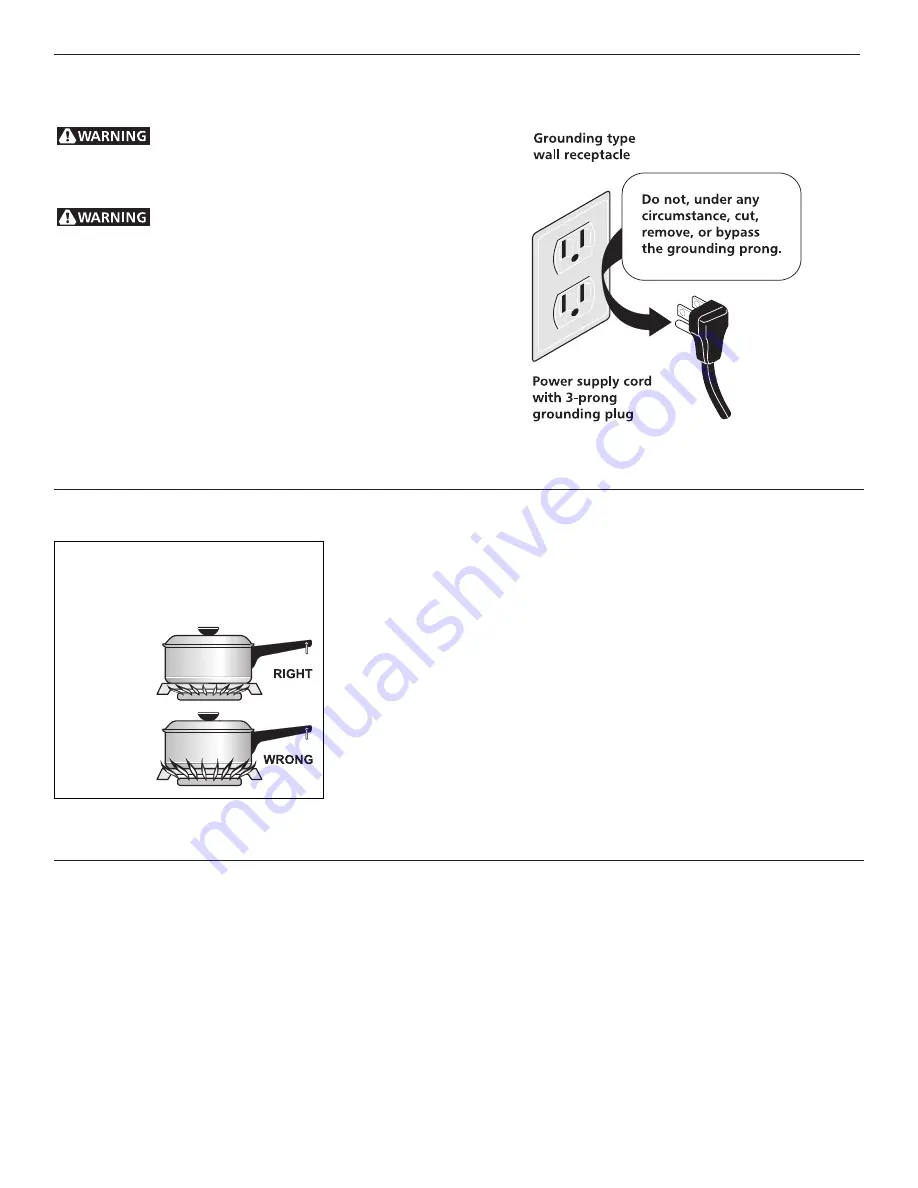
  This  appliance  is  equipped  with  a  3-prong

grounding  plug  for  your  protection  against  shock  hazard  and

should be plugged directly into a properly grounded receptacle.

DO NOT

 cut or remove the grounding prong from this plug.

For personal safety, the range must be properly grounded. For

maximum  safety,  the  power  cord  must  be  plugged  into  an

electrical outlet that is correctly polarized and properly grounded.
DO  NOT  Operate  the  range  using  a  2-prong  adapter  or  an

extension cord. If a 2-prong wall receptacle is the only available

outlet, it is the personal responsibility of the consumer to have it

replaced with a properly grounded 3-prong wall receptacle installed

by a qualified electrician.

See the 

INSTALLATION INSTRUCTIONS

 packaged with this range

for complete installation and grounding instructions.

For most cooking

, start on the highest control setting and then turn to a lower

one to complete the process. Use the chart below as a guide for determining

proper flame size for various types of cooking. The size and type of utensil used

and the amount of food being cooked will influence the setting needed for

cooking.

For deep fat frying

,


use a thermometer and adjust the surface control knob

accordingly. If the fat is too cool, the food will absorb the fat and be greasy.

If the fat is too hot, the food will brown so quickly that the center will be

undercooked. Do not attempt to deep fat fry too much food at once as the food

will neither brown nor cook properly.

*Flame Size

Type of Cooking

High Flame

Start most foods; bring water to a boil; pan broiling

Medium Flame

Maintain a slow boil; thicken sauces, gravies; steam

Low Flame

Keep foods cooking; poach; stew

*These settings are based on using medium-weight aluminum pans with

lids. Settings may vary when using other types of pans.

Never  extend  the  flame  beyond  the

outer  edge  of  the  utensil.  A  higher

flame simply wastes heat and energy,

and increases your risk of being burned

by the flame.

Proper Surface Burner

Adjustments

Surface Unit Flame Size

The color of the flame is the key to proper burner adjustment. A good flame

is clear, blue and hardly visible in a well-lighted room. Each cone of flame

should be steady and sharply defined. Adjust or clean burner if flame is yellow-

orange. To clean burner, see instructions under 

General Cleaning

.

Summary of Contents for 316135924

Page 1: ... and Minute Timer 9 Setting Oven Controls 10 Oven Cleaning 11 General Cleaning 12 16 Changing Cooktop and or Oven Lights 16 Avoid Service Checklist 17 18 Notes 19 Warranty 20 OWNER S GUIDE Porcelain Enamel or Continuous Cleaning Oven Interior READ AND SAVE THESE INSTRUCTIONS GAS RANGE This Owner s Guide contains general operating instructions for your range and feature information for several mode...

Page 2: ...TO DO IF YOU SMELL GAS Do not try to light any appliance Do not touch any electrical switch do not use any phone in your building Immediately call your gas supplier from a neighbor s phone Follow the gas supplier s instructions If you cannot reach your gas supplier call the fire department Installationandservicemustbeperformedbyaqualified installer servicer or the gas supplier This Owner s Guide c...

Page 3: ...or unattended in the area where appliance is in use They should never be allowed to sit or stand on any part of the appliance DO NOT TOUCH SURFACE BURNERS AREAS NEAR THESE BURNERS OVEN BURNERS OR INTERIOR SURFACES OF THE OVEN Both surface and oven burners may be hot even though flames are not visible Areas near surface burners may become hot enough to cause burns During and after use do not touch ...

Page 4: ...ning the door of a hot oven Let hot air or steam escape before you remove or replace food in the oven Keep Oven Vent Ducts Unobstructed The oven vent is located below the backguard Touching the surfaces in this area when the oven is operating may cause severe burns Also do not place plastic or heat sensitive items on or near the oven vent These items could melt or ignite Placement of Oven Racks Al...

Page 5: ... chart below as a guide for determining proper flame size for various types of cooking The size and type of utensil used and the amount of food being cooked will influence the setting needed for cooking For deep fat frying use a thermometer and adjust the surface control knob accordingly If the fat is too cool the food will absorb the fat and be greasy If the fat is too hot the food will brown so ...

Page 6: ...g surface burners manually Do not place plastic items such as salt and pepper shakers spoon holders or plastic wrappings on top of the range when it is in use These items could melt or ignite Potholders towels or wood spoons could catch fire if placed too close to a flame The surface control knobs shown below may not look identical to the Surface Controls knobs on your range They are only represen...

Page 7: ...ACKS WHEN THE OVEN IS COOL PRIOR TO OPERATING THE OVEN Always use oven mitts when using the oven REMOVING REPLACING OVEN RACKS To remove pull the rack forward until it stops Lift up front of rack and slide out To replace fit the rack onto the guides on the oven walls Tilt the front of the rack upward and slide the rack back into place ARRANGING OVEN RACKS WITH 5 RACK POSITIONS To bake on 1 rack pl...

Page 8: ...ition For medium foods use middle position For well done foods such as chicken lobster tails or thick cuts of meat position the rack further from the burner lower position 5 Place insert on broiler pan then place meat on insert DO NOT use the broiler pan without the insert DO NOT cover the insert with aluminum foil The exposed fat could ignite 6 Place broiler pan on rack make sure the broiler pan ...

Page 9: ...operly The bulb is located in the rear of the oven Carefully wipe the bulb clean after each oven cleaning being careful not to move the bulb A change in its position could affect how the oven bakes Avoid bending the bulb and capillary tube 3 DO NOT spray any cleaner on the oven door trim or gasket broiler drawer glides handles or any exterior surfaces of the range plastic or painted surfaces The c...

Page 10: ... cover difficult spots with an ammonia soaked paper towel for 30 to 40 minutes Rinse with clean water and a damp cloth then scrub with a soap filled scouring pad Rinse and wipe dry with a clean cloth Remove all cleaners or the porcelain may become damaged during future heating DO NOT use spray oven cleaners on the range top Clean with hot soapy water and a dishcloth Rinse with clean water and a cl...

Page 11: ...e and Replace Burners for Cleaning To Remove Burners 1 Remove shipping screws with a Phillips Head screwdriver See illustration for screw locations 2 Tilt the burner at the end closest to the support bar until the locator tab is released front burners tilt right rear burners tilt left Move it toward the back of the range This will separate it from the gas valve at the front of the range To clean s...

Page 12: ... in the bottom Lift the rear of the panel up and back until it is clear of the lip at the front of the panel Figure 2 4 Lift the bottom up and out To Replace the Oven Bottom 1 Place the oven bottom in the oven with the back raised about 6 or until you can insert the front of the oven bottom under the hold down lip at the front of the panel 2 Push the back of the oven bottom down fully into place o...

Page 13: ...over off 3 Remove bulb by rolling back and up Install the new bulb by sliding down and rolling forward into place 4 Re install light cover and secure with Phillips Head screws 2 General Cleaning To Remove and Replace Oven Door To Remove Oven Door 1 Open the door 2 Remove screws located on the inside of the oven door near the hinges A one on each side 3 Close the door to the quarter open position G...

Page 14: ...ogged With the burner off clean ports by using a small gauge wire or needle Moisture is present after cleaning Lightly fan the flame and allow burner to operate until flame is full Dry the burners thoroughly following instructions in the General Cleaning section Dust particles in main line Allow the burner to operate a few minutes until flame turns blue In coastal areas a slightly orange flame is ...

Page 15: ...the set temperature before placing food in the oven Try adjusting the recipe s recommended temperature or baking time This oven is equipped with a state of the art electronic oven controller Among its many features is a full time oven circuit diagnostics system The controller constantly monitors its internal circuitry as well as several crucial oven circuits to insure they are all operating correc...

Page 16: ...incidental or consequential damages so this limitation or exclusion may not apply to you 2 Service calls which do not involve malfunction or defects in workmanship or material or for appliances not in ordinary household use The consumer shall pay for such service calls 3 Damages caused by services performed by servicers other than Electrolux Home Products North America or its authorized servicers ...

Reviews: