FRIEDHELM LOH RITTAL KX 1500.000 Assembly And Operating Instructions Manual Download Page 37

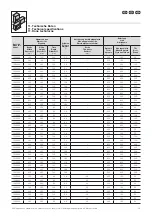
Der Wartungsplan ist empfohlen für alle KX 
Kleingehäuse, Stahlblech.

Wartungsintervall

Die Wartung muss regelmäßig in Abhängigkeit 
der Einsatz- und Umgebungs bedingungen, 
mindestens einmal jährlich durchgeführt und 
entsprechend dokumentiert werden.

Art und Umfang der durchzuführenden Arbe-
iten:


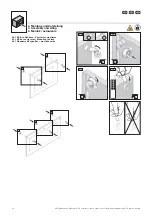
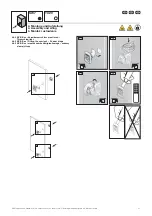
◾ Die Scharniere der Türen werden auf Leicht-

gängigkeit überprüft und mit einem geeigne-
ten, wasserfreien Schmiermittel eingesprüht.


◾ Das Schloss wird auf Leichtgängigkeit 

überprüft. Alle beweglichen Verschlussteile 
werden mit einem geeigneten, wasserfreien 
Schmiermittel eingesprüht.


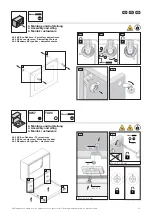
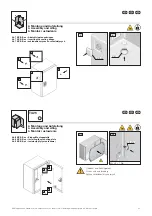
◾ Dichtungen im Andruckkantenbereich 

müssen bei Beschädigung komplett ersetzt 
werden. Bei Beschädigung der Dichtung 
außerhalb der Andruckkanten ist i. d. R. 
noch eine ausreichende Dichtwirkung 
vorhanden.


◾ Um Beschädigungen durch temperaturbe-

dingtes Anfrieren der Dichtungen zu verhin-
dern, können übliche Mittel wie Talkum, 
Vaseline oder Wachse eingesetzt werden. 
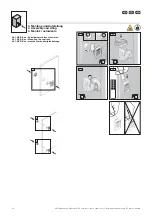
Alle Komponenten und Oberflächen werden 
auf äußere Beschädigungen untersucht.


◾ Stahlschränke werden zusätzlich auf Korro-

sionsspuren untersucht. Eventuelle Beschä-
digungen werden wie folgt repariert: 
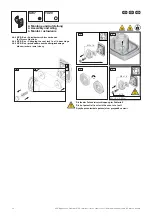
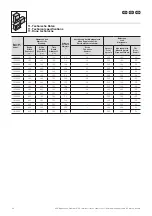
–  Kleinflächige Schäden, die nur einen Teil 

der Oberfläche betreffen (z. B. Kratzer): 
Oberfläche an der beschädigten Stelle 
leicht anschleifen und alle Korrosionsspu-
ren sowie alle Verschmutzungen entfer-
nen. Je nach Größe der Beschädigung 
entweder mit einem Lackstift, einem Pinsel 
oder mit der Lackspraydose den Rittal 
Ausbesserungslack aufbringen (alternativ: 
2K-PUR Acryllack)

 – 


Großflächige Schäden: Oberfläche 
gleichmäßig abreiben und mit Testbenzin 
reinigen; anschließend gesamte Fläche mit 
Rittal Ausbesserungslack überlackieren 
(alternativ: 2K-PUR Acryllack).

Wartungsarbeiten sind durch die jeweilige 
Fachkraft zu vollziehen. Alle allgemein gel-
tenden Richtlinien zu Wartungseinheiten sind 
einzuhalten.

The maintenance schedule is recommended 
for all KX small enclosures, sheet steel.

Maintenance interval

Maintenance must be performed at regular 
intervals depending on use and ambient con-
ditions, at least once annually and documen-
ted accordingly.

Nature and extent of the work to be perfor-
med:


◾ The hinges of the doors are checked for 

ease of movement and sprayed with a suita-
ble, water-free lubricant.


◾ The lock is checked for ease of movement. 

All moving closure parts are sprayed with a 
suitable, water-free lubricant.


◾ Gaskets in the contact edge area must 

be replaced completely if damaged. If the 
gasket is damaged outside the contact 
edges, the sealing effect is still sufficient as 
a rule.


◾ Common agents such as talcum, vaseline or 

wax can be used to prevent damage due to 
gaskets freezing because of low tempe-
ratures. All components and surfaces are 
examined for external damage.


◾ Steel enclosures are also inspected for 

traces of corrosion. Any damage is repaired 
as follows: 
–  Damage to small areas that affect only a 

part of the surface (e.g. scratches): Lightly 
sand off the surface at the damaged place 
and remove all traces of corrosion as well 
as all contamination. 
Depending on the degree of damage, 
apply the Rittal touch-up paint either with 
a paint stick, a brush or a spray can (alter-
native: 2K-PUR acrylic paint)

 – 


Large area damage: Smooth the surface 
uniformly and clean with white spirit; then 
paint over the entire surface with Rittal 
touch-up paint (2K-PUR acrylic paint).

All maintenance work should be carried out by 
trained experts. The applicable guidelines on 
maintenance units must be observed.

37

KX Kleingehäuse, Stahlblech / KX small enclosures, sheet steel / Obudowy małogabarytowe KX, blacha stalowa

9. Inspektion und Wartung
9. Inspection and maintenance
9. Przegląd i konserwacja

Plan konserwacji jest zalecany dla wszyst-
kich małogabarytowych obudów KX z blachy 
stalowej.

Częstotliwość konserwacji

Konserwacja musi być przeprowadzana 
i odpowiednio udokumentowana regularnie, w 
zależności od warunków eksploatacji i otocze-
nia, jednak nie rzadziej niż raz w roku.

Rodzaj i zakres prac do wykonania:


◾ Sprawdzić swobodę ruchu zawiasów drzwi, 

spryskać odpowiednim, niezawierającym 
wody środkiem smarującym.


◾ Sprawdzić swobodę ruchu zamka. Wszyst-

kie ruchome części zamka spryskać odpo-
wiednim, niezawierającym wody środkiem 
smarującym.


◾ Uszczelki w obszarze styku krawędzi w 

przypadku uszkodzenia muszą zostać 
wymienione w całości. Przy uszkodzeniach 
uszczelek poza krawędziami styku działanie 
uszczelniające z reguły jest jeszcze wystar-
czające.


◾ Aby zapobiec uszkodzeniom w wyniku przy-

marzania uszczelek z powodu temperatury, 
można zastosować standardowe środki jak 
talk, wazelina lub wosk. Zbadać wszystkie 
komponenty i powierzchnie pod kątem 
uszkodzeń zewnętrznych.


◾ Szafy stalowe bada się dodatkowo pod 

kątem śladów korozji. Ewentualne uszko-
dzenia są naprawiane w następujący 
sposób: 
–  Uszkodzenia o małej powierzchni, 

dotyczące jedynie części powierzchni (np. 
zarysowania): w uszkodzonym miejscu 
lekko zeszlifować powierzchnię i całko-
wicie usunąć ślady korozji i zabrudzenia. 
W zależności od rozmiarów uszkodzenia, 
pokryć lakierem naprawczym Rittal (alter-
natywnie: lakierem akrylowym 2K-PUR) 
– sztyftem, pędzelkiem lub lakierem w 
puszce z aerozolem.

 – 


Uszkodzenia o dużej powierzchni: rów-
nomiernie zetrzeć powierzchnię i oczy-
ścić benzyną ekstrakcyjną; następnie 
polakierować całą powierzchnię lakierem 
naprawczym Rittal (alternatywnie: lakierem 
akrylowym 2K-PUR).

Prace konserwacyjne powinny wykonywać 
odpowiednio wykwalifikowane osoby. Należy 
przestrzegać wszystkich ogólnie obowiązu-
jących wytycznych dotyczących jednostek 
serwisowych.

Summary of Contents for RITTAL KX 1500.000

Page 1: ...KX 1512 000 KX 1513 000 KX 1514 000 KX 1515 000 KX 1516 000 KX 1517 000 KX 1518 000 KX 1527 000 KX 1528 000 KX 1529 000 KX 1530 000 KX 1531 000 KX 1532 000 KX 1533 000 KX 1535 000 KX 1536 000 KX 1537...

Page 2: ...arthing 26 4 3 6 Interior installation 27 4 4 KX E Box 28 34 4 4 1 Mounting the cam lock 28 4 4 2 Mounting the door 29 4 4 3 Dismantling the cam lock 29 4 4 4 Changing the cam lock to a l h door hinge...

Page 3: ...owe KX blacha stalowa Inhaltsverzeichnis Contents Spis tre ci IP 4 19 36 45 KX KL 20 KX KL 21 KX KL 21 KX KL 22 KX KL 22 IP KX BG 24 KX BG 25 KX BG 25 KX BG 26 KX BG 26 KX EB 28 IP KX EB 29 KX EB 29 K...

Page 4: ...hat they are readily available when needed 1 3 Symbols used Please observe the following safety instructions and other notes in this guide Danger F R Note Front rear view 1 4 Other applicable document...

Page 5: ...000 V AC lub 1500 V DC kt re mo na stosowa do urz dze pomiarowych steruj cych i reguluj cych wewn trz budynk w Stosowanie w innych warunkach oraz na wolnym powietrzu wymaga uzyskania dodatkowego potwi...

Page 6: ...contenitore vi il rischio di lesioni dovute a componenti non montati Rispettare le norme antinfortunistiche ad es utilizzare cutter di sicurezza Uso correcto Estos productos Rittal son armarios vac os...

Page 7: ...selon la norme DIN EN ISO 12100 Les remarques suivantes sont respecter car quelques risques r siduels ne peuvent pas tre supprim s Il est possible que la sant et la vie des personnes soient mises en...

Page 8: ...ponentele libere Trebuie respectate reglement rile de prevenire a accidentelor de ex utiliza i un cu it Safety tip cutter Predvi ena uporaba Ovi proizvodi tvrtke Rittal odnose se na prazna ku i ta za...

Page 9: ...naudoti atitinkamas asmenines apsaugos priemones I pakuodami korpus galite susi eisti d l palaid komponent B tina laikytis nelaiming atsitikim prevencijos taisykli pvz naudoti apsaugines peilio gele t...

Page 10: ...IN EN ISO 12100 m sa predi lo ich v skytu Ke e nie je mo n vyl i v skyt mal ho po tu zvy kov ch riz k je nutn dodr iava nasledovn pokyny V pr pade nere pektovania bezpe nostn ch pokynov m e d js k ohr...

Page 11: ...centre of gravity Ostrze enie przed przewr ceniem si z powodu przesuni cia rodka ci ko ci Waarschuwing voor kantelen als gevolg van zwaartepunt verschuiving Varning f r v ltande f rem l p grund av f r...

Page 12: ...Risiko for v ltning p grund af forskydning af tyngdepunktet Attention au basculement lors du d placement du centre de gravit Leggere le istruzioni Leer el manual de instrucciones Lue k ytt ohjeet Vej...

Page 13: ...soben m posunut m t i t Avertizare de r sturnare prin deplasarea centrului de greutate Odkaz na instrukce n vodu k pou it bro ury A se citi manualul Instalace vy aduje elektro odbornost Instalarea se...

Page 14: ...ukku mise eest raskuskeskme nihkumise t ttu Br din jums par apg anos smaguma centra novirz an s d Pro itajte upute Az utas t st el kell olvasni Skaityti instrukcij Lugeda kasutusjuhendit Izlasiet inst...

Page 15: ...a pelo deslocamento do centro de gravidade Preberite navodila Pre tajte si n vod Ler as instru es Namestitev lahko izvajajo samo usposobljeni strokovnjaki za elektro tehni na dela In tal ciu smie vyko...

Page 16: ...ekorpus KX 1500 000 01 0123456789 04 399339 09 150 10 150 11 120 51 E 19HG 1234567 3 2 Labelling The mounting plate cover door enclosure body and the rating plate have a QR code containing component s...

Page 17: ...000 1509 000 1511 000 1514 000 1515 000 1516 000 1517 000 1518 000 1528 000 1529 000 1589 000 1506 000 1510 000 1512 000 1513 000 1527 000 1530 000 1531 000 1532 000 1533 000 1535 000 1536 000 1539 00...

Page 18: ...45 000 1546 000 1547 000 1548 000 1549 000 1550 000 1551 000 1552 000 1553 000 1554 000 1555 000 1556 000 1574 000 1575 000 1576 000 1577 000 1557 000 1578 000 1579 000 2 3 2 3 1 2 1 2 1 1 1 1 1 1 M4...

Page 19: ...ructions Observe the load capacities speci ed on pages 39 44 When installing the enclosures the mounting surfaces must be sufficiently smooth Observe all speci ed torque values Over or undershooting t...

Page 20: ...owa 4 2 1 KX Klemmenkasten Verschluss montieren 4 2 1 KX terminal boxes Mounting the lock 4 2 1 Skrzynki zaciskowe KX monta zamka 4 Montage und Aufstellung 4 Assembly and siting 4 Monta i ustawienie 1...

Page 21: ...boxes Dismantling the lock 4 2 2 Skrzynki zaciskowe KX demonta zamka 4 Montage und Aufstellung 4 Assembly and siting 4 Monta i ustawienie IP 4 2 3 KX Klemmenkasten Abdichtstopfen anbringen 4 2 3 KX te...

Page 22: ...iskowe KX monta p yty ko nierzowej 4 Montage und Aufstellung 4 Assembly and siting 4 Monta i ustawienie 1 2 2 1 1 1 2 2 2 2 2 2 1 MA 2 5 0 5 Nm 5 x 10 2 MA 2 5 0 5 Nm 5 x 10 4 2 5 KX Klemmenkasten Erd...

Page 23: ...4 Monta i ustawienie 4 2 6 KX Klemmenkasten Innenausbau 4 2 6 KX terminal boxes Interior installation 4 2 6 Skrzynki zaciskowe KX zabudowa wewn trzna 1 1 2 2 21 5 x 10 MA 5 1 Nm 1 nur bei only for tyl...

Page 24: ...udowy ma ogabarytowe KX blacha stalowa 4 3 1 KX Bus Geh use Verschluss montieren 4 3 1 KX bus enclosures Mounting the lock 4 3 1 Obudowy KX typu Bus monta zamka 4 Montage und Aufstellung 4 Assembly an...

Page 25: ...4 3 2 Obudowy KX typu Bus demonta zamka 4 Montage und Aufstellung 4 Assembly and siting 4 Monta i ustawienie 4 Montage und Aufstellung 4 Assembly and siting 4 Monta i ustawienie 4 3 3 KX Bus Geh use...

Page 26: ...g bungs 4 3 4 Obudowy KX typu Bus zak adanie zatyczek uszczelniaj cych 4 Montage und Aufstellung 4 Assembly and siting 4 Monta i ustawienie 1 1 1 2 1 1 9 25 2 8 7 4 3 5 KX Bus Geh use Erdung 4 3 5 KX...

Page 27: ...and siting 4 Monta i ustawienie 4 3 6 KX Bus Geh use Innenausbau 4 3 6 KX bus enclosures Interior installation 4 3 6 Obudowy KX typu Bus zabudowa wewn trzna 1 2 2 1 21 5 x 10 MA 5 1 Nm 1 nur bei only...

Page 28: ...budowy ma ogabarytowe KX blacha stalowa 4 4 1 KX E Box Vorreiberverschluss montieren 4 4 1 KX E Box Mounting the cam lock 4 4 1 KX E Box monta zamka d wigienkowego 4 Montage und Aufstellung 4 Assembly...

Page 29: ...KX E Box Dismantling the cam lock 4 4 3 KX E Box demonta zamka d wigienkowego 4 Montage und Aufstellung 4 Assembly and siting 4 Monta i ustawienie 4 Montage und Aufstellung 4 Assembly and siting 4 Mon...

Page 30: ...rreiberverschluss umbauen f r T ranschlag links 4 4 4 KX E Box Changing the cam lock to a l h door hinge 4 4 4 KX E Box przebudowa zamka d wigienkowego dla zawias w z lewej strony SW7 TX20 2 3 1 4 MA...

Page 31: ...stalowa 4 Montage und Aufstellung 4 Assembly and siting 4 Monta i ustawienie 4 4 5 KX E Box Vorreiberverschluss montieren T ranschlag links 4 4 5 KX E Box Fitting the cam lock l h door hinge 4 4 5 KX...

Page 32: ...we KX blacha stalowa 4 Montage und Aufstellung 4 Assembly and siting 4 Monta i ustawienie 4 4 6 KX E Box T r montieren T ranschlag links 4 4 6 KX E Box Mounting the door l h door hinge 4 4 6 KX E Box...

Page 33: ...uszczelniaj cych 4 Montage und Aufstellung 4 Assembly and siting 4 Monta i ustawienie 1 1 2 1 1 1 9 25 2 8 7 4 Montage und Aufstellung 4 Assembly and siting 4 Monta i ustawienie 4 4 8 KX E Box Einbau...

Page 34: ...ting 4 Monta i ustawienie 2 MA 5 1 Nm Typ S 6 2 6 x 13 1 MA 5 1 Nm 6 x 13 Typ S 6 2 3 MA 5 1 Nm Typ S 6 2 6 x 13 4 Montage und Aufstellung 4 Assembly and siting 4 Monta i ustawienie 4 4 10 KX E Box In...

Page 35: ...slipping during transportation Ensure that the load is properly secured Observe the accident prevention regulations Wear personal safety equipment 35 KX Kleingeh use Stahlblech KX small enclosures sh...

Page 36: ...ation of earthing cables to enable system compatible earthing where required for con guration purposes Potential equalisation between the enclosure and the mounting plate gland plate has been incorpor...

Page 37: ...ng because of low tempe ratures All components and surfaces are examined for external damage Steel enclosures are also inspected for traces of corrosion Any damage is repaired as follows Damage to sma...

Page 38: ...t lower than 10 C the relative humidity does not exceed 50 at 40 C Higher humidity levels are permitted at lower temperatures e g 90 relative humidity at 20 C Suitable measures should be taken to prev...

Page 39: ...0 600 250 1513 000 800 400 120 38 4 900 600 250 1514 000 150 150 80 1 8 200 100 50 1515 000 300 150 80 3 6 250 100 100 1516 000 200 200 80 3 2 350 200 100 1517 000 300 200 80 4 8 350 200 100 1518 000...

Page 40: ...7 2 0 200 100 50 1554 000 200 300 120 7 2 2 0 250 150 50 1555 000 300 300 120 10 8 2 0 250 150 50 1556 000 300 400 120 14 4 2 0 250 150 50 1557 000 200 500 120 12 0 2 0 250 150 50 1574 000 200 300 15...

Page 41: ...800 400 120 66 08 4 1514 000 150 150 80 66 08 4 1515 000 300 150 80 66 08 4 1516 000 200 200 80 66 08 4 1517 000 300 200 80 66 08 4 1518 000 400 200 80 66 08 4 1527 000 800 200 120 66 08 4 1528 000 2...

Page 42: ...Wysoko mm Tiefe Depth G boko mm IP 1 IK 2 Type NEMA 3 1550 000 200 400 120 66 08 4 1551 000 150 150 80 66 08 4 1552 000 200 300 80 66 08 4 1553 000 150 150 120 66 08 4 1554 000 200 300 120 66 08 4 155...

Page 43: ...300 120 54 46 37 1511 000 400 400 120 48 42 34 1512 000 600 400 120 68 57 47 1513 000 800 400 120 88 74 62 1514 000 150 150 80 9 8 6 1515 000 300 150 80 15 13 10 1516 000 200 200 80 13 12 9 1517 000...

Page 44: ...51 000 150 150 80 9 8 6 1552 000 200 300 80 19 17 13 1553 000 150 150 120 11 10 7 1554 000 200 300 120 23 20 15 1555 000 300 300 120 31 26 21 1556 000 300 400 120 39 33 26 1557 000 200 500 120 35 31 2...

Page 45: ...1658 Minyi Road Songjiang District Shanghai 201612 Phone 86 21 5115 7799 213 Fax 86 21 5115 7788 E mail service rittal cn 45 KX Kleingeh use Stahlblech KX small enclosures sheet steel Obudowy ma ogaba...

Page 46: ...46 KX Kleingeh use Stahlblech KX small enclosures sheet steel Obudowy ma ogabarytowe KX blacha stalowa Notizen Notes Notatki...

Page 47: ...47 KX Kleingeh use Stahlblech KX small enclosures sheet steel Obudowy ma ogabarytowe KX blacha stalowa Notizen Notes Notatki...

Page 48: ...e Software Services www rittal com contact Dane kontaktowe wszystkich sp ek Rittal na ca ym wiecie s dost pne poni ej RITTAL GmbH Co KG Auf dem Stuetzelberg 35745 Herborn Germany Telefon 49 2772 505 0...

Reviews: