Setup the Computer IP Address Configuration
Note
: The images used in these procedures are for Windows® 7.
1.
On the computer, click the Windows® Start button and select
Control
Panel
.
2.
View the
Control Panel
window by
Category
and click
Network and
Internet > View Network Status and Tasks
.
3.
Click the
Change Adapter Settings
link.
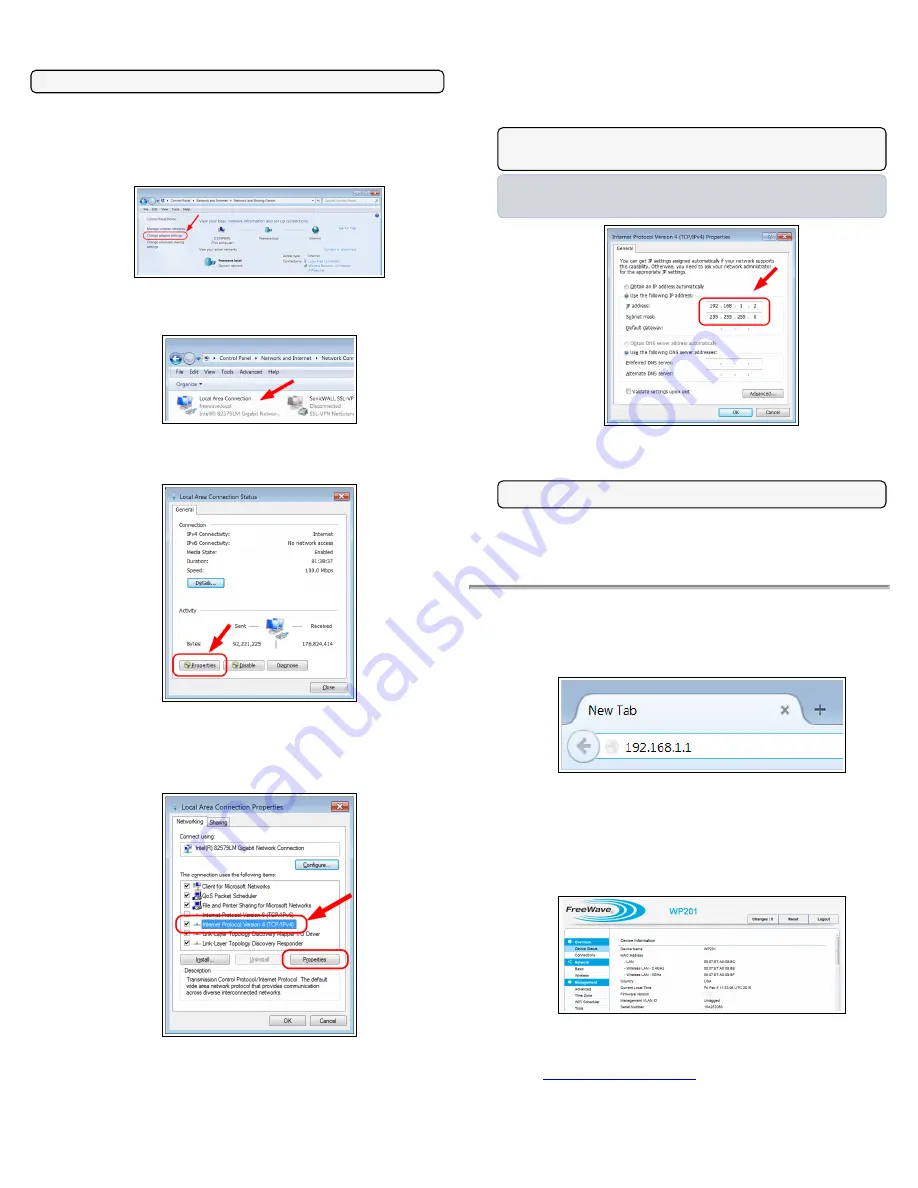
Figure 3: Change Adapter Settings Link
4.
Double-click the
Local Area Connection
link.
Figure 4: Local Area Connection Link
The
Local Area Connection Status
dialog box opens.
Figure 5: Local Area Connection Status dialog box
5.
Click
Properties
.
The
Local Area Connection Properties
dialog box opens.
6.
Select the
Internet Protocol Version 4 (TCP/IPv4)
option.
Figure 6: Local Area Connection Properties dialog box
7.
Click
Properties
.
The
Internet Protocol Version 4 (TCP/IPv4) Properties
dialog box
opens.
8.
Make a note of the current settings (to reverse this procedure later).
9.
Select the
Use the following IP address
option button.
10.
In the
IP Address
text box, enter an IP Address that is
in the same subnet range but a DIFFERENT IP Address
than the
WP201-100 AND
different than the computer
IP Address.
Note
: The default WP201-100 IP Address is
192.168.1.1
. The default
subnet mask is
255.255.255.0
.
Example
: Enter an
IP Address
from
192.168.1.1 to 192.168.1.254
(but NOT
192.168.1.1
) and the
Subnet Mask
to
255.255.255.0
.
Figure 7: Internet Protocol Version 4 (TCP/IPv4) Properties
dialog box
Note
: An IP Address is NOT required in the
Default Gateway
text box.
11.
Click
OK
to save the changes and close the dialog box.
12.
Click
Close
twice to close the
Local Area Connection Properties
and
Local Area Connection Status
dialog boxes.
Access the WP201-100
1.
On the computer connected to the WP201-100, open a web browser.
2.
In the address bar of the browser, enter the default WP201-100 IP Address:
192.168.1.1
.
Figure 8: Entered IP Address
3.
Press <Enter>.
The
Login
window opens.
4.
Enter the default
Username
and
Password
(
admin
for both) and click
Login
.
The
Device Status
window opens.
Figure 9: Device Status window - Device Information area
5.
Verify the WP201-100
Firmware
version is the current version available
from the
site.
QSG0027AA Rev Aug-2017
Page 2 of 4
Copyright © 2017 FreeWave


