background image

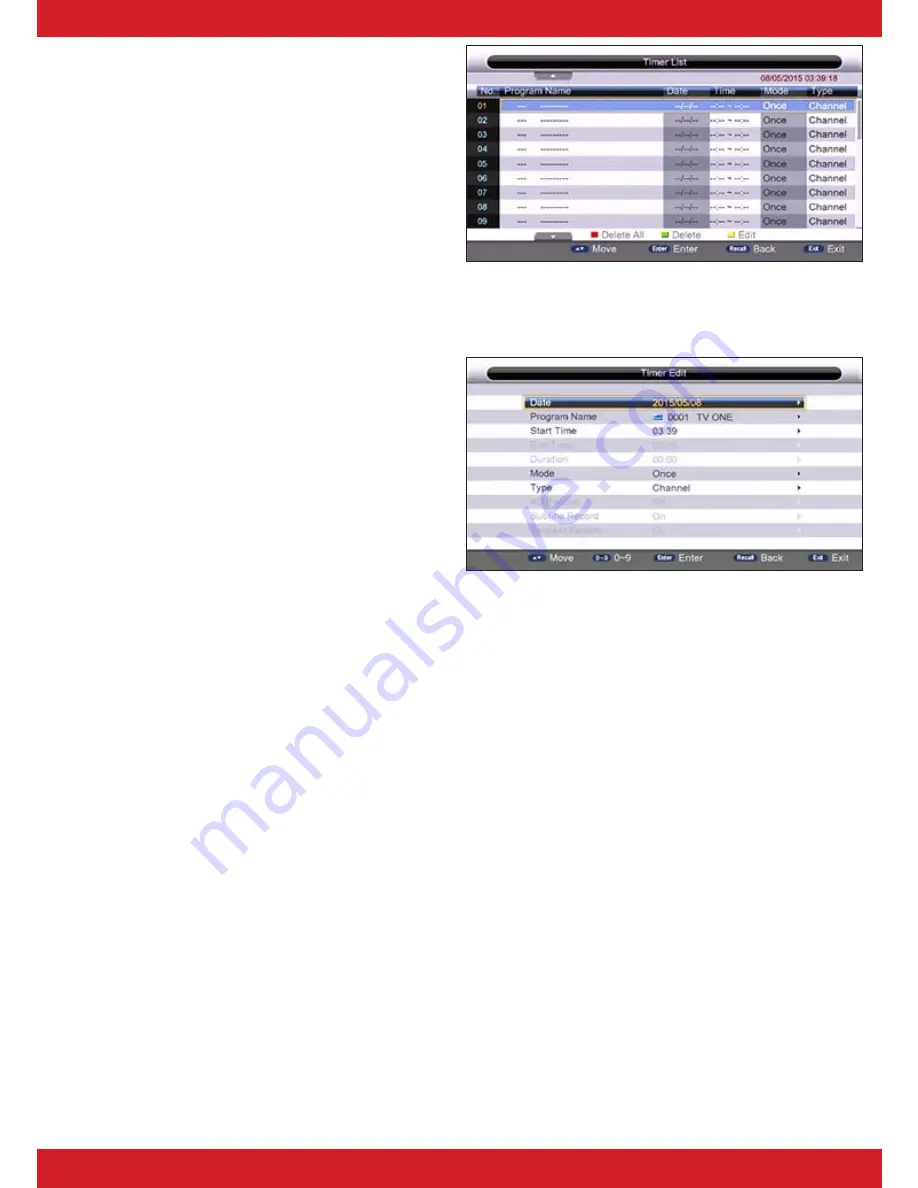
2.4.1 Timers

Menu>Setting>Timers

This option is used for multi-timer 

recordings or setting a channel 

to be displayed at a certain time 

etc...

RECORDING, 

requires an External 

USB Device to be connected.

Press 

<YELLOW>

 or 

<ok> 

to edit/

enter the timer window.

NOTE, 

make sure the 

<ok>

 key is 

pressed to save data or press the 

<exit> 

key to cancel setting timer. 

User can put unit into standby, 

and unit will turn on automatically

to start any set timer recordings.

Date: 

Select date you would like timer to begin.

Program Name: 

Select channel you would like recorded or displayed.

Start Time: 

Select time you wish timer to start.

End Time: 

This will change according to duration selected.

Duration: 

Select how long you wish the timer duration to be.

Mode: 

Select how often you wish timer to occur. The options are 

(Once, Daily, Weekly, Monthly).

Type: 

This will give you a choice of one of the following options...

On- When chosen the receiver will turn on at time and date selected.

Recorder- The receiver will start recording at time and date selected.

Channel- Receiver will change channel at time and date selected.

Standby-


Receiver will turn to standby at time and date selected.

Subtitle Recorder: 

When set to “ON”, subtitles will be included in the 

recording. As long as the program has subtitles available. Press the 

<subtitle>

 key on your remote to view subtitles during playback.

Teletext Record: 

When this option is set to “ON”, teletext will be in-

cluded in the recording.

Summary of Contents for T1000n

Page 1: ...User Manual T1000n...

Page 2: ......

Page 3: ...hoto 3 3 Music 4 1 Ways to Select Programs 4 2 Program Information 4 3 EPG 4 4 Audio 4 5 Subtitle 4 6 Recording 3 Media 2 1 1 Channel Filter 2 1 2 Country 2 1 3 LCN 2 1 4 Auto Search 2 1 5 Manual Sear...

Page 4: ...ect the power cord from being walked on or pinched particu larly at the plug receptacles and the point where they exit from the unit 7 Unplug this unit during lightning storms or when unused for long...

Page 5: ...Placement Avoid placing the unit in areas of Direct sunlight or heat sources High temperature over 35 C or high humidity over 90 3 Non use Periods When the unit is not being used turn it off When not...

Page 6: ...grade USB Device Connection 03 ANT IN UHF Aerial Input 04 LOOP OUT UHF Signal Output 05 COAXIAL Digital Audio Out 06 HDMI PORT High Definition Output 07 L R AUDIO Audio Output 08 COMPONENT Pb Pr Y for...

Page 7: ...tles 10 TTX Teletext 11 TIMESHIFT Starts Timeshift 12 GOTO Set time of playing for Media 13 PAUSE PLAY Program Playback 14 STOP Stop Program Playback 15 MUTE Toggle Sound On Off 16 INFO Information Wi...

Page 8: ...earch for channels NOTE Once search has finished a random channel will be shown 2 Main Menu 2 1 Installation Menu Installation Press menu for Main Menu Press ok on Installation Enter Password Default...

Page 9: ...rch Menu Installation Auto Search Press ok to select Auto Search A window will appear Highlight Yes and press ok to delete all channels and start channel search to re install Once search has finished...

Page 10: ...channel Default Password 0000 You will be asked to confirm select Yes to delete it SKIP Press YELLOW key to set SKIP status Press again to toggle off This channel will now be skipped when using CH CH...

Page 11: ...on screen window Range 0 60 1st Preferred Subtitle Select preferred default subtitle language 2nd Preferred Subtitle Select backup subtitle language incase 1st Preferred is not available Preferred Te...

Page 12: ...e This will change according to duration selected Duration Select how long you wish the timer duration to be Mode Select how often you wish timer to occur The options are Once Daily Weekly Monthly Typ...

Page 13: ...ns there is no Parental Lock If changed G PGR AO programs with the rating selected and above will require a password to be viewed Change Pin Code Change pass word Default Password 0000 2 4 3 Date Time...

Page 14: ...asted via the UHF transmitter The software will only be broadcast for a few weeks if a major update is needed 2 4 6 Version Menu Setting Version This is an information page only Here you can find your...

Page 15: ...io This is to set the output display shape Full Screen 16 9 Video Output Select either Composite or Component CVBS YUV Video Resolution This is where you set the output resolution depend ing on what y...

Page 16: ...vie option To access and browse through movies on the device Just select it to start Re cordings made are viewed here 3 2 Photo Press ok to start slideshow up down left right will change the orientati...

Page 17: ...n EPG Pressing the BLUE key will move you to the next day in EPG 4 4 Audio Press audio on your remote to enter the multi audio window Press left right to switch between options stereo left right To se...

Page 18: ...connections or adjust antenna position Factory default and try to re scan the channels Poor Picture Sound Quality Check there is nothing obstructing the UHF Antenna Due to bad interference in your are...

Page 19: ...tact your supplier and have your receipt of purchase on hand This warranty is subject to the following provisions This is only valid within New Zealand The product must be correctly connected and oper...

Page 20: ......

Reviews: