background image

23

These guidelines will help you to plan your exercise

program. For detailed exercise information, obtain a

reputable book or consult your physician. Remember,

proper nutrition and adequate rest are essential for

successful results.

EXERCISE INTENSITY

Whether your goal is to burn fat or to strengthen your

cardiovascular system, exercising at the proper inten-

sity is the key to achieving results. You can use your

heart rate as a guide to find the proper intensity level.

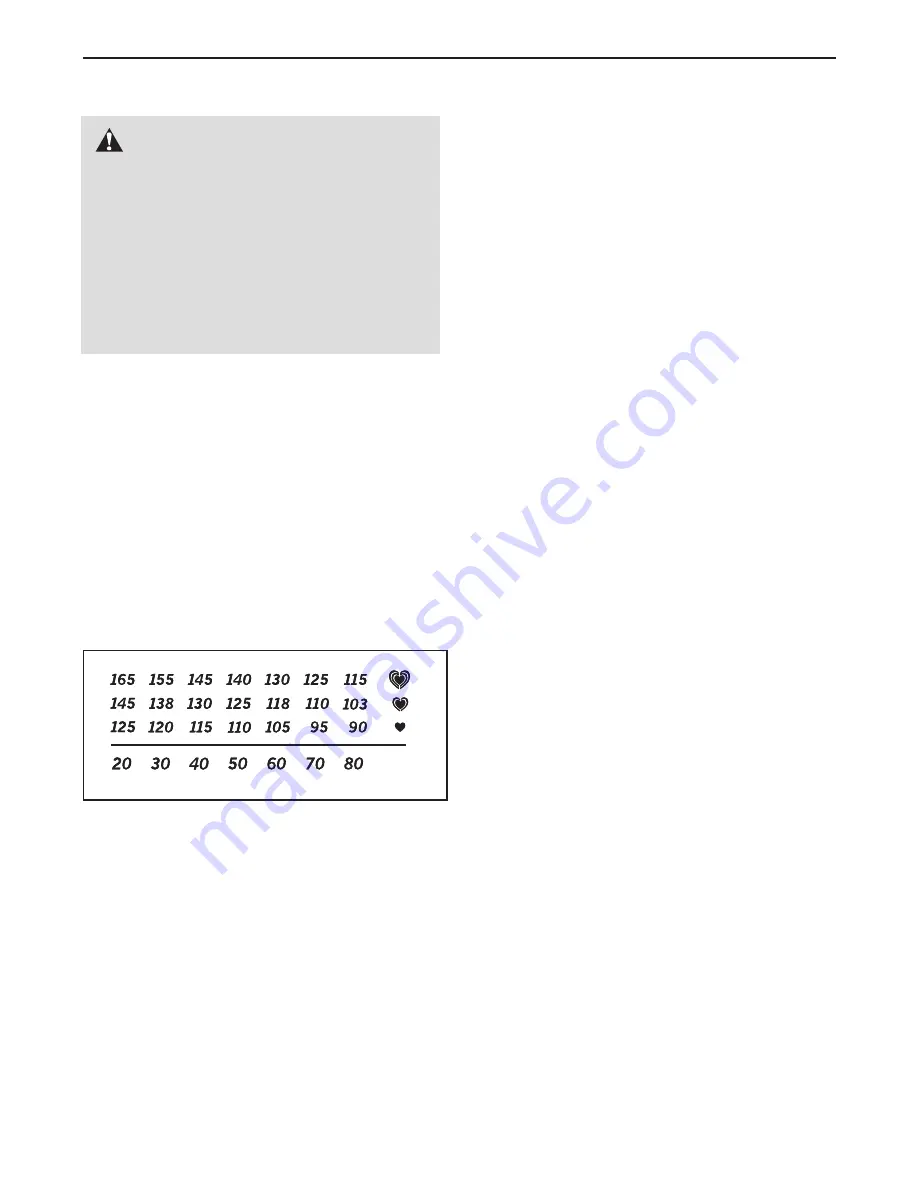
The chart below shows recommended heart rates for

fat burning and aerobic exercise.

To find the proper intensity level, find your age at the

bottom of the chart (ages are rounded off to the near-

est ten years). The three numbers listed above your

age define your “training zone.” The lowest number is

the heart rate for fat burning, the middle number is the

heart rate for maximum fat burning, and the highest

number is the heart rate for aerobic exercise.

Burning Fat

—To burn fat effectively, you must exer-

cise at a low intensity level for a sustained period of

time. During the first few minutes of exercise, your

body uses

carbohydrate calories

for energy. Only after

the first few minutes of exercise does your body begin

to use stored

fat calories

for energy. If your goal is to

burn fat, adjust the intensity of your exercise until your

heart rate is near the lowest number in your training

zone. For maximum fat burning, exercise with your

heart rate near the middle number in your training

zone.

Aerobic Exercise

—If your goal is to strengthen your

cardiovascular system, you must perform aerobic exer-

cise, which is activity that requires large amounts of

oxygen for prolonged periods of time. For aerobic ex-

ercise, adjust the intensity of your exercise until your

heart rate is near the highest number in your training

zone.

WORKOUT GUIDELINES

Warming Up

—Start with 5 to 10 minutes of stretching

and light exercise. A warm-up increases your body

temperature, heart rate, and circulation in preparation

for exercise.

Training Zone Exercise

—Exercise for 20 to 30 min-

utes with your heart rate in your training zone. (During

the first few weeks of your exercise program, do not

keep your heart rate in your training zone for longer

than 20 minutes.) Breathe regularly and deeply as you

exercise–never hold your breath.

Cooling Down

—Finish with 5 to 10 minutes of stretch-

ing. Stretching increases the flexibility of your muscles

and helps to prevent post-exercise problems.

EXERCISE FREQUENCY

To maintain or improve your condition, complete three

workouts each week, with at least one day of rest be-

tween workouts. After a few months of regular exer-

cise, you may complete up to five workouts each

week, if desired. Remember, the key to success is to

make exercise a regular and enjoyable part of your

everyday life.

EXERCISE GUIDELINES

WARNING:

Before beginning this

or any exercise program, consult your physi-

cian. This is especially important for persons

over age 35 or persons with pre-existing

health problems.

The pulse sensor is not a medical device.

Various factors may affect the accuracy of

heart rate readings. The pulse sensor is in-

tended only as an exercise aid in determining

heart rate trends in general.

Summary of Contents for FMEX3256P.1

Page 1: ...r and serial number in the space above CAUTION Read all precautions and instruc tions in this manual before using this equipment Keep this manual for future reference QUESTIONS If you have questions o...

Page 2: ...RTANT PRECAUTIONS 3 BEFORE YOU BEGIN 4 ASSEMBLY 5 HOW TO SET UP THE EXERCISE CYCLE 7 HOW TO UPGRADE THE CONSOLE 9 HOW TO USE THE BASIC CONSOLE 10 MAINTENANCE AND TROUBLESHOOTING 22 EXERCISE GUIDELINES...

Page 3: ...und your exercise cycle 5 Inspect and properly tighten all parts regu larly Replace any worn parts immediately 6 Keep children under age 12 and pets away from your exercise cycle at all times 7 Your e...

Page 4: ...the exercise cycle If you have questions after reading this manual please see the back cover of this manual To help us assist you note the product model number and serial number before contacting us T...

Page 5: ...ire A Tip Avoid pinching the wires Attach the Console 4 to the Upright 3 with six Console Screws 44 Console Wires Console Wires Pulse Wires Avoid pinching the wires 44 A 44 44 1 4 3 ASSEMBLY Assembly...

Page 6: ...the Upright While a second person holds the Upright 3 near the Frame 1 connect the console wires to the matching connectors on the frame wires Tip Avoid pinching the wires Slide the Upright 3 onto the...

Page 7: ...the rocking motion is eliminated HOW TO ADJUST THE SEAT For effective exercise the seat should be at the proper height As you pedal there should be a slight bend in your knees when the pedals are in...

Page 8: ...exercise cycle Connect a CATV cable from the coaxial output on your equipment usually labeled TV OUT or RF OUT to the cable jack Note Audio video equipment without coaxial outputs some satellite rece...

Page 9: ...es of the Basic console see page 10 To learn about the features of the Workout TV console see the user s manual included with the Workout TV console To upgrade your console and expand the capabilities...

Page 10: ...through an ef fective workout The console also offers two PULSE programs that automatically adjust the resistance of the pedals to keep your heart rate near a target level during your workouts Note Th...

Page 11: ...NSOLE If the power cord is not being used and if the ped als are not moved for a short period of time the con sole will automatically turn off If the power cord is being used and if the pedals are not...

Page 12: ...esti mated maximum heart rate The display will change from one number to the other every few seconds Speed RPM The right end of the main display will show your pedaling speed in miles per hour or kil...

Page 13: ...be resting on the upper contacts and your fingers must be touching the lower contacts Avoid moving your hands When your pulse is de tected the HEART RATE indicator above the main dis play will begin...

Page 14: ...you select a resistance setting higher than 8 the indicators in all columns will shift downward until you select a lower resis tance setting After every 30 seconds that you exercise a tone will sound...

Page 15: ...the left column of the matrix will flash During the last four seconds of the first segment the column to the right will also flash When the first segment ends a tone will sound and the column to the r...

Page 16: ...the left column of the matrix will flash During the last four seconds of the first segment the column to the right will also flash If the resistance of the ped als is about to change a series of tone...

Page 17: ...t the words CONSTANT MODE will appear in the main display If you plan to use the CON STANT PULSE program press the ENTER button If you plan to use the VARIABLE PULSE program press the or button beside...

Page 18: ...occurs see the instructions included with the chest pulse sensor 9 Follow your progress with the main display See THE MAIN DISPLAY on page 12 10 When you are finished using the exercise cycle the cons...

Page 19: ...ate the console See HOW TO ACTIVATE THE CONSOLE on page 11 2 Select the PLATEAU program To select the PLATEAU program press the PLATEAU button The indicator on the button will light and the word PLATE...

Page 20: ...le See HOW TO ACTIVATE THE CONSOLE on page 11 2 Select the desired program Press the FOOTHILLS PEAKS or ALL TERRAIN button The indicator on the button will light and the word FOOTHILLS PEAKS or ALL TE...

Page 21: ...a lan guage for the main display The main display can display text messages in English International English German Spanish Italian or French To change the language press the and buttons beside the EN...

Page 22: ...SELECTING A SYSTEM OF MEASUREMENT The console can display data using the standard system miles and pounds or the metric system kilometers and kilograms To change the system of measurement see step 7...

Page 23: ...our goal is to strengthen your cardiovascular system you must perform aerobic exer cise which is activity that requires large amounts of oxygen for prolonged periods of time For aerobic ex ercise adju...

Page 24: ...les Stretch With one leg in front of the other reach forward and place your hands against a wall Keep your back leg straight and your back foot flat on the floor Bend your front leg lean forward and m...

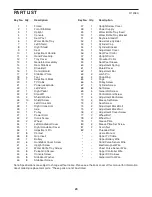
Page 25: ...Insert 50 1 Water Bottle Tray Bracket 51 2 Keyhole Standoff 52 1 Resistance Cylinder 53 1 Cylinder Cap 54 1 Cylinder Bracket 55 1 Adjustment Cover 56 1 Seat Post Collar 57 1 Upright Collar 58 1 Crossb...

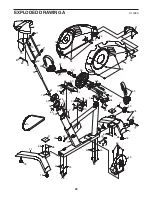
Page 26: ...20 21 22 23 27 28 29 30 32 32 33 33 36 51 52 53 54 55 56 57 58 59 60 61 62 63 64 64 65 65 65 66 66 67 68 68 69 70 71 71 73 73 74 75 76 76 77 77 78 46 46 45 45 45 45 26 26 26 17 68 68 70 24 39 25 25 25...

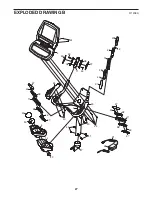
Page 27: ...27 3 4 6 11 11 11 12 34 35 37 37 37 37 37 37 38 38 38 38 38 38 47 48 49 50 43 43 43 43 43 43 42 41 41 40 40 44 44 11 37 37 38 38 43 43 31 EXPLODED DRAWING B R1208A...

Page 28: ...isted below Please note the model number serial number and name of the product see the front cover of this manual before contacting Customer Care If you are ordering replacement parts please also note...

Reviews: