background image

35

GB

5

5.4 Partitioning your FHD-1 under Windows XP / 2000

5.4.1 Deleting a partition on the FHD-1 under Windows XP / 2000

Delete a partition on the FHD-1 under Windows XP/2000

1. Click with the right mouse button on the "My Computer" icon on your

desktop.

2. Select the option "Manage".
3. Select the option "Storage" -> "Disk Management".
4. Choose your external hard drive and right-click on the partition.
5. Select "Delete Partition" and confirm by clicking on "Yes". The partition will

be deleted now.

5.4.2 Creating a partition on the FHD-1 under Windows XP / 2000

The following steps will guide you through the process of creating partitions on

your FHD-1. After this procedure your Freecom FHD-1 will be ready for use and

it will be allocated a drive letter.

1. Click with the right mouse button on the "My Computer" icon on your

desktop.

2. Select the option "Manage".
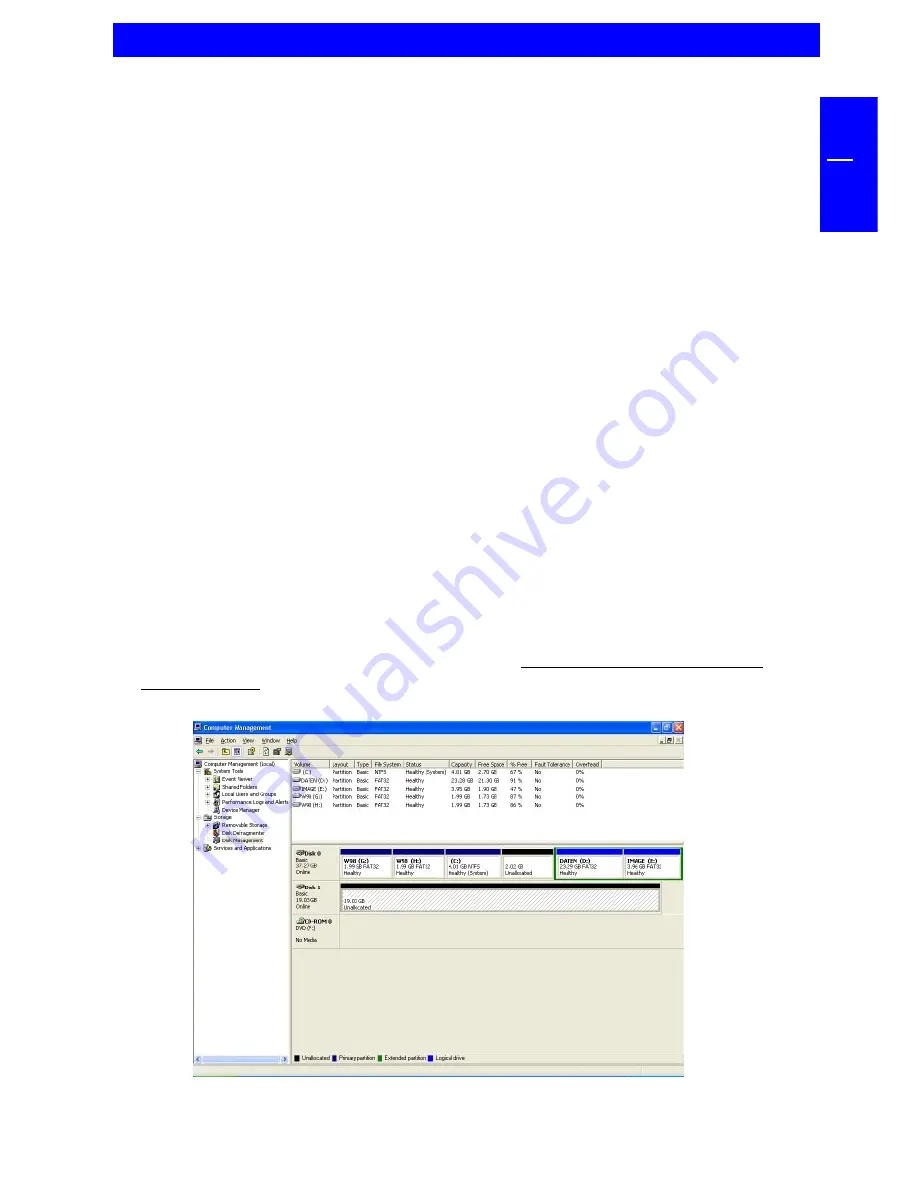
3. Select the option "Storage" -> "Disk Management".
4. Choose the hard disk, which is "unallocated". Ensure that the entire drive is

"unallocated".

Partitioning your FHD-1 under Windows XP / 2000

Summary of Contents for FHD-1

Page 1: ...www freecom com FHD 1 Rev 224 ...

Page 2: ...gthe FreecomFHD 1externalharddrive Foroptimaluse and performance we advise you to read this manual carefully before using this product Freecom Technologies Germany www freecom com Contents of the box Please check the contents of the box the following items should be included Freecom FHD 1 external USB 2 0 hard drive Power Adapter Freecom Cable II USB 2 0 CD ROM with manual driver and application s...

Page 3: ...age 6 CHAPTER 1 Installation of the Freecom SYNC software page 8 CHAPTER 2 Hardware installation page 10 CHAPTER 3 Driver installation only Windows 98 SE page 12 CHAPTER 4 Daily use of the FHD 1 with Freecom SYNC software page 14 CHAPTER 5 Partitioning your FHD 1 page 28 CHAPTER 6 Troubleshooting page 41 Freecom Internet Service Support Hotline page 42 ...

Page 4: ... or higher CD ROM drive for installing drivers and or software Available USB 2 0 or USB 1 1 port USB2 0isdownwardscompatibletoUSB1 1 Toachieveoptimalperformance from the Freecom FHD 1 your PC should be equipped with an USB 2 0 port USB 2 0 PCI Host Controllers are separately available at www freecom com Internet connection for online warranty registration and driver software updates and downloads ...

Page 5: ...t with the electronics within the drive enclosure it will damage the drive and will cause the drive to malfunction Do not use the FHD 1 in a dusty environment Dust inside the enclosure may damage the internal electronics and result in drive malfunction Only use the power adapter that was supplied with the FHD 1 Opening the FHD 1 will void the warranty Note SinceUSB2 0isbackwardscompatiblewithUSB1 ...

Page 6: ...ayback and all applications that need fast file access Foryourconvenience theFreecomFHD 1hasbeenpartitioned 1partition and pre formatted FAT32 file system The FAT32 format ensures maximum interchangeability of the FHD 1 between different computers Should you choose to format the FHD 1 in another file system e g NTFS please be aware ofpossibleproblemswhenconnectingtheFHD 1toanothercomputerthanthe o...

Page 7: ...tact your local Freecom reseller dealer Recommended sequence of installation 1 Install Freecom SYNC software 1 Connectallcablestothedriveandplugthepowersupplyunitintothesocket Plug the Freecom Cable II USB 2 0 into a USB slot of your computer 2 Install all necessary drivers under Windows 98 SE Under Windows ME 2000 XP a separate Freecom driver is not required 5 Creating a SYNC folder with Freecom ...

Page 8: ...eselect SoftwareInstallation and click on Freecom SYNC 1 0 Follow the instructions on the screen please select Next to continue installation 2 Please read the license agreement carefully If you accept the license agreementpleaseselect Yes NOTE Selecting No willcancelinstallation Choose the destination folder and the program folder in the start menu you want the SYNC icon to appear Thedefaultdestin...

Page 9: ...s taskbar It is recommended to select both options in order to improve the usabilityofFreecomSYNC1 0 Select Next tostartinstallationandcopyall necessary program files to your computer s hard drive 4 In the last window you are requested to choose if you want to start Freecom SYNC 1 0 It is recommended to select this option in order to configure your Freecom FHD 1 Please select Finish ...

Page 10: ...lower than when the drive is connected to a USB 2 0 port For optimal performance the FHD 1 should always be connected to a USB 2 0 port Freecom USB 2 0 PCI Host Controllers are available at www freecom com 1 Connect the large 36pin connector of the Freecom Cable II USB 2 0 to the FHD 1 2 Connect the cable of the power supply to the FHD 1 and the power supply itself to the socket 3 Connect the USB ...

Page 11: ...YourFreecomFHD 1isfullybackwardscompatible with USB 1 1 Creating a SYNC folder 1 After the installation of the FHD 1 is finished the Freecom SYNC folder will be created automatically If not please refer to chapter 4 3 page 16 Creating a new SYNC folder 2 Freecom SYNC uses the Microsoft Briefcase to synchronize files between computer and FHD 1 A window with some brief information about the Microsof...

Page 12: ...anual and driver CD into the CD ROM drive 2 Connect your Freecom FHD 1 to the USB connector of your notebook or computer 3 The AddNewHardwareWizard opensanda USB2 0Device USB2 0PCI Host Controller or a USB2 IDE Controller USB 1 1 connector is found Click on Next 4 In the next window select Search for the best driver for your device Recommended Click on Next 5 Make sure that the checkbox CD ROM dri...

Page 13: ...r 1 After the installation of the FHD 1 is finished the Freecom SYNC folder will be created automatically If not please refer to chapter 4 3 page 16 Creating a new SYNC folder 2 Freecom SYNC uses the Microsoft Briefcase to synchronize files between computer and FHD 1 A window with some brief information about the Microsoft Briefcase appears Please read the information carefully and refer to the Wi...

Page 14: ...oftware is installed on your computer Please refer to chapter 1 Installation of the Freecom SYNC software for software installation instructions Status of LEDs The Freecom FHD 1 has three blue front LEDs to indicate its status LED1 TheLED1ontheleftfrontsideoftheFreecomFHD 1indicatesthataread or write access takes place SYNC LED The SYNC LED located in the SYNC button shows the status of the Freeco...

Page 15: ...0isasoftwarefordatasynchronization Forthis onecomputer serves as data source Data can be edited on as many computers as you like The data synchronization will always be made between source computer and the Freecom FHD 1 Example Youcreateadocumentatworkandwanttoworkonitathome FreecomSYNC 1 0 is installed on your PC at work CopythedocumentfromthePCatworktoyourFreecomSYNCfolderonyour FHD 1 Connectthe...

Page 16: ... SYNC 1 0 will start automatically If for any reason the software should not start please press the SYNC button on the FHD 1 Alternatively you can choose Config in the context menu of the SYNC icon in the Windows taskbar To open the context menu please click with the right mouse button on the SYNC icon in the Windows taskbar 3 Select Create SYNC folder ...

Page 17: ...o create the folder 5 FreecomSYNCusestheMicrosoftBriefcasetosynchronizefilesbetweenyour computer and FHD 1 A window with some brief information about the Microsoft Briefcase appears Please read the information carefully and refer to the Windows Help function for further information on using Microsoft Briefcase Click on Finish to finish creating the SYNC folder Afterwards the Freecom SYNC folder op...

Page 18: ...ly be selected if a SYNC folder is available It can be used to open a SYNC folder from a Freecom FHD 1 5 Delete SYNC folder this button can only be selected if a SYNC folder is available It can be used to delete a SYNC folder and all its contents If you select Delete SYNC folder all data in the SYNC folder will be lost The deleted folder will be moved to the Recycle Bin The original files on your ...

Page 19: ...rhomeorontheroad 4 4 1 Reconnecting the FHD 1 If you have used the FHD 1 following message appears when reconnecting the FHD 1 dependingonoperatingsystemused Windows98SEdoesnotshowthis message You can immediately work with the FHD 1 and Freecom SYNC 4 4 2 Selecting files or folders for synchronization Pleasefollowtheseinstructionsforselectingfilesorfoldersforthesynchronization process Method 1 1 S...

Page 20: ... the right mouse button on the selected items and select Copy 2 OpentheFreecomSYNCfolderontheFHD 1e g withtheWindowsExplorer Now paste the items into the folder The files are copied into the Freecom SYNC folder and are ready for synchronization 4 4 3 Usage of the SYNC folder with other computers PleasefollowtheseinstructionsifyouwanttousetheSYNCfolderwithanother second computer Allfilesyouwanttowo...

Page 21: ...ter 2 Press the SYNC button or open the context menu on the SYNC icon in the taskbar and click on Start synchronization 3 A status window appears and the SYNC LED on the FHD 1 starts blinking Please select Update if you wish to synchronize the file or otherwise select Cancel If you choose not to synchronise the file Cancel you will be able to synchronize this file during the next synchronization S...

Page 22: ...anttoskipjustonefileoutofmany pleaseclickonthisfilewiththeright mouse button and select Skip The green arrow next to the selected file changestoablueone indicatingthatthisfilewillnotbesynchronized Youwill be able to synchronize this file during the next synchronization ...

Page 23: ...o proceed If you wish to keep the file please click with the right mouse button on the file and select Don t Delete The file will not be deleted and will be disregarded during the next synchronization IfyouwanttodeleteafileoneithertheprimarycomputerorintheSYNCfolder anddonotwanttoaffectitscounterpart itisnecessaryto SplitFromOriginal the files Please follow the instructions 1 Select the file or fo...

Page 24: ...24 FREECOM FHD 1 GB 4 3 Select Update and Split From Original 4 Select Yes You can delete the file without affecting its counterpart during the next synchronization ...

Page 25: ...ffice use Have you ever had doubts storing your data on the network of your company only Sure thereisalwaysabackupoftheserverbutdoyoureallyfeelgoodwith this remote backup TheFHD 1isidealformakingalocalbackup whichstores yourdataindependentlyfromyournetworkorlocalcomputer Simply sendto yourimportantfilesanddirectoriestotheSYNC folderontheFHD 1andupdate your backup from time to time by pressing just...

Page 26: ...olders you want to copy to the SYNC folder Click with the right mouse button on the files and folders and select Send to SYNC folder Done Now all your valuable data has been copied to the FHD 1 Every time you push the SYNC button all changed or added deleted files and folders from the selected folders will be synchronized with the data on the FHD 1 ...

Page 27: ... single button This is extremely easyandveryfast becausetheSYNC toolonlybackupschangedfilesviathefast USB 2 connection And all your memories are safe This is what you have to do Follow the instruction in the manual to install the FHD 1 and the SYNC folder Mark the files and folders you want to copy to the SYNC folder Click with the rightmousebuttononthefilesandfolders whichcontainthepicturesorvide...

Page 28: ...ur needs 5 2 File System features Please refer to the tables below for an overview File systems supported by different operating systems FAT FAT32 NTFS Windows 98SE yes yes not supported Windows ME yes yes not supported Windows 2000 yes yes yes Windows XP yes yes yes Maximum size of a partition FAT FAT32 NTFS Windows 98SE 2 GB 60 GB 1 2 n a Windows ME 2 GB 2 TB 2 n a Windows 2000 4 GB 3 32 GB 16 T...

Page 29: ...th Windows 98SE ME PCs For storing the data under Windows 2000 XP both partitions can be used As the NTFS file system is not recognized by Windows 98SE ME data to be used on these operating systems must be stored on the FAT32 partition Please follow the steps below to adapt the FHD 1 for your needs Example for different partitions with different file systems on one FHD 1 File system Total size of ...

Page 30: ...Change current fixed disk drive by pressing 5 and Return 6 Select the hard disk to be deleted by its number ATTENTION Please make sure that the correct drive is selected Selecting the wrong drive will lead to a loss of your data 7 ChooseOption 3 DeletepartitionorLogicalDOSDrive bypressing 3 and Return 8 Your FHD 1 comes formatted as primary partition Select option 1 Delete Primary DOS Partition by...

Page 31: ...elect Run 3 Enter fdisk and confirm with OK 4 Answerthequestion Doyouwishtoenablelargedisksupport bypressing the Return key FAT32 is now activated 5 Choose Option 5 Change current fixed disk drive by pressing 5 and Return 6 Select the hard disk by its number where the Usage contains no value but onlyapercentsymbol Selectthenumberofthecorrespondingharddiskand confirm by pressing the Return key Now ...

Page 32: ... is completely checked 9 If only one partition is required then answer Y to the question Do you wish to use the maximumavailable size for a Primary DOS partition If more than on partition is required go to the next section Create two or more partitions on the FHD 1 under Windows 98 Windows ME Now the whole disk will be partitioned as one primary partition Wait until the drive integrity check is co...

Page 33: ...rtition or Logical DOS drive by pressing 1 and confirm with Return 6 Select Option 2 Create Extended DOS Partition by pressing 2 and confirm with Return Wait until the drive integrity check is completed 7 Enter either the size or a percentage value for the partition size or press Return to accept the default value 8 Press ESC to return and wait until the drive integrity check is completed 9 Alogic...

Page 34: ...at the correct drive is selected 5 Confirm the next message with OK 6 Afterformattingisfinishedyoucanperformadiskscan Todoso followthe instructionsoftheWindowsHelpsystem Ifyoudon twanttoscanyourdisk just close the message window Repeatthesestepsforeachpartitionifmorethanonepartitionwascreated 7 After partitioning your FHD 1 the Freecom SYNC folder is deleted To create a new SYNC folder simply run ...

Page 35: ...eletePartition andconfirmbyclickingon Yes Thepartitionwill be deleted now 5 4 2 Creating a partition on the FHD 1 under Windows XP 2000 Thefollowingstepswillguideyou through theprocessofcreatingpartitionson your FHD 1 After this procedure your Freecom FHD 1 will be ready for use and it will be allocated a drive letter 1 Click with the right mouse button on the My Computer icon on your desktop 2 Se...

Page 36: ...eate Partition Wizard The New Partition Wizard opens Click on Next 6 Select Primary partition and click on Next 7 Now you can adjust the size of your partition Click on Next if only one partition is to be created See next chapter Creating two or more partitions on the FHD 1 under Windows XP 2000 how to create more than one partition ...

Page 37: ...ormatting option Choose either FAT32 or NTFS the Allocation Unit Size should remain on Default Finally select Perform Quick Format and click on Next 10 Clickon Finish tocompletethepartitioningofyourFHD 1 YourFHD 1will be formatted now and is ready to use afterwards Creating a partition on the FHD 1 under Windows XP 2000 ...

Page 38: ...use button on the My Computer icon on your desktop 3 Select the option Manage 4 Select the option Storage Disk Management 5 Right click on the unallocated space of your FHD 1 and select the option New partition Windows 2000 Create partition The New Partition Wizard Windows2000 CreatePartitionWizard opens Clickon Next 6 Select Extended partition and click on Next 7 Now you can adjust the size of yo...

Page 39: ...39 GB 5 Creating two or more partitions on the FHD 1 under Windows XP 2000 8 Click on Finish to create the Extended partition The unallocated space now changed to Free space ...

Page 40: ...ion Choose either FAT32 or NTFS the Allocation Unit Size should remain on Default Finally select Perform Quick Format and click on Next 14 Click on Finish to complete partitioning Your partition will be formatted now and is ready to use 15 After partitioning your FHD 1 the Freecom SYNC folder is deleted To create a new SYNC folder simply run Freecom SYNC or press the SYNC button on your FHD 1 Sele...

Page 41: ...nough memory on the target drive FHD 1 during synchronization Solution Install the Freecom SYNC 1 0 software and safely remove and reconnect the FHD 1 Follow the instructions on chapter 4 3 Creating a new SYNC folder ConnecttheFreecomFHD 1toyour computer Checkallconnectionsbetweenthe Freecom FHD 1 the power supply and the computer Safely remove and reconnect the Freecom FHD 1 You have to Split Fro...

Page 42: ...om Schweiz D 41 0 8 48 88 99 10 supportde freecom com Suisse F 41 0 8 48 88 77 10 supportfr freecom com Suomessa 03 6 10 13 82 supportint freecom com Sverige 08 29 66 00 supportint freecom com United Kingdom Ireland 44 0 14 23 70 47 15 supportuk freecom com other countries 31 0 1 58 88 01 10 supportint freecom com alléén in België seulement pour la Belgique nur in Belgien If possible try to call f...

Reviews: