background image

36

Freecom Hard Drive

GB

6

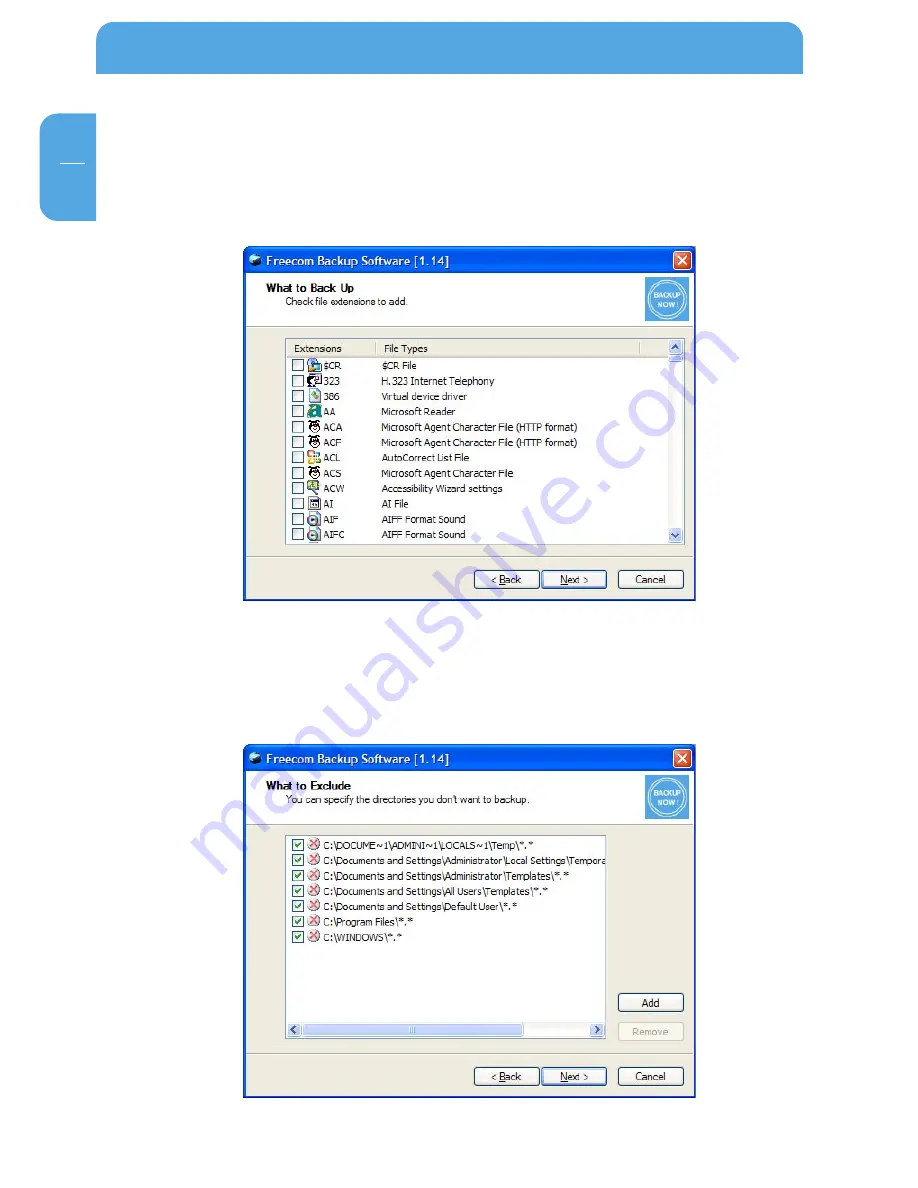
6.1.10 Add extensions

When you click on "Add" a list of all known file types is displayed. Select the file types
you need. In case the file name extension you are looking for is not on the list, then
you can define it yourself. For this go to the end of the list and select "Click here to
add your own extension".

6.1.11 Folders that should not be backed up

In the following window you can exclude folders from being backed up. By default
various folders of the system drive are selected. Click the "Add" button to add a fur-
ther directories. To remove directories from the list, select the directory to be omitted
and then click on "Remove".

Then click on "Next".

Summary of Contents for 3.5 " / USB 2.0 / ESATA

Page 1: ...Rev 604 MANUAL HARD DRIVE EXTERNAL HARD DRIVE 3 5 USB 2 0 WIN MAC...

Page 2: ...erved The products named in this manual are only used for identification purposes and may be trademarks or registered trademarks of the respective companies This device was designed for home or office...

Page 3: ...allation page 12 Chapter 3 Driver installation page 14 Chapter 4 Daily use of the Freecom Hard Drive with Freecom Personal Media Suite software PC page 14 Chapter 5 The User Interface of the Freecom P...

Page 4: ...software Available USB 2 0 or USB 1 1 port Internet connection for online warranty registration and driver software updates and downloads Software Requirements Windows 2000 Windows XP Mac iMac iBook...

Page 5: ...e liquids or drinks on the Freecom Hard Drive When liquids are spilled and get in contact with the electronics within the drive enclosure it will damage the drive and will cause the drive to malfuncti...

Page 6: ...eecom Hard Drive between different computers Should you choose to format the Freecom Hard Drive in another file system e g NTFS please be aware of possible problems when connecting the Freecom Hard Dr...

Page 7: ...om Hard Drive has to be con nected to your PC 1 1 Installation of the Freecom Personal Media Suite 1 Insert the Freecom Hard Drive Software Manual CD into your CD drive The Freecom start menu opens In...

Page 8: ...Clicking on No ends the installation Select the target folder and program folder in the start menu in which the Freecom Personal Media Suite symbol is to appear 4 Default target folder is C Programs...

Page 9: ...m files are now written on the hard drive of your computer 7 In the last window you will be asked whether you want to start Freecom Personal Media Suite now It is recommended to select this option so...

Page 10: ...read the licensing agreement carefully To accept the licensing agreement confirm with Yes Note Clicking on No ends the installation Select the target folder and program folder in the start menu in whi...

Page 11: ...later then remove the check mark at Start Freecom Backup Software and then click on Finish 1 4 Uninstallation of the Freecom Backup Software In order to remove the Freecom Backup Software from your c...

Page 12: ...er supply to the Freecom Hard Drive and the power supply itself to the socket 3 Connect the interface cable to the interface port of your computer 4 Switch on the Freecom Hard Drive SinceUSB2 0isbackw...

Page 13: ...nnected from your computer Therefore please turn off the Freecom Hard Drive if it is not used This saves power and increases the lifetime of the hard disk The power switch is on the back side of the F...

Page 14: ...speed data transfer through the USB 2 0 interface makes it ideally suitable for data storage file sharing backup archiving audio playback and all applications that need fast file access 4 1 Daily use...

Page 15: ...er information about your Freecom Hard Drive 7 Quick Help for Freecom Personal Media Suite 8 Minimizes Freecom Personal Media Suite in the system tray 5 1 Configuration Toopentheconfigurationmenu plea...

Page 16: ...you were working on MP3 play lists your favourite film and much more These files do not have to be on your Freecom Hard Drive for this 5 2 1 Adding files folders 1 Open the Freecom Personal Media Suit...

Page 17: ...olders 1 Open the Freecom Personal Media Suite and select the tab Secure Compress 2 Click on Change folder and select the folder on your Freecom Hard Drive whose content is to be compressed and encryp...

Page 18: ...e Compress folder using the drag drop function Each file is now compressed and then encrypted 3 The first time you will be requested to enter and confirm a password Select Save password on this comput...

Page 19: ...is carried out whether you really want to delete the folder 5 3 6 Changing the password 1 Open the Freecom Personal Media Suite and select the tab Secure Compress 2 Click on Change password The follo...

Page 20: ...omputerservesasoriginofthedata Thisdatacanbeprocessed on any number of other computers Example Youcreateadocumentatworkandwanttoworkonitathome FreecomPersonalMedia Suite is installed on your PC at wor...

Page 21: ...ar youcanalsoopentheSYNCfolderthrougharight clickonthetaskbar symbol of the Freecom Personal Media Suite 5 4 4 Adding files into the SYNC folder 1 Open the SYNC folder 2 Pull the respective files or f...

Page 22: ...ve is connected to your computer For this please proceed as follows a Open the Freecom Personal Media Suite and click on the tab Freecom SYNC b Select a SYNC folder if you have not yet done so c Activ...

Page 23: ...derwithanother second computer All files you want to work with on another computer have to be opened directly out of the Freecom SYNC folder You should not copy them to another hard disk as this might...

Page 24: ...to synchronize this file during the next synchronization 5 4 10 Skip files during synchronization If you want to skip just one file out of many please click on this file with the right mouse button an...

Page 25: ...ish to keep the file please click with the right mouse button on the file and select Don t Delete The file will not be deleted and will be disregarded during the next synchronization If you want to de...

Page 26: ...26 Freecom Hard Drive GB 5 3 Select Update and Split From Original 4 Select Yes...

Page 27: ...lyourbusinessdataavailable Simplyclick Syncnow beforeyouleavetheoffice and you are always up to date and can work with the data on the Freecom Hard Drive The Freecom Hard Drive provides a vast amount...

Page 28: ...ndupdateyourbackupfromtimetotime click Sync now This is extremely easy and very fast because the SYNC tool only backups changed files via the fast USB 2 0 connection And all your memories are safe Cop...

Page 29: ...as well as data or data types individually specified by the user This can be carried out as a full backup or in incremental backups to save time There are two user interfaces available 1 The Wizard M...

Page 30: ...the My Documents folder Internet Favour ites as well as the desktop of the logged in user 2 Alldocumentsandsettingsonthiscomputer backsupthefilesofallusersonyour computer 3 Letmechoosewhattobackupgiv...

Page 31: ...nd settings on this computer and then click on Next A list of available Freecom drives is displayed then Select the drive to which you want to back up your data You can open the advanced backup option...

Page 32: ...sting backup set is opened and only that data is backed up that has been created or modified since the last backup An incremental backup is significantly faster than a full backup because not all data...

Page 33: ...backup 6 1 6 Backup While the backup is in progress a window is displayed showing the status of the backup A bar indicates the progress of the backup Furthermore the number of backed up files and the...

Page 34: ...8 Select drives This window lists the drives from which a backup can be made By clicking on Add you can select further folders With Remove you can take folders drives from the list All the drives or f...

Page 35: ...select which types of files should be backed up This prevents unwanted files such as temporary files from being backed up Alistofthemostcommonfilestypesispresented Clickthe Add buttontoaddafurther fil...

Page 36: ...e it yourself For this go to the end of the list and select Click here to add your own extension 6 1 11 Folders that should not be backed up In the following window you can exclude folders from being...

Page 37: ...p While the backup is in progress a window is displayed showing the status of the backup A bar indicates the progress of the backup Furthermore the number of backed up files and the total size of the...

Page 38: ...Mode 6 2 1 Select source In Source the source drives or folders can be specified from which a backup should be made 6 2 2 File types to back up extensions File types can be selected in the Files windo...

Page 39: ...ppending data backup are available 1 Full backup means that at every backup a new directory is created with all data to be backed up 2 Incremental backup means that an already existing backup set is o...

Page 40: ...d not be included in the backup Click on Backup Now to start the backup 6 2 6 Backup While the backup is in progress a window is displayed showing the status of the backup A bar indicates the progress...

Page 41: ...ightfitbetterfortheirneeds Thismanualdescribes currentlimitationsofmostcommonfilesystemsandInstructionstoenableyoutoadapt the Freecom Hard Drive to your needs 7 2 File System features Please refer to...

Page 42: ...ows XP 2000 1 Click with the right mouse button on the My Computer icon on your desktop 2 Select the option Manage 3 Select the option Storage Disk Management 4 Choose your external hard drive and rig...

Page 43: ...lick with the right mouse button on the unallocated area and select the option New Partition Windows 2000 Create Partition Wizard The New Partition Wizard opens Click on Next Partitioning your Freecom...

Page 44: ...size of your partition Click on Next if only one partition is to be created See next chapter Creating two or more partitions on the Freecom Hard Drive under Windows XP 2000 how to create more than on...

Page 45: ...UnitSize should remain on Default Finally select Perform Quick Format and click on Next 10 Click on Finish to complete the partitioning of your Freecom Hard Drive Your Freecom Hard Drive will be forma...

Page 46: ...he right mouse button on the My Computer icon on your desktop 3 Select the option Manage 4 Select the option Storage Disk Management 5 Right click on the unallocated space of your Freecom Hard Drive a...

Page 47: ...47 GB 7 8 Click on Finish to create the Extended partition The unallocated space now changed to Free space Partitioning your Freecom Hard Drive...

Page 48: ...Logical drive is already selected Click on Next 11 Specify the partition size and click on Next 12 Assign a drive letter and click on Next 13 Select the formatting option Choose either FAT32 or NTFS t...

Page 49: ...ility This can be found in Applications Utilities 2 Click on the tab Partition Here you can setup the partition settings and partition the drive according to your settings Detailed information how to...

Page 50: ...m Hard Drive can be read but not written Solution Install the Freecom Personal Media Suite software and safely remove and reconnect the Freecom Hard Drive Followtheinstructionsonchapter5 4 2 Creating...

Page 51: ...re programs data or removable storage media c any damage resulting from adaptations changes or adjustments which may have been made to the product without the prior written consent of Freecom d attemp...

Reviews: