background image

12

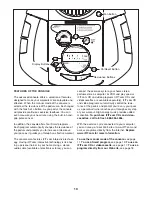
To reset the displays, press the On/Reset button.

Note: The con-
sole can show
speed and dis-
tance in either
miles or kilo-
meters. 

The let-

ters MPH or KM/H will appear in the lower section
of the large display to show which system of mea-
surement is selected. To change the system of
measurement, hold down the On/Reset button for
about six seconds. Note: When the button is held
down, the fan will turn on for a moment. When the
batteries are replaced, it may be necessary to res-
elect the desired system of measurement.

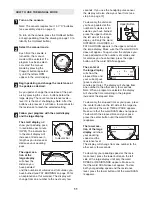
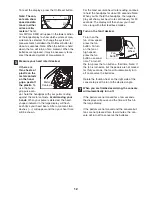
Measure your heart rate if desired.

If there are
thin sheets of
plastic on the
metal contacts
on the hand-
grips, peel off
the plastic. 

To

use the hand-
grip pulse sen-
sor, hold the handgrips with your palms resting
against the metal contacts. 

Avoid moving your

hands.

When your pulse is detected, the heart-

shaped indicator in the large display will flash
each time your heart beats. After a moment, two
dashes (– –) will appear and then your heart rate
will be shown.  

For the most accurate heart rate reading, continue
to hold the handgrips for about 30 seconds. Note:
When you first hold the handgrips, the large dis-
play will show your heart rate continuously for 30
seconds. The display will then show your heart
rate along with other feedback modes.  

Turn on the fan if desired.

To turn on the
fan at low speed,
press the fan
button. To turn
on the fan at
high speed,
press the fan
button a second
time. To turn off
the fan, press the fan button a third time. Note: If
the fan is turned on but the pedals are not moved
for thirty seconds, the fan will automatically turn
off to conserve the batteries. 

Rotate the thumb wheel on the right side of the
console to pivot the fan to the desired angle.     

When you are finished exercising, the console
will automatically turn off.

If the pedals are not moved for a few seconds,
the displays will pause and the time will flash in
the large display. 

If the pedals are not moved and the console but-
tons are not pressed for a few minutes, the con-
sole will turn off to conserve the batteries.  

7

6

5

Metal

Contacts

Thumb

Wheel

Fan

Button

Summary of Contents for 831.300270

Page 1: ...al for future reference Serial Number Decal Model No 831 300270 Serial No If you are MISSING PARTS or require INFORMATION on how to operate this product call 1 888 936 ICON 1 888 936 4266 To schedule...

Page 2: ...IONS 3 BEFORE YOU BEGIN 4 ASSEMBLY 5 HOW TO OPERATE THE EXERCISE CYCLE 9 MAINTENANCE AND TROUBLESHOOTING 19 CONDITIONING GUIDELINES 20 PART LIST 22 EXPLODED DRAWING 23 HOW TO ORDER REPLACEMENT PARTS B...

Page 3: ...vice Various factors including the user s move ment may affect the accuracy of heart rate readings The pulse sensor is intended only as an exercise aid in determining heart rate trends in general 11 A...

Page 4: ...l our manufac ture s Customer Service Department toll free at 1 888 936 4266 Monday through Friday 8h00 until 18h30 eastern time excluding holidays To help us assist you please note the product model...

Page 5: ...mbly The number in parenthesis below each drawing refers to the key number of the part from the PART LIST on page 22 The second number refers to the quantity needed for assembly Note Some small parts...

Page 6: ...Upright 13 in the position shown connect the Upper Wire Harness 36 to the Lower Wire Harness 35 Carefully pull the upper end of the Upper Wire Harness to remove any slack from the Wire Harnesses make...

Page 7: ...ar 51 into the Left Handlebar Connect the Handlebar Collars the Left Handlebar and the Right Handlebar with two M4 x 16mm Screws 66 Attach the Handlebar Bracket 15 to the Left and Right Handlebars 50...

Page 8: ...kept tight ened Adjust the Left Pedal Strap 25 to the desired position and press the end of the Pedal Strap onto the tab on the Left Pedal 24 Adjust the Right Pedal Strap not shown in the same way 9 2...

Page 9: ...urns to loosen it if the knob is not loosened enough it may scratch the seat bracket Next pull the knob slide the seat to the desired position and then release the knob Move the seat bracket forward a...

Page 10: ...io cable available at electronics stores you can connect the exercise cycle to your home stereo portable stereo computer or VCR and play special iFIT com CD and video programs iFIT com CDs and videoca...

Page 11: ...step 5 on page 12 To view only the distance you have pedaled or the number of calories or fat calories you have burned press the upper button on the left side of the large display until only the word...

Page 12: ...and then your heart rate will be shown For the most accurate heart rate reading continue to hold the handgrips for about 30 seconds Note When you first hold the handgrips the large dis play will show...

Page 13: ...tance of the pedals will automatically change if a different resistance level is programmed for the next period The target pace for the current period will be shown by the arrows in the small display...

Page 14: ...available at electronics stores Plug the Y adapter into the PHONES jack on your CD player Plug your headphones into the other side of the Y adapter HOW TO CONNECT YOUR PORTABLE STEREO Note If your ste...

Page 15: ...into the LINE OUT jack on your stereo HOW TO CONNECT YOUR COMPUTER Note If your computer has a 1 8 LINE OUT jack see instruction A If your computer has only a PHONES jack see instruction B A Plug one...

Page 16: ...r end of the cable into the AUDIO OUT jack on your VCR B Plug one end of a 1 8 to RCA stereo audio cable available at electronics stores into the jack beneath the console Plug the other end of the cab...

Page 17: ...or VCR A moment after the play button is pressed your personal trainer will begin guiding you through your workout Simply follow your personal trainer s instructions The program will function in almo...

Page 18: ...display Go to your computer and start an internet con nection Start your Web browser if necessary and go to our Web site at www iFIT com Follow the desired links on our Web site to select a program F...

Page 19: ...t under the front stabilizer until the rocking motion is eliminated HANDGRIP PULSE SENSOR TROUBLESHOOTING Avoid moving your hands while using the handgrip pulse sensor Excessive movement may interfere...

Page 20: ...xercise Aerobic Exercise If your goal is to strengthen your cardiovascular sys tem your exercise must be aerobic Aerobic exer cise is activity that requires large amounts of oxygen for prolonged perio...

Page 21: ...les Stretch With one leg in front of the other reach forward and place your hands against a wall Keep your back leg straight and your back foot flat on the floor Bend your front leg lean forward and m...

Page 22: ...C Magnet 42 1 Left Crank Arm 43 1 Reed Switch Wire 44 1 Crank Bearing Assembly 45 2 M5 Nut 46 1 Adjustment Cable 47 1 Return Spring 48 1 Idler Arm 49 1 M8 x 14mm Button Screw 50 1 Left Handlebar 51 1...

Page 23: ...1 69 45 45 63 11 60 29 65 65 2 31 32 39 40 40 61 61 62 68 63 63 63 22 66 43 52 52 66 66 52 51 50 35 36 12 70 28 44 15 34 33 53 10 48 26 27 57 56 5 20 4 23 65 58 28 58 8 10 10 67 67 70 28 72 66 73 7 7...

Page 24: ...urpose intended under normal conditions and provided it receives proper care HOW LONG DOES THE COVERAGE LAST This warranty lasts for one year on all parts The warranty is extended only to the original...

Reviews: