Franklin 91017C1X Quick Start Manual Download Page 3

2

ITEM#:

For replacement parts:

Visit: www.franklinsports.com/91017X

Email: [email protected]

Call: 1-800-225-8649

FAILURE TO FOLLOW THESE SAFETY INSTRUCTIONS MAY RESULT IN

SERIOUS INJURY AND/OR PROPERTY DAMAGE AND WILL VOID WARRANTY.

Owner must ensure that all players know and follow these rules for safe operation of the system.

• 

2 capable adults are recommended for this operation.

• 

Check base daily for leakage. Leaks will cause system to fall.

• 

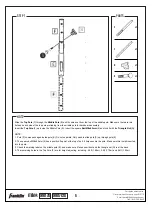
Assemble the pole sections properly. Failure to do so could cause the pole sections to separate during play or transport.

SAFETY INSTRUCTIONS

To ensure safety, do not attempt to assemble this system without following the instructions carefully. Check entire box

and inside all packing material for parts and/or additional instruction material. Before beginning assembly, read the

instructions and identify parts using the hardware identifier and parts list in this document. Proper and complete assembly,

use, and supervision are essential for proper operation and to reduce the risk of accident or injury. A high probability of

serious injury exists if this system is not installed, maintained and operated properly.

Most injuries are caused by misuse and/or not following instructions. Use caution when using this system.
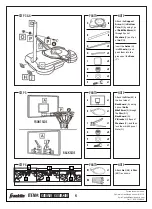
PARTS LIST

x1

Backboard

A

QTY

B

x1

Rim

B1

QTY

B2

x1

Bottom Pole

D

QTY

x1

Middle Pole with Warning Label

E

QTY

x1

Top Pole

F

QTY

x2

Support Arm

G

QTY

x2

Axle

H

QTY

x2

Y Bracket

I

QTY

x2

Wheel

J

QTY

x1

Plastic Nut

K

QTY

x1

Top Pole Cap

L

QTY

x1

Base Cap

M

QTY

x1

Triangle Nut

N

QTY

x10

Lock Nut M8

O

QTY

x18

Washer M8

P

QTY

Rep. Part: 92004X-R1

Rep. Part: 92004X-R2

PRE-INSTALLED

x1

Base

C

QTY

Adjustable Wrench

Tools Required

(NOT INCLUDED)

13mm Wrench

14mm Wrench

91017X 91017C1X

x1

Bolt M8 x 65mm

5

QTY

x2

Bolt M8 x 20mm

1

QTY

x4

Bolt M8 x 35mm

2

QTY

x3

Bolt M8 x 55mm

3

QTY

x1

Bolt M8 x 60mm

4

QTY

x1

Ball

8

QTY

x2

Bolt M6 x 8mm

6

QTY

x2

Washer M6

7

QTY

x1

Pump& Needle

9

QTY

Summary of Contents for 91017C1X

Page 1: ...www franklinsports com 91017X ITEM NUMBER 91017X 91017C1X 30IN 76 2CM PORTABLE BASKETBALL Small parts Not for children under 3 yrs Adult assembly required CHOKING HAZARD ...

Page 2: ...klinsports com or Visit our website at www franklinsports com Thank you for purchasing this Franklin product In the event that the product you ve purchased has missing or damaged parts please contact us at Thank you for your continued support and welcome to the FranklinFamily WE RE HERE FOR YOU PLEASE DO NOT RETURN THIS PRODUCT TO THE STORE IT WAS PURCHASED FROM WE ARE COMMITTED TO FULFILLING ALL ...

Page 3: ...ardware identifier and parts list in this document Proper and complete assembly use and supervision are essential for proper operation and to reduce the risk of accident or injury A high probability of serious injury exists if this system is not installed maintained and operated properly Most injuries are caused by misuse and or not following instructions Use caution when using this system PARTS L...

Page 4: ...yout all components on the ground 2 Ensure you have all components shown in the parts list GENERAL NOTE PARTS NOTE STEP 2 Attach the Support Arms G on the Base C by using 2pcs of Bolts M8x20mm 1 through 2pcs of Washers P and 2pcs of Nuts O NOTE Do not fully tighten bolts during this step It will allow for easier assembly if they are tightened later ITEM For replacement parts Visit www franklinspor...

Page 5: ...e front side of Backboard A using 4pcs of Bolts M8x35mm 2 through the Rim B1 Backboard A Y Bracket I 8pcs of Washers P and then lock them with 4pcs of Nuts O ITEM For replacement parts Visit www franklinsports com 91017X Email parts franklinsports com Call 1 800 225 8649 C x1 D x1 G x2 O x2 P x2 H x2 J x2 4 x1 A x1 B x1 I x1 O x2 P x2 4 x1 PARTS NOTE STEP 6 Attach Net B2 to Rim B1 as shown B1 x1 B...

Page 6: ...o not separate Only need to slide pole F up through pole E 2 The square bolt M8x65mm 5 has a position fix point at the top of bolt It helps secure the pole Make sure this is well inserted into the pole 3 Check the warning label on the middle pole E and make sure it faces user front and the triangle nut N is at the back 4 The remaining holes in the Top Pole F are for height adjusting including 5 5f...

Page 7: ... O and insert the Cap L into the Top Pole F E x1 PARTS NOTE STEP 9 Attach the Y Bracket I on the backside of Backboard A by using 2pcs of Washers M6 7 and 2pcs of Bolts M6X8mm 6 ITEM For replacement parts Visit www franklinsports com 91017X Email parts franklinsports com Call 1 800 225 8649 F x1 O x2 P x2 3 x2 I x1 L x1 I x1 A x1 6 x2 7 x2 91017X 91017C1X ...

Page 8: ...insports com Call 1 800 225 8649 PARTS NOTE STEP 10 Insert the Middle Pole E inside the Bottom Pole D and secure by using Bolt M8x55mm 3 2pcs of Washers P and 1pc of Nut O NOTE Make sure all hardware is fully tightened before moving or playing D x1 E x1 O x1 P x2 3 x1 91017X 91017C1X ...

Page 9: ... property damage If using water check the base carefully for leaks If a leak is found lay the system down on the ground and call customer service Do not use stand up or play on a leaking system ITEM For replacement parts Visit www franklinsports com 91017X Email parts franklinsports com Call 1 800 225 8649 The system must only be moved by at least 2 adults that are capable of handling weight DO NO...

Page 10: ...ip quickly causing serious personal injury When adjusting height or moving system keep hands and fingers away from moving parts Do not allow children to move or adjust system During play do not wear jewelry rings watches necklaces etc Objects may entangle in net Surface beneath the base must be smooth and free of gravel or other objects Punctures can cause leakage and could cause system to tip ove...

Reviews: