background image

21 


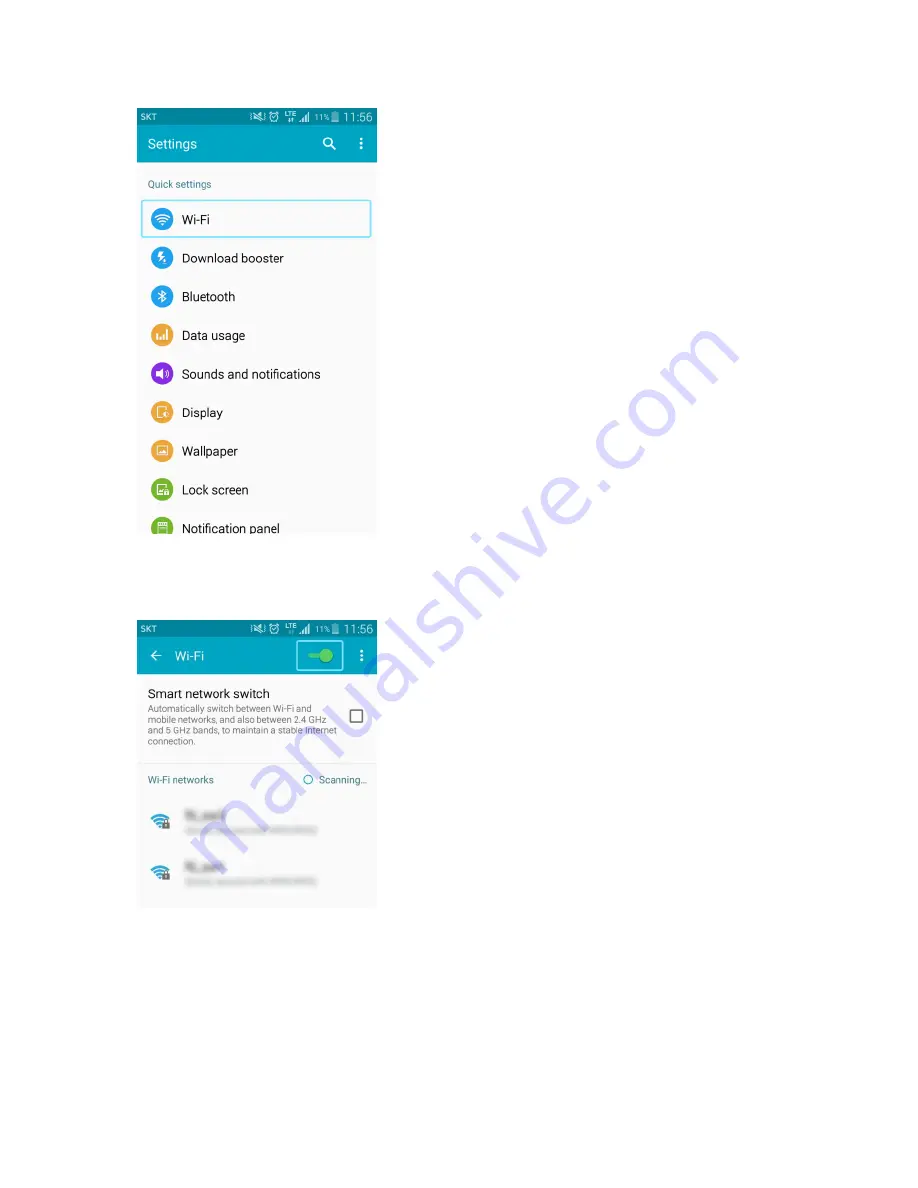
  The Wi-Fi settings menu appears. 

4.  Tap or click the Wi-Fi slider to turn Wi-Fi on. 


  Wi-Fi is enabled on the Android device. 

5.  Tap or click your R872's Wi-Fi Name (SSID) from the list, and tap 

Connect


6.  Enter the Wi-Fi password and then tap or click 

Connect

  The Android device connects to your mobile broadband device. The connected status 

icon on your device will show an additional device has been connected. 

Summary of Contents for R872

Page 1: ...R872 Mobile Hotspot User Guide...

Page 2: ...se 12 Turn Your Device On and Off 15 Connect with Wi Fi WLAN 16 Wi Fi WLAN Overview 16 Activate Wi Fi WLAN Function 16 Connect Windows PCs with Wi Fi 17 Connect Mac Computers with Wi Fi 17 Connect iOS...

Page 3: ...ii Trademarks and Copyrights 52 Safety and Notices 53 Safety Precautions 53 Important Notice 53 Safety and Hazards 53 Proper Battery Use and Disposal 54 Index 55...

Page 4: ...Safety and Notices thoroughly for proper usage Accessible services may be limited by subscription contract conditions Guide Usage Notes Note that most descriptions in this guide are based on your dev...

Page 5: ...for operating system compatible OS listed below is the current information for your device sold as of Feb 2016 Check Compatible Operating Systems for the latest information in regards to operating env...

Page 6: ...cific to your device Note when the device display is off the first press wakes up the display You will see the WiFi Name and WiFi Password Additional Information The following list describes additiona...

Page 7: ...e information you need to set up your device and wireless service the first time Parts and Functions Learn your device s primary parts and functions Device Layout The following illustration outlines y...

Page 8: ...ve or insert the battery or SIM card Factory Reset Button Long press to reset your device to its default settings Power Menu button Long press to toggle power on or off Short press to navigate device...

Page 9: ...networks connected Service signal strength The more bars the better service signal received Out of service area Appears when roaming The number of connected WLAN devices Battery full Battery low No ba...

Page 10: ...rd is the property of the company The SIM card is replaceable at cost in case of loss damage Return the SIM card to the company when cancelling subscription Returned SIM cards are recycled for environ...

Page 11: ...se instructions to insert or remove a SIM card Remember to power off your device before inserting or removing a SIM card 1 Press and hold the Power key to turn off the device before inserting or remov...

Page 12: ...11 3 Open the SIM card cover 4 Insert the SIM card gently with gold IC chip facing downward 5 Remove the SIM card by gently pressing down and sliding outwards...

Page 13: ...me unusable Charge once every six months before storing or leaving unused for a long period Bulges Depending on use bulges may appear near end of battery life This does not affect safety Replacing the...

Page 14: ...rging Cautions Charging Conditions Under low temperatures charging performance decreases Charge in temperatures between 5 C 35 C Do not charge in places where there is high humidity USB charging may b...

Page 15: ...Charge Using the AC Adapter Use the supplied AC adapter 1 Plug the AC adapter into an electrical outlet The indicator light on the power button illuminates red when charging starts The light turns gr...

Page 16: ...hold the Power button until the device displays Welcome Turn Your Device Off Press and hold the Power button until the device displays Goodbye Restart Your Device If your device will not turn on or of...

Page 17: ...i Fi connection optimizing settings may be automatically received and updated Wi Fi WLAN Usage Cautions For added security it is recommended that you change the default Wi Fi network name SSID and Wi...

Page 18: ...nual for details on activating Wi Fi 3 On your PC select WLAN icon Select your device s Wi Fi Name SSID from the list and click Connect 4 Enter the Wi Fi password The PC connects to your device The co...

Page 19: ...Wi Fi password in the Password field check Remember this network and then click Join The computer connects to your device The connected status icon on your device will show an additional device has b...

Page 20: ...elect Settings Wi Fi 3 Select Turn on Wi Fi The iPhone or iPod Touch s Wi Fi function activates 4 In the Choose a Network list tap your R872 s Wi Fi Name SSID 5 Enter the Wi Fi password and then tap J...

Page 21: ...droid devices such as wireless phones tablets and Chromebook computers 1 Press and hold the Power button to power on your R872 Your device s Wi Fi function activates and automatically connects to the...

Page 22: ...n the Android device 5 Tap or click your R872 s Wi Fi Name SSID from the list and tap Connect 6 Enter the Wi Fi password and then tap or click Connect The Android device connects to your mobile broadb...

Page 23: ...tp my hotspot 3 The Web UI launches and displays the main window 4 Log In with the Admin Password Admin Log in Accessing other menus from the home screen requires admin log in Click Log in on the uppe...

Page 24: ...connection and data usage on the Home page From the Web UI click the Home tab Connection The Connection Status display Network Status LTE Status Connection time current Data Used and Connect control b...

Page 25: ...vices currently connected to your Hotspot on the display Edit the Connected Device 1 Click the Edit button A page opens allowing you to edit a Main Wi Fi Devices 2 You can change a devices name on the...

Page 26: ...ess Permissions menu select Allow only users on Permitted list The Add Devices option will appear onscreen 4 Click next to Add Devices to open the Add Devices menu and then click Add More 5 Enter a Fr...

Page 27: ...ettings for your device These advanced settings should only be changed for specific circumstances Changes to the advanced settings could result in loss of Wi Fi connection with your devices Consult yo...

Page 28: ...ion and encryption won t be performed There are risks that private info will be intercepted or network will be used by unauthorized individuals SHARED Authentication via Shared Key protocol WPA2 PSK W...

Page 29: ...Settings Reset Click the Reset button to reset all Wi Fi settings to the default Wi Fi Advanced Settings 1 From the Web UI click Settings Wi Fi Advanced 802 11 Mode Use this setting to change the Wi F...

Page 30: ...wn in the following figure Cellular data Turn Cellular data on or off Turn it OFF to prevent all Internet traffic from using the mobile broadband connection Auto Connect Turn Auto Connect on or off An...

Page 31: ...bile Network APN The default APN parameters are shown in the following figure You can use the default APN to connect to the Internet You can also add new APNs To add a new APN follow the steps below 1...

Page 32: ...tion is established Authentication Password Authentication Protocol PAP provides a simple method without encryption for the peer to establish its identity using a 2 way handshake Challenge Handshake A...

Page 33: ...ivate the new APN check the circle in front of it and then click Save Changes To edit the new APN click Edit change the settings and then click Save To delete the new APN click Delete Note The default...

Page 34: ...Enabled Once the SIM PIN Lock is enabled you need to enter SIM PIN to connect to the mobile broadband network each time you power on your R872 Note If you enter the wrong SIM PIN three times your SIM...

Page 35: ...Preferences You can set the display timeout on this page Display Timeout Select a timeout time from the drop down list Your R872 display turns off after this timeout period if there is no menu button...

Page 36: ...menu Change Password o Current Password Enter the current password o New Password Enter the new password o Confirm New Password Enter the new password again 2 Click Save Changes to save your settings...

Page 37: ...by your service provider you can select the file and update your R872 manually by pressing Update Software button Backup and Restore From the Web UI click Settings Device Backup and Restore to access...

Page 38: ...restore from the backup follow the steps below 1 Click Choose File to select the backup file in your computer 2 Click Restore now To restore your device to its factory default settings follow the step...

Page 39: ...38 Note System logs are used for engineering purposes by your service provider Keep it OFF during regular usage of your device...

Page 40: ...e following figure IP Address IP address for Web User Interface Subnet Mask Subnet mask for the IP address VPN passthrough VPN passthrough must be enabled if you want to allow VPN tunnels to pass thro...

Page 41: ...ode Turn DNS manual mode on or off NAT Timer Set TCP NAT time 2 Click Save Changes to save your settings Firewall 1 From the Web UI click Settings Advanced Router Firewall You may set up firewall rule...

Page 42: ...41 Turn on the Firewall Switch Turn on the IP Address Filtering Click Add Enter the related parameters as described in the following table...

Page 43: ...Set the WAN port Protocol Set which protocol will be used for filtering Status Set how to handle the packet if it matches with the rule Click Save Changes to add the new filtering rule Portmapping To...

Page 44: ...on Name Enter a name for the rule WAN port Set the WAN port LAN IP address Enter the LAN IP address LAN port Set the LAN port Protocol Set which protocol will be used for filtering Status Set how to h...

Page 45: ...bout Show your device s connection information firmware information WWAN information Wi Fi details and device information From the Web UI main screen Click the About tab to view the available informat...

Page 46: ...45 Support Tab Obtain support information on this interface From the Web UI main screen click the Support tab to view the available options...

Page 47: ...e may be a problem with your account From device LCD The device has no power or the LED indicator does not come on when the power button is pressed Make sure the battery is properly seated in the devi...

Page 48: ...ry the following 1 Open Network Connections 2 Right click Wireless Network Connection and select Properties 3 Click the Wireless Networks tab 4 Delete any unused wireless connections from the Preferre...

Page 49: ...How do I turn off my device Press and hold the power button for three seconds until the LCD turns off Your device is connected to the AC adapter and being charged What is the default administrative lo...

Page 50: ...inal password password to complete the setup and assign a new unique password Specifications The following tables list the specifications for the mobile broadband device the AC charger and the materia...

Page 51: ...y 4 DL 150Mbps UP 50Mbps 1 Approximate values 2 Varies by ambient temperature battery usage etc 3 Varies by environment signal conditions etc AC Charger Specifications Item Description Rated input vol...

Page 52: ...ces Before submitting your device for repairs contact Customer Service or General Information be prepared to describe problem in detail During the warranty period repairs will be made under the terms...

Page 53: ...d services used in this guide are registered trademarks or trademarks of the respective companies Franklin Wireless logo is trademarks or registered trademarks of Franklin Wireless Corporation in US C...

Page 54: ...eceived using your device or for failure of your device to transmit or receive such data Safety and Hazards Do not operate your device under the following conditions In areas where blasting is in prog...

Page 55: ...a charger use only the AC charger supplied with your device Do not short circuit the battery When replacing a battery use the same model of battery that was supplied with your device Follow local reg...

Page 56: ...ntents 4 Power Key 7 Power Off 15 Power On 15 Safety Precautions 53 Security Key 5 Services 52 Settings 22 SIM Card 9 Insert 10 Specifications AC charger 51 Materials 51 Mobile broadband device 49 SSI...

Reviews: