4
ELECTRICAL INSTALLATION
1. Employ a licensed electrician to perform the wiring. All wiring
must be done in accordance with applicable national and
local electrical codes.
2. Disconnect electrical power at the main breaker.
3. Check that the power supply corresponds with the electrical
rating of the submersible motor.
4. Every installation requires a fused disconnect switch or
circuit breaker.
5. Every installation must be grounded. There must be
a reliable ground connection between the pump and
the distribution panel. The motor lead incorporates
a green grounding conductor.
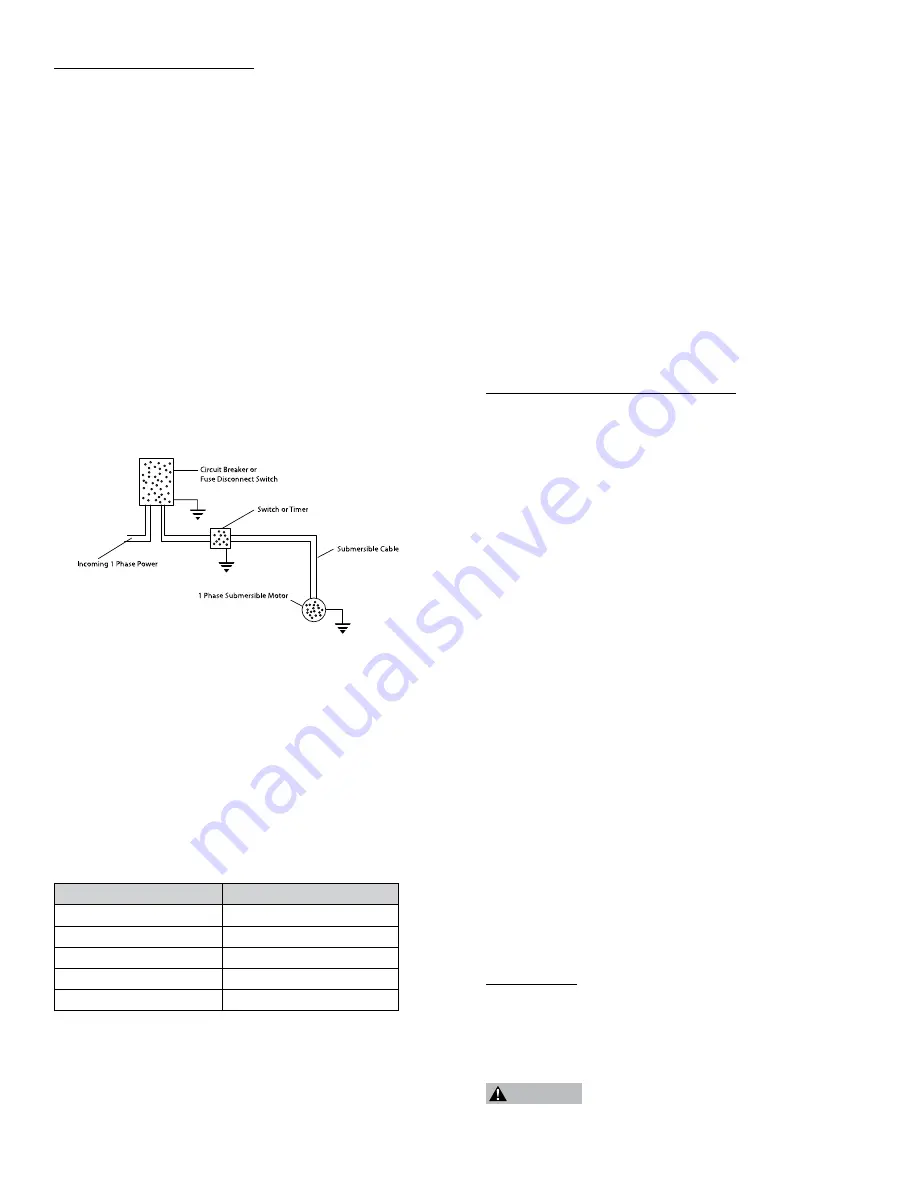
6. A 2-wire C1-Series has two power supply wires and one
ground wire, and does not require a motor control box, since
all electrical components are built inside the motor. FIGURE 1
shows a typical wiring diagram for a 2-wire installation.
7. Use an ohmmeter to make continuity and insulation checks
after the installation is completed.
Plumbing, Piping, And Hoses
In general, keep the discharge line as large as possible. Avoid
using bends, elbows and fittings whenever possible. All discharge
connections must be airtight, the use of pipe compound/or Teflon
tape is recommended for all threaded joints.
Flow Capacity By Pipe Size
The discharge pipe diameter should be selected not to
exceed a maximum water velocity of 8 ft/sec. Use the table
below (FIGURE 2) for selection of the proper pipe sizes based
on the overall system’s output.
FIGURE 2 - Flow Capacity By Pipe Size
Minimum Pipe Diameter
Maximum Flow Rate GPM
1/2"
4.9
3/4"
11.0
1"
19.6
1-1/4"
30.6
1-1/2"
44.1
Water Supply Requirement
The C1-Series is designed to pump water from a cistern holding
tank. The unit should be kept completely full of water at all times.
The system should not be run dry, without water, for even short
periods of time, as this will cause damage to the pump and the
pumping system.
Horizontal Offset Suction Piping
When the pump is offset a long distance from the end point of
fluid discharge, the horizontal offset suction piping may have to
be increased in diameter to reduce friction loss. The friction loss
in a system increases:
1. As the flow rate increases.
2. As the piping size decreases.
Refer to the included C1-Series performance curves (Appendix 1)
and friction loss tables (Appendix 2) to determine the amount of
head lost for a given application.
PUMP INSTALLATION PROCEDURE
1. Disconnect electrical power at the main breaker.
2. A qualified professional installer should be used to install the
pump system and any associated control devices.
3. Pump is not to be installed in a hazardous environment.
Hazardous locations are defined by the National Electrical
Code, ANSI/NFPA 70-1984.
4. C1-Series pumps are designed for permanent installations only.
All power connections should use approved connection box
strain reliefs to ensure that undue stress is not put upon
the units power cord. All system control boxes and or electrical
panels must be UL/CSA listed and approved as suitable for
the particular end use application of the product.
5. The products electrical lead/cord is not intended to be used
to transport or install the unit. If the unit must be lowered
into its place of operation, do so by way of threading a
fixed pipe into the pumps discharge. DO NOT lower the
unit by the factory installed electrical cord.
6. The pump discharge is 1.25-inch.
NOTICE: This pump is designed for a maximum submergence
of 85 feet (25 meters). Installation beyond this depth can cause
damage to the pump and plumbing system.
7. To facilitate priming and starting of the pump, it is
recommended that a valve be placed in the discharge
plumbing. This valve is critical if the unit will be operated
on a regular basis at near maximum discharge. To use the
valve to assist in the pumps priming and start up, first
close the valve completely. Fill the pump and plumbing
completely with water. Next, crack the valve open to allow
any air in the system to bleed off once the system is turned
on. Start the pump. As water begins to flow, slowly open
the valve the rest of the way until the desired flow rate
is achieved.
OPERATION
Priming
Never run the pump dry. To prime, fully submerse the pump
and its discharge connection under water prior to starting the
pump's motor.
HAZARDOUS PRESSURE:
Do not run pumps
against a closed discharge, or at a system
operating pressure above what is mentioned
by the pump manufacturer.
WARNING
FIGURE 1 - 2-WIRE, 1 Phase, 1/2 thru 1-1/2 HP
Pump Wiring Diagram
Summary of Contents for C1 SERIES
Page 2: ......


