background image

8

NT630 Pro ABS & Airbag Reset Tool Manual_English_V1.01

2 Introduction

NT630 Pro Professional ABS & Airbag Reset Tool works on most vehicles on the road today. It

does not only have extensive coverage of vehicles but also provides accurate and professional

diagnosis of ABS and airbag faults.
With the tool properly connected to the vehicle’s data link connector (DLC), you can use the

scanner to read diagnostic trouble codes and view “live” data readings from ABS and airbags

control systems. You can also save “recordings” of the data readings, and print stored

information.

2.1 Scanner Descriptions

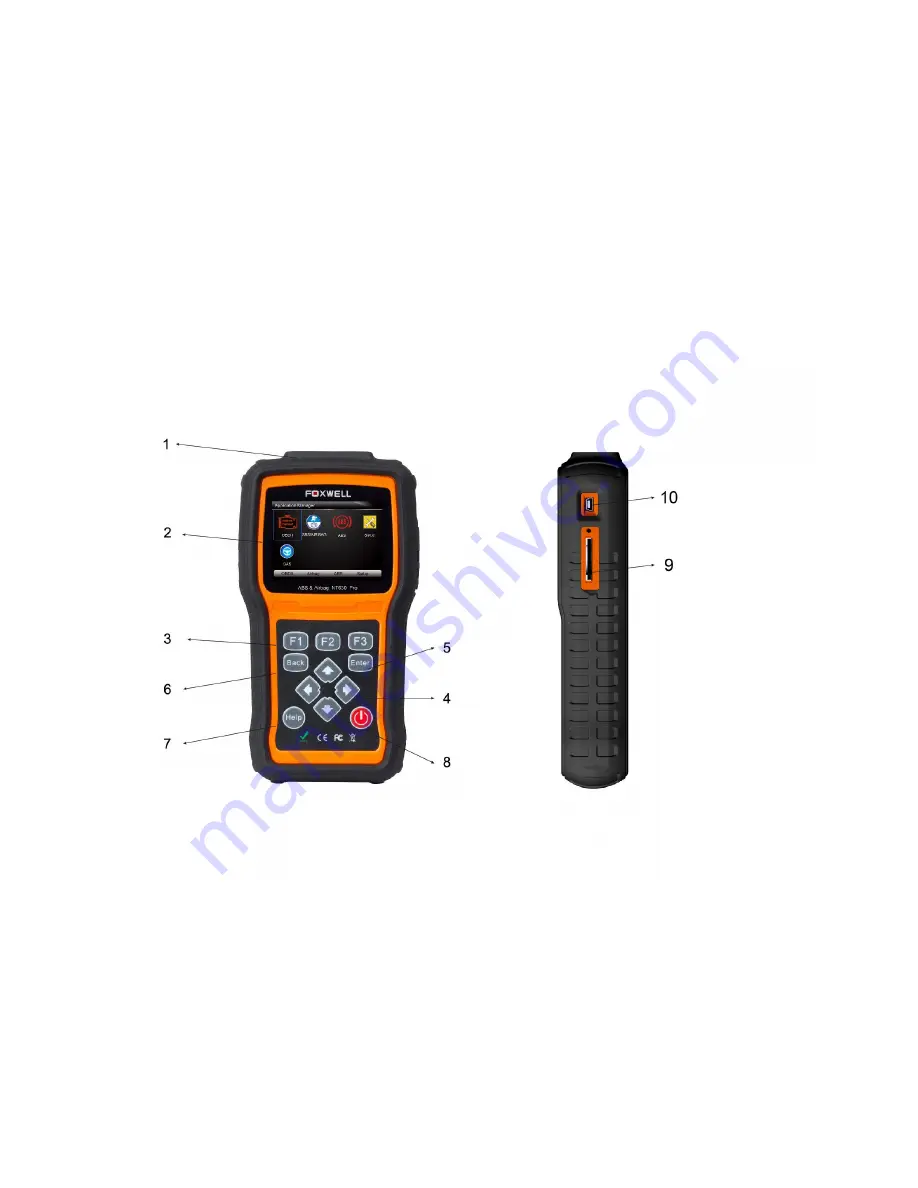
This section illustrates external features, ports and connectors of the scanner.

Figure 2-1 front view

1

Diagnostic Port

- provides connection between the scan tool and vehicle.

2

LCD Display

- shows menus, test results and operation tips.

3

Function Keys / Shortcut keys

- three keys that correspond with “buttons” on some screens

for executing special commands or provide quick access to most frequently used applications or

functions.

4

Direction Keys

- select an option or scroll through a screen of data or text.

5

ENTER Key

– executes a selected option and generally goes to the next screen.

Summary of Contents for NT630 Pro

Page 1: ...ers Copyright Information 2013 Shenzhen Foxwell Technology Co Ltd All rights reserved Disclaimer The information specifications and illustrations in this manual are based on the latest information available at the time of printing Foxwell reserves the right to make changes at any time without notice Visit our website at www foxwelltech com For Technical Assistance send us email at support foxwellt...

Page 2: ... product back to the customer after the completion of service under this limited warranty 4 FOXWELL does not warrant uninterrupted or error free operation of the product If a problem develops during the limited warranty period the consumer shall take the following step by step procedure a The customer shall return the product to the place of purchase for repair or replacement processing contact yo...

Page 3: ...CT NEGLIGENCE STRICT TORT OR ANY OTHER LEGAL OR EQUITABLE THEORY EVEN IF FOXWELL KNEW OF THE LIKELIHOOD OF SUCH DAMAGES FOXWELL SHALL NOT BE LIABLE FOR DELAY IN RENDERING SERVICE UNDER THE LIMITED WARRANTY OR LOSS OF USE DURING THE PERIOD THAT THE PRODUCT IS BEING REPAIRED 6 Some states do not allow limitation of how long an implied warranty lasts so the one year warranty limitation may not apply ...

Page 4: ...l safety messages Do not route the test cable in a manner that would interfere with driving controls Do not exceed voltage limits between inputs specified in this user s manual Always wear ANSI approved goggles to protect your eyes from propelled objects as well as hot or caustic liquids Fuel oil vapors hot steam hot toxic exhaust gases acid refrigerant and other debris produced by a malfunction e...

Page 5: ...ARTED 9 3 1 PROVIDING POWER TO SCANNER 9 3 1 1 Connecting to Vehicle Power 10 3 1 2 Connecting to Personal Computer with USB Cable 10 3 2 APPLICATION OVERVIEW 10 3 3 INPUT DIALOG BOX 11 4 DIAGNOSTIC OPERATIONS 12 4 1 VEHICLE IDENTIFICATION 12 4 1 1 Automatic VIN Acquisition 12 4 1 2 Manual VIN Entry 14 4 1 3 Manual Vehicle Selection 15 4 1 4 Vehicle Data Recorder 15 4 2 SYSTEM SELECTION 17 4 2 1 A...

Page 6: ...I M READINESS STATUS DATA 36 5 7 O2 MONITOR TEST 38 5 8 ON BOARD MONITOR TEST 39 5 9 COMPONENT TEST 41 5 10 REQUEST VEHICLE INFORMATION 42 5 11 MODULES PRESENT 44 5 12 DTC LOOKUP 44 6 PLAYBACK DATA 46 7 SYSTEM SETUP 47 7 1 SELECT LANGUAGE 47 7 2 CHANGE UNITS 48 7 3 CONFIGURE BEEPER 49 7 4TEST KEYPAD 50 7 5 LCD KEYPAD 50 7 6 TOOL INFORMATION 51 7 7 CONFIGURE SHORTCUT KEYS 52 8 UPDATE 52 8 1 REGISTE...

Page 7: ...available options displays Menu options include Languages Unit Beep Keypad Test LCD Test About Shortcuts 1 2 2 Arrow Icon An arrow icon indicates a procedure Example To change menu language 1 Scroll with the arrow keys to highlight Language on the menu 2 Press the ENTER button to select 1 2 3 Note and Important Message Note A NOTE provides helpful information such as additional explanations tips a...

Page 8: ...ms You can also save recordings of the data readings and print stored information 2 1 Scanner Descriptions This section illustrates external features ports and connectors of the scanner Figure 2 1 front view 1 Diagnostic Port provides connection between the scan tool and vehicle 2 LCD Display shows menus test results and operation tips 3 Function Keys Shortcut keys three keys that correspond with ...

Page 9: ...mory Card contains the scanner s operating software and applications IMPORTANT Do not remove the memory card unless performing updates to the card 4 Diagnostic Cable provides connection between the scan tool and vehicle 5 Blower Molding Case stores the scanner and its accessories 2 3 Technical Specifications Display Backlit 480 272 TFT color display Working Temperature 0 to 60 32 to 140 Storage Te...

Page 10: ...ting to Personal Computer with USB Cable The scan tool also receives power through the USB port when it is connected to a PC for updating software and transferring saved files To connect to PC 1 Insert the small end of the USB cable to the USB port at the right side of the scanner and the large end to a computer 2 Press the power switch of the scan tool to power it on 3 2 Application Overview When...

Page 11: ...types of keyboard to meet your specific needs Depending on the needs of text entry it automatically shows the most suitable keypad classic QWERTY keyboad for input of texts that contain both letters and numbers numeric keyboard for input of numbers alphabet keyboard for input of letters hexadecimal keyboard for special functions such as key matching UDS coding To input text with the scan tool 1 Wh...

Page 12: ...mpts and make a series of choices Each selection you make advances you to the next screen A Back button in the upper left corner of the screen returns you to the previous screen Exact procedures may vary somewhat by vehicle It typically identifies a vehicle by any of the following means Automatic VIN acquisition Manual VIN entry Manual vehicle selection Vehicle data recorder NOTE Not all identific...

Page 13: ...s Figure 4 2 Sample Vehicle Manufacturer Area Selection Screen 3 Select the vehicle manufacturer A list of vehicle identification options displays Figure 4 3 Sample Vehicle Manufacturer Selection Screen 4 Select Vin acquisition from the menu and press the ENTER key Figure 4 4 Sample Vin Acquisition Screen 5 The scan tool starts to communicate with the vehicle and read the Vehicle Specification or ...

Page 14: ...wer NO if it is incorrect and you are required to enter the correct VIN number manually Figure 4 6 Sample manual VIN entry screen 4 1 2 Manual VIN Entry Manual VIN Entry identifies a vehicle by manually inputting a 17 digit VIN code To identify a vehicle by manual VIN entry 1 Refer to Step 1 3 of 4 1 1 Automatic VIN Acquisition 2 Select an appropriate option from the menu A virtual keyboard opens ...

Page 15: ... 1 1 Automatic VIN Acquisition 2 On each screen that appears select the correct option and then press the ENTER key Do this until the complete vehicle information is entered and the menu of controller selection displays Figure 4 8 Sample Manual Vehicle Selection Screen 4 1 4 Vehicle Data Recorder The scan tool is able to save a tested vehicle by creating a Vehicle Record It provides quick identifi...

Page 16: ...e screen and a screen with a QWERTY keyboard displays Figure 4 10 Sample Save Vehicle Record Screen 3 Enter a unique name for this vehicle and save it and you will see this new vehicle in Vehicle Data Recorder menu Figure 4 11 Sample Vehicle Record Screen To identify a previously tested vehicle 1 Select Vehicle record and press the ENTER key to start ...

Page 17: ...ontrol modules are installed on the vehicle and obtain diagnostic trouble codes DTCs overview Depending on the number of control modules it may take a few minutes to complete the test To perform an automatic system scan 1 Scroll with the arrow keys to highlight Auto Scan from the menu and press ENTER to start Figure 4 13 Sample Select System Scan Screen 2 To pause the scan press the function key c...

Page 18: ...tion key corresponding with Display DTC on the screen to view details of code information and press the function key Quick Erase to clear them Figure 4 16 Sample Display DTC screen 5 Select the system you would like to test and press the ENTER key When the scanner has established connection with the vehicle the Function Menu displays Figure 4 17 Sample Function Menu screen ...

Page 19: ...nit from the menu and press the ENTER key A controller menu displays Figure 4 18 Sample Control Unit Menu Screen 2 Select the system you would like to test When the scanner has established connection with the vehicle the Function Menu displays Figure 4 19 Sample Common menu screen 4 3 Diagnostic Function Selection After a system is selected and the scanner establishes communication with the vehicl...

Page 20: ...y the cause of a trouble or troubles with a vehicle These codes have occurred a specific number of times and indicate a problem that requires repair History codes are also referred to as past codes that indicate intermittent DTCs that are not currently active To read codes from a vehicle 1 Scroll with the arrow keys to highlight Read Codes from Function Menu and press the ENTER key A code list inc...

Page 21: ...lt DTCs should only be erased after correcting the condition s that caused them To clear codes 1 Scroll with the arrow keys to highlight Erase Codes from Function Menu and press the ENTER key Figure 4 22 Sample Function Menu Screen 2 Follow the on screen instructions and answer questions about the vehicle being tested to complete the procedure Figure 4 23 Sample Erase Codes Screen 3 Check the code...

Page 22: ... use the BACK key to exit 4 3 4 Live Data Live Data menu lets you view and record real time PID data from a selected vehicle electronic control module Menu options typically include Complete Data List Custom Data List 4 3 4 1 Complete Data List Complete Data List menu lets you view all live PID data from a selected system To view all live PID data 1 Scroll with the arrow keys to highlight Live Dat...

Page 23: ...m screen Figure 4 27 Sample Complete List Screen 3 Scroll with the up and down arrow keys to highlight a line if the One Graphic on the bottom is highlighted it indicates the graphing is available for the selected line Press the function key One Graphic to display the PID graph Figure 4 28 Sample PID graph Screen 4 Press the function key Two Graphics to display two PID graphs in one screen ...

Page 24: ...AVE and press Stop Saving to stop recording at any time 7 Press Text to return to text viewing of PID data 8 Select Pause to suspend collecting data from the scanner and use the Start key to resume collecting data 9 Press the Back key to return to the previous menu 4 3 4 2 Custom Data List Custom Data List menu lets you to minimize the number of PIDs on the data list and focus on any suspicious or...

Page 25: ...ss the ENTER key and then repeat the action to make more selections Figure 4 32 Sample Custom List Selection Screen NOTE To deselect an item select it again and then press the ENTER key Alternatively use the function keys SELECT ALL and CLEAR ALL to select or deselect all items at once 3 When finished selection use the function key VIEW DATA to display selected items Figure 4 33 Sample Datastream ...

Page 26: ...al for excessive travel or a spongy feel Bleed again if either condition is present Automated Test automatically commands each solenoid valve and the pump motor on and off to test for proper operation Brake Bleed Preparation Test prepares the brake lines for bleeding by clearing air from the modulator The test rehomes all the ABS and TCS motors cycles the TCS motors and then returns all motors to ...

Page 27: ... and press the ENTER key Figure 4 34 Sample Function menu screen 2 A group selection screen test selection screen several step by step instruction screens or bi directional control screen may appear Read the screens and follow all instructions If necessary use the function keys to perform commands or answer any questions If more than 3 function keys displays use the Up Down arrow keys to select a ...

Page 28: ...rd system test or component Service 09 request Vehicle Information When OBDII EOBD application is selected from Home screen the scanner starts to detect the communication protocol automatically Once the connection has established a menu that lists all of the tests available on the identified vehicle displays Menu options typically include System Status Read Codes Freeze Frame Data Erase Codes Live...

Page 29: ...d a specific number of times and indicate a problem that requires repair Pending codes are also referred to as maturing codes that indicate intermittent faults If the fault does not occur within a certain number of drive cycles depending on vehicle the code clears from memory If a fault occurs a specific number of times the code matures into a DTC and the MIL illuminates or blinks To read codes pe...

Page 30: ...ific or enhanced codes detected select vehicle a make before viewing DTC information Figure 5 5 Sample No Codes Screen 3 Use the up and down arrow keys to scroll through data to select lines and left and right arrow keys to scroll back and forth through different screens of data Figure 5 6 Sample Code screen 4 Press function key Save to store DTC information Or use the BACK key to exit ...

Page 31: ...ase Codes does not fix the problem that caused the fault DTCs should only be erased after correcting the condition s that caused them To clear codes 1 Scroll with the arrow keys to highlight Erase Codes from Diagnostic Menu and press the ENTER key Figure 5 7 Sample Diagnostic Menu Screen 2 Follow the on screen instructions and answer questions about the vehicle being tested to complete the procedu...

Page 32: ...the arrow keys to highlight Live Data from Diagnostic Menu and press the ENTER key Figure 5 9 Sample Diagnostic Menu Screen 2 Select Complete List from the menu and press the ENTER key to display the datastream screen Figure 5 10 Sample Live Data Menu Screen 3 Use the up and down arrow keys to scroll through data to select lines and left and right arrow keys to scroll back and forth through differ...

Page 33: ...tes the graphing is available for the selected line Press the function key One Graphic to display the PID graph Figure 5 12 Sample PID Graph Screen 5 Press the function key Two Graphics to display two PID graphs in one screen Figure 5 13 Sample Two PID Graph Screen 6 Press the function key Merge Graph to display two PID plots in one coordinate for easy and intuitive diagnosis Figure 5 14 Sample Me...

Page 34: ... focus on any suspicious or symptom specific data parameters To create a custom data list 1 Select Custom List from the menu and press the ENTER key Figure 5 15 Sample Live Data Menu Screen 2 The custom datastream selection screen displays Scroll with the up and down arrow keys to highlight a line press the ENTER key and then repeat the action to make more selections Figure 5 16 Sample Custom Data...

Page 35: ...f the DTC set It is a good function to help determine what caused the fault To view freeze frame data 1 Select Freeze Frame from the Diagnostic Menu Details of freeze frame data displays Figure 5 18 Sample Diagnostic Menu Screen 2 Use the up and down arrow keys to scroll through data to select lines and left and right arrow keys to scroll back and forth through different screens of data If no free...

Page 36: ...ws status of the monitors since the DTCs were last cleared This Drive Cycle shows status of monitors since the start of the current drive cycle Below is a list of abbreviations and names of OBD II monitors supported by the scanner No Abbreviation Name 1 Misfire Monitor Misfire Monitor 2 Fuel System Mon Fuel System Monitor 3 Comp Component Comprehensive Components Monitor 4 Catalyst Mon Catalyst Mo...

Page 37: ...ess test one of these 2 screens will be present Use the up and down arrow keys to scroll through data to select lines and left and right arrow keys to scroll back and forth through different screens of data Figure 5 21 Sample IM Readiness Screen 1 Or Figure 5 22 Sample IM readiness screen 2 3 Press the BACK key to exit ...

Page 38: ...l to communicate this function is not supported by vehicle Refer to On Board Monitor Tests on page 38 39 for O2 monitor data of CAN equipped vehicles To retrieve O2 monitor data 1 Scroll with the arrow keys to highlight O2 Monitor Test from Diagnostic Menu and press the ENTER key A screen with a list of available sensors displays Figure 5 23 Sample Diagnostic Menu Screen 2 Scroll with the arrow ke...

Page 39: ...esults for emission related powertrain components and systems that are not continuously monitored for Non CAN vehicles And for CAN vehicles it receives test data for emission related powertrain components and systems that are and are not continuously monitored It is vehicle manufacturer who is responsible for assigning test and component IDs NOTE Test results do not necessarily indicate a faulty c...

Page 40: ... Screen Or Figure 5 29 Sample CAN vehicle test screen 3 Scroll with the arrow keys to highlight a test group and press the ENTER key to confirm A screen with details of the selected sensor displays Use the up and down arrow keys to scroll through data to select lines and left and right arrow keys to scroll back and forth through different screens of data For non CAN vehicles test screen is illustr...

Page 41: ...t Test allows the scanner to control operation of vehicle components tests or systems NOTE Some manufacturers do not allow tools to control vehicle systems The manufacturer sets the criteria to automatically stop test Refer to appropriate vehicle service manual before using this function To perform a component test 1 Scroll with the arrow keys to highlight Component Test from Diagnostic Menu and p...

Page 42: ...ion in vehicle control module s calibration verification numbers CVN s and in use performance tracking on model year 2000 and newer OBD II compliant vehicles CVNs are calculated values required by OBD II regulations They are reported to check if emission related calibrations have been changed Multiple CVNs may be reported for a control module It may take several minutes to do the CVN calculation I...

Page 43: ...rmation A screen with a list of available options displays Figure 5 35 Sample Vehicle Info Screen 3 Scroll with the arrow keys to highlight an available option and press the ENTER key A screen with details of the selected option displays Figure 5 36 Sample Calibration ID Screen 4 Press function key Save to store the readiness data Or use the BACK key to exit and return ...

Page 44: ...m Diagnostic Menu and press the ENTER key Figure 5 37 Sample Diagnostic Menu Screen 2 A screen with the module IDs and protocols displays Figure 5 38 Sample Module Present Screen 3 Press function key Save to store the readiness data Or use the BACK key to exit and return 5 12 DTC Lookup DTC Lookup menus allows to request DTC definitions stored in the scan tool To Look up DTCs 1 Scroll with the arr...

Page 45: ...C Lookup Screen 3 A screen with code number and its definition displays If definition could not be found SAE or Manufacturer Specific the scanner displays DTC definition not found Please refer to vehicle service manual If a P1xxx C1xxx B1xxx or U1xxx code is entered select a vehicle make to look for DTC definitions Press the Back key to exit Figure 5 41 Sample Trouble Codes Screen ...

Page 46: ...en and press the ENTER key Figure 6 1 Sample Home Screen 2 A screen with a list of test records displays If no data is recorded the message No Data available is displayed Figure 6 2 Sample Playback Screen 3 Scroll with the arrow keys to highlight a vehicle record and press the ENTER key Details of the test record displays Use the up and down arrow keys to scroll through data to select lines Figure...

Page 47: ... key Delete All Answer Yes to delete and No to quit 7 System Setup This section illustrates how to program the scanner to meet your specific needs When Setup application is selected a menu with available service options displays Menu options typically include Language Unit Beep Set Key Test LCD Test About Shortcuts 7 1 Select Language Selecting Language opens a screen that allows you to choose sys...

Page 48: ...turn Figure 7 2 Sample Language Selection Screen 7 2 Change Units Selecting Unit opens a dialog box that allows you to choose between US customary or metric units of measure To change the unit setup 1 Scroll with the arrow keys to highlight Units from Setup menu and press the ENTER key Figure 7 3 Sample Setup Screen 2 Press the LEFT RIGHT arrow key select an item and press the ENTER key to save an...

Page 49: ...ns a dialog box that allows you to turn on off the beeper To turn on off the beeper 1 Scroll with the arrow keys to highlight Beep Set from Setup menu and press the ENTER key Figure 7 5 Sample Setup Screen 2 Press the LEFT RIGHT arrow key select an item and press the ENTER key to save and return Figure 7 6 Sample Beeper On Off Selection Screen ...

Page 50: ...ess any key to start test The virtue key corresponding with the key you pressed will be highlighted on the screen if it works correctly Figure 7 8 Sample Key Test Screen 3 To quit the test click the F2 function key twice 7 5 LCD Keypad Selecting LCD Test option opens a screen that allows you to check the functionality of the display To test the display 1 Scroll with the arrow keys to highlight LCD...

Page 51: ...on opens a screen that show information about your scan tool such as serial number and register password which may be required for product registration To view information of your scan tool 1 Scroll with the arrow keys to highlight About from Setup menu and press the ENTER key Figure 7 10 Sample Setup screen 2 A screen with detailed information of the scanner displays ...

Page 52: ...he ENTER key A screen with available shortcut keys displays Figure 7 12 Sample Setup screen 2 Press the UP DOWN arrow key select an shortcut key and press the ENTER key A screen with a list of loaded applications displays Figure 7 13 Sample ShortCuts Screen 3 Scroll with the UP DOWN arrow keys to highlight an application and press the ENTER key to assign the application to the shortcut key 4 Press...

Page 53: ...elect Support Updates Professional Scanner http www foxwelltech com support3 php id supportUpdate_5 to download the update tool DiagMate to complete the registration If you have already had a Foxwell ID just click the Sign in link http www foxwelltech com login php at the top right of the website to login Figure 8 1 Sample Register Products Screen 2 Select your scanner part number enter your seria...

Page 54: ...ditions Screen 4 Create a unique user name and password complete the registration form and then click Submit to create your ID When your ID has been created you are allowed to view all programs associated with your tool download updates edit your profile leave us feedbacks and join our community to share your ideas and your stories about our products ...

Page 55: ...55 NT630 Pro ABS Airbag Reset Tool Manual_English_V1 01 Figure 8 4 Sample Registration Form Filling Screen 5 A Submit OK message will comes up if it is registered successfully ...

Page 56: ...your user ID and or password link to input product s serial number and registered email address The New password will comes up once you click Submit button If you want to change password please sign in with your user name and password then select My Profile Password Change to input the old password and new password Figure 8 6 Sample User ID and or Password Reset Screen Figure 8 7 Sample Password R...

Page 57: ...an your user name to retrieve your password Figure 8 8 Sample Registration Screen 7 Sign in with your Foxwell ID and click My Products New Registration option if you have more than one scan tool to be registered And repeat the process as necessary Figure 8 19 Sample New Registration Screen 8 2 Update the Scanner To update your scanner you need following tools the scan tool ...

Page 58: ... Intel PⅢ or better RAM 64MB or better Hard Disk Space 30MB or better Display 800 600 pixel 16 byte true color display or better Internet Explorer 4 0 or newer NOTE Before updating please make sure your network works correctly and the SD card has been identified 1 Download the update tool DiagMate from our site www foxwelltech com by selecting Support updates Professional Scanner and save the appl...

Page 59: ...check box es in front of the software s you wish to update and then click the Update button to download and update When download completed the downloaded programs start to update automatically Figure 8 12 Sample Software Download Screen 8 An Update Complete message displays once the updates completed ...

Page 60: ...ed Please check the network connection or SD card If the problem still exists please contact with your local dealer for assistance 9 To view installed items click the Installed Software tab 10 To uninstall a software or all software select them and click the Uninstall button And the uninstalled items can be found in the Updates screen Figure 8 14 Sample Uninstall Software Screen ...

Reviews: