background image

Operating Instructions

www.foxunhd.com

(Host:Transmitter;client: Receiver)

Button state for Unicast Mode:HDMI Extender:

Default Mode will be highlighted in Green

CONNECT AND OPERATE

1. Check the power supply is unplugged.
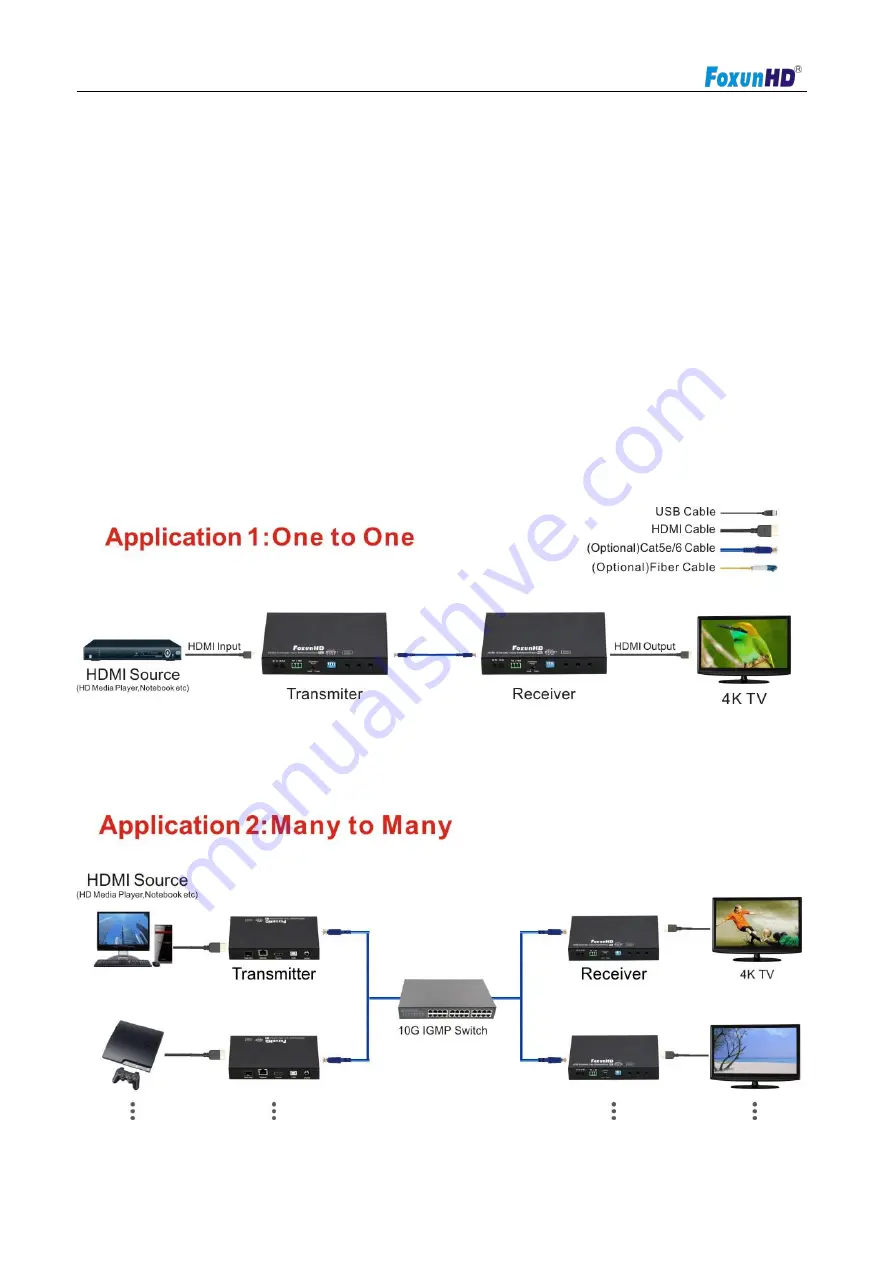
2. Set up the group of the transmitter with the correspondent receiver for signal extension and display .
3. Connect the Transmitter to video source with HDMI cable,and connect Receiver to a monitor or display with HDMI cable.
4. Connect the USB cables from transmitter to PC,and connect the USB additional devices such as USB mouse,USB
keyboard and USB pen drive to Receiver.
5. Connect Transmitter and Receiver to the Ethernet switch with network cable.
6. Power on the Transmitter,Receiver and all the connected devices.
7. Power on and activate all the connected devices.
8. Connect the IR extension cable with transmitter and the IR receiver cable with Receiver for remote control.

Summary of Contents for FX-EX37

Page 1: ...product For optimum performance and safety please read these instructions carefully before connecting operating or adjusting this product Please keep this manual for future reference ABLE OF CONTENTS...

Page 2: ...Our company reserve the right to make changes in the hardware packaging and any accompanying documentation without prior written notice SPECIFICATIONS Performance Protocol TCP UDP RTSP RTP DHCP IGMP M...

Page 3: ...m Net Weight TX 472 8G RX 472 3G Note1 Specifications are subject to change without notice Mass and dimensions are approximate Note2 when transmit over Fiber 4kx2k require 3 125g module PACKING CONTEN...

Page 4: ...Green LED Link LED when the connection has established over Cat5e 6 cable or Fiber cable the Green LED will illuminate B Yellow LED When the yellow LED is blinking it indicates the connection has bee...

Page 5: ...ink LED when the connection has established over Cat5e 6 cable or Fiber cable the Green LED will illuminate B Yellow LED When the yellow LED is blinking it indicates the connection has been establishe...

Page 6: ...to video source with HDMI cable and connect Receiver to a monitor or display with HDMI cable 4 Connect the USB cables from transmitter to PC and connect the USB additional devices such as USB mouse U...

Page 7: ...P Configuration The 4k HDMI USB over IP Extender can configure via LAN in the same subnet 1 Assign a LAN IP address to the computer in the same subnet The IP address default of the Transmitter and rec...

Page 8: ...the factory reset so the forst thing we need know the IP address of each unit There is two way to get the IP address 1 Via Node List Open the Node List in the Tool file press twice the Node_list bat t...

Page 9: ...ow in the lower right corner Remember the transmitter and receiver IP address on monitor screen and then plug HDMI video source cable into transmitter 3 The administrator can input transmitter or rece...

Page 10: ...tting 7 1 1 Version Information Indicating the firmware version and relevant information of the devices 7 1 2 Update Firmware To update the firmware of the connected extender please click on the selec...

Page 11: ...pdate the firmware during the process of update the web user interface sows the status as below diagram the extender system will reboot automatically after updating firmware if it doesn t reboot autom...

Page 12: ...7 1 3 Utilities There are some functions Factory Default Click on to return to the factory default when necessary Reboot click on to reboot the extender systerm Console API Command Input Linux command...

Page 13: ...Operating Instructions www foxunhd com Indicating the extender linking and working status 7 2 Video wall To set up the video wall application 7 2 1 Basic setup...

Page 14: ...le height Please NOTE 1 The viewable width must be less than the outside width and the viewable height must be less than the outside height 2 If administrator doesn t need this just set all values to...

Page 15: ...Operating Instructions www foxunhd com 1 8 horizontal monitor number 1 16...

Page 16: ...foxunhd com Apply to 1 All Configure all transmitter and receiver in the same group IP 2 This Local the IP you input into address bar of web browser 3 Hosts or Clients select which transmitter or rece...

Page 17: ...Operating Instructions www foxunhd com Show OSD Check this box to output each receiver s specific number to the connected monitor 7 2 2 Advance setup...

Page 18: ...ww foxunhd com Before enter advanced setup Please complete the Basic Setup as follows Step1 In Basic Setup select Vertical and Horizontal Monitor Count For example example Vertical monitor Count 3 Hor...

Page 19: ...control If user make incorrect operations press Reset in reset to basic setup function Setup the video output to Fit in or Stretch out mode the screen Setup the rotation angle of the video output Setu...

Page 20: ...n position of monitor number from 0 to total number of vertical monitor Setup the video position shift and video enlarge Horzontal shift Setup the video horizontal shift left or right Vertical Shift s...

Page 21: ...Linux command to do advance setup 7 3 Network update the network setup of the extender system 7 3 1 IP Setup Auto IP use automatically extender assign IP system for example 169 254 xxx xxx DHCP use th...

Page 22: ...manually 7 3 2 Casting Mode Select the broadcast mode of the extender application Multicast point to multiple point or multiple point to multiple points broadcast Unicast point to point broadcast 7 4...

Page 23: ...Operating Instructions www foxunhd com Setup the video output and USB extension mode for receiver 7 4 1 Video over IP Setup the video output mode...

Page 24: ...lect the required scalar output mode or select customize and input 8 Hex values for more video output resolution and refresh rate selection 1 80000004 HD 720p 60 2 81000061 WXGA 1366x768 60 3 81000040...

Page 25: ...2 USB over IP Setup the USB extension mode Enable USB over IP Check enable USB extension mode over IP Operation Mode including auto select mode active on line and active per request modes for option...

Page 26: ...Operating Instructions www foxunhd com 7 4 3 serial over IP set up the serial extension mode Select Type 2 as operation mode Set up the baud rate for type 2 Serial over IP Broadcast mode setting...

Page 27: ...and multicast 8 1 Multicast To enable the USB interactive devices controlled by tums please check Auto select USB operation mode per casting mode 8 2 Unicast 8 3 Matrix Install multiple transmitter a...

Page 28: ...tep4 set up the column of the monitor to 0 Step5 Apply the setting to extender system Administrator can complete each extender position setting after follow 5 steps in above and then follow the above...

Page 29: ...al video wall layout showing the selected monitor in the upper left corner with green outline Returned to the previous setup of video wall quickly when incorrect operation was input Reset Adjust the h...

Page 30: ...green outline Adjust the vertical position of the video output Up Down shift the selected monitor to adjust is shown with green outline Horizontal scale up to scale up the video output horizontally a...

Page 31: ...Operating Instructions www foxunhd com Vertical Scale Up to scale up the video output vertically as the monitor shown with green outline...

Page 32: ...vicer uses parts specified by the manufacturer or parts that have the same characteristics as the original parts Unauthorized substitutes may result in fire electric shock or other hazards 4 Safety ch...

Page 33: ...stment of consumer controls improper maintenance power line surge lightning damage modification or service by anyone other than a Factory Service center or other Authorized Servicer or damage that is...

Reviews: