Foscam FI9802W Quick Installation Manual Download Page 29

FI9802W  Quick  Installation  Guide 

www.foscam.com


- 28 - 


Figure 2.7 

– Port forwarding in a Linksys Router 


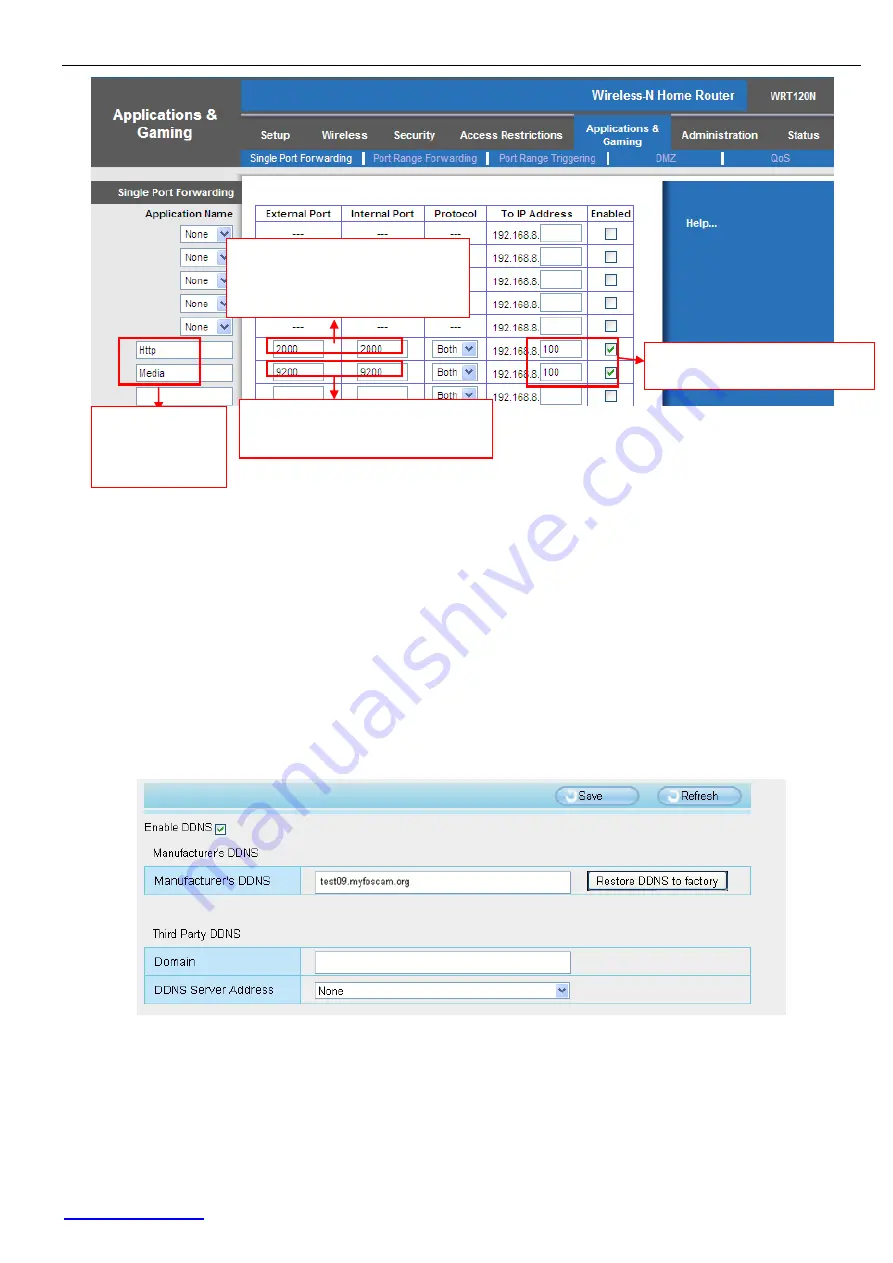
Use the embedded DDNS to access the camera via the Internet 

Each Foscam camera has an embedded unique DDNS domain name, the format of this domain 
name is xxxxxx.myfoscam.org. On the bottom of the camera, you can see the domain name sticker 
with this information on it. 
 
For example, we can use 

test09.myfoscam.org

. In the camera, click Settings at the top, click 

“Network” on the left, then click “DDNS” to get to the DDNS settings page. Here you can see the 
unique domain name of your camera. 


Figure 2.8 

– DDNS Settings Page


Now you can use “http://

Domain name + HTTP Port

” 

to access the camera via the Internet. 

Take hostname 

test09.myfoscam.org and HTTP Port of 2000 

for example, the URL link to access 

the camera via the Internet would be 

http:// test09.myfoscam.org:2000


Fill this section with the LAN IP 
of the camera, Example: 100 

Assign a name 

for the port 

forward setting 

here 

Fill the HTTP Port of the camera in 

the columns of External Port and 

Internal Port.    Example: 2000 

Fill the Media Port of the camera in 
the  columns  of  External  Port  and 
Internal Port. Example: 9200 

Summary of Contents for FI9802W

Page 1: ...V2 01 Model FI9802W Quick Installation Guide Outdoor HD Wireless IP Camera For Windows OS Page 1 For MAC OS Page 16 ShenZhen Foscam Intelligent Technology Co Ltd...

Page 2: ...Power Adapter 12V 2 0A x 1 Network Cable x 1 Wi Fi Antenna x 1 Mounting Bracket x 1 Quick Installation Guide x 1 CD ROM with Setup Software x 1 Warranty Card x 1 Package Contents Quick Installation D...

Page 3: ...etwork cable 3 Get the camera connected to the router and insert the power adapter Use the network cable to connect the camera to the router or the switch in the LAN network at your home or your offic...

Page 4: ...mporarily until the camera is set up Double click the IP address of the camera your default browser will open to the camera login page Figure 1 5 The Login window If it is your first time logging into...

Page 5: ...F Fo or r I In nt te er rn ne et t E Ex xp pl lo or re er r Figure 1 6 Install the ActiveX plugin Internet Explorer After installing the plugin refresh the browser and you will be able to see the live...

Page 6: ...ugin Figure 1 8 Download the plugin Firefox Drag the download file into Firefox web page and it will prompt you to install it Figure 1 9 Installing the Firefox plugin Refresh or reopen Firefox after t...

Page 7: ...as in Figure 1 8 Download the plugin and drag it to the Extensions page of Google Chrome Figure 2 0 The Extensions page in Google Chrome Click the Add button to install the Plugin Figure 2 1 Installin...

Page 8: ...k panel on the left side of the screen then click Wireless Settings Click the Scan button and the camera will detect all wireless networks around the area It should also display your router in the lis...

Page 9: ...ction and the LAN IP of the camera will show again on the window of the IP Camera Tool The IP address may have changed after the camera receives a wireless connection we recommend setting a static loc...

Page 10: ...eras have the default HTTP port of 88 For example if the LAN IP link of the camera is http 192 168 8 102 88 this means that the camera s HTTP port is 88 You can change port 88 to another port if you d...

Page 11: ...8 102 2000 in IP Camera Tool Also the LAN IP address is now fixed at a static IP address of http 192 168 8 102 2000 This IP address will not change even if the camera is powered off and back on the ca...

Page 12: ...be different Once you change the Media port click save to save the settings you may need to wait about 10 seconds for the information to be updated Firstly please check to see if your ISP Internet Se...

Page 13: ...cess the IP Camera from the Internet remote access Enter the WAN IP address and port number in your standard browser For example you would enter http 183 37 28 254 85 Make sure port forwarding is succ...

Page 14: ...forwarding you are telling your router to allow a connection through a certain port you can think of it as a gateway into your router You set this port to a specific device in our case an IP Camera s...

Page 15: ...S to get to the DDNS settings page Here you can see the unique domain name of your camera Figure 2 9 DDNS Settings page Now you can use http Domain name HTTP Port to access the camera via the Internet...

Page 16: ...finished the quick installation guide of the camera Please refer to the electronic user manual in the CD ROM for other settings such as Alarm Settings Email Settings User Settings and much more If yo...

Page 17: ...0A x 1 Network Cable x 1 Wi Fi Antenna x 1 Mounting Bracket x 1 Quick Installation Guide x 1 CD ROM with Setup Software x 1 Warranty Card x 1 Quick Installation Guide Flow Chart P 1 Package Contents Q...

Page 18: ...e network cable 3 Get the camera connected to the router and insert the power adapter Use the network cable to connect the camera to the router or the switch in the LAN network at your home or your of...

Page 19: ...that MAC address filtering firewalls and anti virus are disabled temporarily until the camera is set up Double click the IP address of the camera Safari will open to the camera login page Figure 1 5 T...

Page 20: ...6 Download the plugin for Safari Figure 1 7 Click Continue to start the installation During the installation you may receive a pop up dialogue asking for your password enter the login password and al...

Page 21: ...ation After the installation close and reopen the browser then the plugin will take effect log into the camera again and you will be able to see the live video screen Figure 1 9 The Live Video Page If...

Page 22: ...our router in the list Figure 2 0 Figure 2 0 Wireless Settings Step 2 Click the SSID name of your router in the list the corresponding information related to your network such as the name and the encr...

Page 23: ...the camera receives a wireless connection we recommend setting a static local IP address if this IP address changes Congratulations You have set up the wireless connection of the camera successfully...

Page 24: ...f you d like such as 2000 or 8090 which will not be conflict with other existing ports like 25 21 Here you can set the port no between 1 and 65535 Media Port When you login to the camera you can see t...

Page 25: ...8 100 2000 This IP address will not change even if the camera is powered off and back on the camera will remain on this LAN IP address This is very important that a static LAN IP address is set or you...

Page 26: ...one for Static IP addresses and one for Dynamic IP addresses If your ISP provides a Static WAN IP Address please go to Chapter 5 1 Page 25 If your ISP provides Dynamic WAN IP Address please go to Cha...

Page 27: ...the status of UPnP reads UPnP Successful on the Device Status page 2 Do port HTTP port and Media port forwarding manually See Figure 2 7 for further details If your router has a Virtual Server it can...

Page 28: ...so it can be accessed from anywhere in the world Click this link to learn more about port forwarding http portforward com help portforwarding htm How do we configure Port Forwarding For this section...

Page 29: ...hen click DDNS to get to the DDNS settings page Here you can see the unique domain name of your camera Figure 2 8 DDNS Settings Page Now you can use http Domain name HTTP Port to access the camera via...

Page 30: ...tallation guide of the camera Please refer to the electronic user manual in the CD ROM for other settings such as Alarm Settings Email Settings User Settings and much more If you have problem with FOS...

Reviews: