


17
w
w
w
w
w
w
w
w
.
.
f
f
o
o
s
s
c
c
a
a
m
m
.
.
c
c
o
o
m
m
S
S
h
h
e
e
n
n
z
z
h
h
e
e
n
n
F
F
o
o
s
s
c
c
a
a
m
m
I
I
n
n
t
t
e
e
l
l
l
l
i
i
g
g
e
e
n
n
t
t
T
T
e
e
c
c
h
h
n
n
o
o
l
l
o
o
g
g
y
y
C
C
o
o
.
.
,
,
L
L
i
i
m
m
i
i
t
t
e
e
d
d
T
T
e
e
l
l
:
:
8
8
6
6
7
7
5
5
5
5
2
2
6
6
7
7
4
4
5
5
6
6
6
6
8
8
F
F
a
a
x
x
:
:
8
8
6
6
7
7
5
5
5
5
2
2
6
6
7
7
4
4
5
5
1
1
6
6
8
8
17
3.5 Multi-Device Settings
If you want to view multi-surveillance screens on one window, you need to login one camera, and
set it as the main device, and do Multi-Device Settings, add other cameras to the first one
camera. Before you do multi-cams settings, you need to assign different port such as 81, 82, 83,
84, 85, 86, 87, 88 to the cameras if there is 8 cams installed.
The firmware within the camera can support a maximum of 9 devices monitoring all at the same
time.
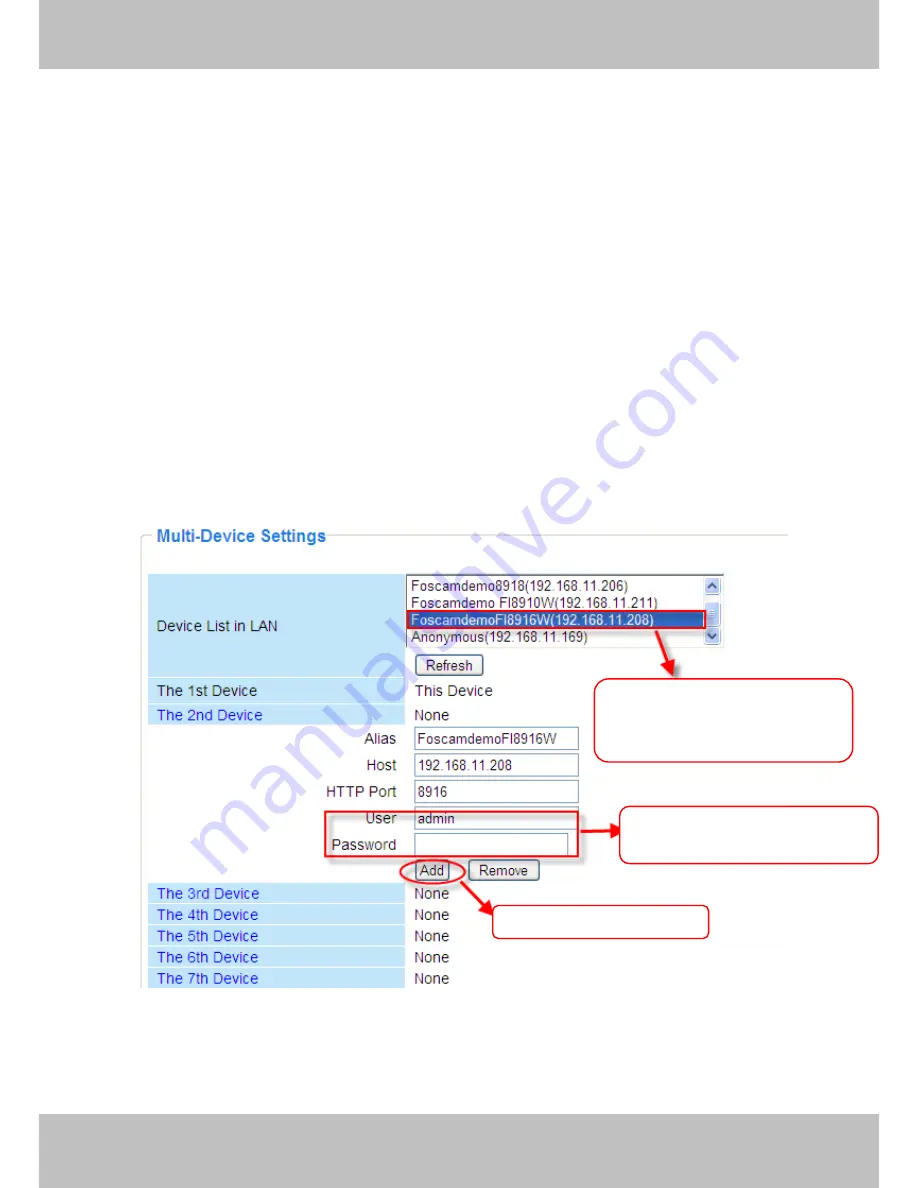
3.5.1 Add cameras in LAN
In Multi-Device Settings page, you can see all devices searched in LAN. The 1st Device is the
default one. You can add more cameras in the list in LAN for monitoring. The
camera’s software
supports up to 9 IP Cameras online simultaneously. Click
The 2nd
Device
and click the item in
the
Device List in LAN
, the Alias, Host and Http Port will be filled in the boxes below
automatically. Enter the correct username and password then click
Add
. Add more cameras in
the same way. After all cameras have been added, choose
Submit
.
Figure 3.7a
1 Click it, alias, host and HTTP
Port will be filled in the following
boxes automatically
2 Enter the User name and
password of the 2nd
camera
3 Click Add to take effect


