background image


13


Issued: 08.01.2008


Extent of delivery

The equipment of the FOR U 
depends on the options ordered. 


After receiving your FOR U, please 
check the following: 
•    the completeness of the delivery

on the basis of the order form 

•    the delivery condition using the 

inspection plan (chapter 14.2) 

If any faults are apparent or 
components are missing, please 
contact KYMCO or your medical 
supplier. 

The following items are included in 
delivery in addition to the FOR U:

1. Shopping basket 

2. Two vehicle keys for switching 

the FOR U on 

3. Battery Charger 

4. Operating Manual 

2.2


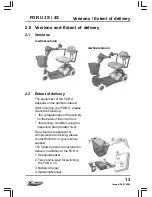
4-wheel version

Versions and Extent of delivery


Versions


3-wheel version


2.0


2.1


delivery


Versions / Extent of

FOR U 3S / 4S

Summary of Contents for 3S

Page 1: ...MANUAL OPERATING 3S and 4S ...

Page 2: ......

Page 3: ...ard to other versions The operating manual will help you get to know the function of our FOR U and in addition describes operation care and maintenance repair This Operating Manual assumes that the suitability of the user for FOR U usage has been discussed with a doctor therapist and or dealer before operation With the FOR U you have now purchased a product which has been manufactured in accordanc...

Page 4: ...FOR U3S 4S 4 Issued 08 01 2008 ...

Page 5: ...ting the speed 35 Before driving 35 Driving 36 7 1 7 2 7 3 7 4 6 0 5 2 5 3 5 0 4 0 3 0 Versions and Extent of delivery 13 2 1 Versions 13 2 2 Extent of delivery 13 Components 14 3 1 The FOR U 14 3 2 The dashboard displays and controls 14 Brief instructions 15 4 1 Driving the FOR U 15 4 2 Transporting the FOR U 17 Setting up the Strider 19 Adjusting the seat height 19 5 2 1 Adjusting the armrest wi...

Page 6: ... What are batteries for cyclic use 43 11 2 2 When do the batteries achieve their maximum performance 43 11 2 3 How do I make sure the batteries achieve their best service life 44 11 3 The auto switch off 44 11 4 The drive unit 44 11 5 The working principle 44 11 6 The control unit 44 11 7 Anti tipping wheels 45 11 8 Wheels and tyres 45 11 9 Brakes on the FOR U 45 11 10 The tiller lock 46 11 11 Dri...

Page 7: ...icator blink codes 61 Repairs 63 16 1 Information about safety at work 63 16 2 Tools 63 16 3 Front wheel removal and replacement 3 wheel version 64 16 4 Front wheel removal and replacement 4 wheel version 65 16 5 Rear wheels removal and replacement 66 16 6 Replacing the tyre 67 16 7 Adjusting lock counterstop 68 16 8 Fuses 69 16 9 Batteries 70 16 9 1 Disposal of used or damaged batteries 70 16 9 2...

Page 8: ...riving situations correctly and reacting correspondingly to them at any time Intended use The KYMCO scooter is Class B European standard EN 12 184 1 2 NOTE You will also find information about dealing with the product under this symbol Safety instructions Symbols used This instruction manual contains the following symbols which are used to highlight special hazards in dealing with the product or i...

Page 9: ...lways rectify any faults which could influence the function and safety of the scooter immediately Observe maximum loading see Specifications Only use accessories and spare parts authorized by KYMCO The scooter is only authorized for transport of one person Do not carry out any seat adjustments while driving General Information Read the entire operating manual thoroughly before using the FOR U Ensu...

Page 10: ... Always drive straight up and down gradients do not drive in zigzags Do not turn around on inclines Do not drive down steps Do not drive backwards down gradients stairs or kerbstones or over obstacles Safety when driving Risk of accidents Check correct functioning of the brakes before every journey Always use the seat belts when driving Do not switch the scooter off while driving Do not drive up o...

Page 11: ...rrectly assembled After assembly check that all locking devices are holding correctly Clamping and crushing hazard Increased hazards due to clamping or crushing result due to the high component weight such as batteries during preparation for transport and maintenance work Always carry out any work to be done with great care Always try to get help from a second person especially when stowing parts ...

Page 12: ...u are using your mobile phone 1 7 Burn hazard due to damaged batteries Batteries discharging acid can lead to serious burns Do not touch damaged batteries with your bare hands Use rubber gloves If acid should contact your skin wash the affected area immediately with plenty of water and contact a doctor If acid should come in contact with your eyes rinse them out immediately with lots of water and ...

Page 13: ...ion using the inspection plan chapter 14 2 If any faults are apparent or components are missing please contact KYMCO or your medical supplier The following items are included in delivery in addition to the FOR U 1 Shopping basket 2 Two vehicle keys for switching the FOR U on 3 Battery Charger 4 Operating Manual 2 2 4 wheel version Versions and Extent of delivery Versions 3 wheel version 2 0 2 1 de...

Page 14: ...dle Handle The dashboard displays and controls Operation indicator fault display Keyswitch ON OFF switch Speed contoller 3 2 Steering wheel Battery case Shopping basket Tiller Seat unit with armrests Rear view mirror accessory Components The FOR U Dashboard with controls 3 0 3 1 Components FOR U 3S 4S ...

Page 15: ...t height the backrest and the armrests to a comfortable position Your specialist dealer would be very glad to help 4 1 Brief instructions The following brief instructions should enable people to quickly get used to operating the scooter after a long period of non use and to refresh existing knowledge of operation It is imperative that you follow the instructions given in the main manual 4 0 Brief ...

Page 16: ...e lever position controls the speed variably right up to maximum driving speed 7 Driving Operate the drive lever slowly until the required speed has been reached highest possible driving speed approx 4 mph lowest possible driving speed approx 1 5 mph 5 Check the battery Brief instructions 6 Set the maximum speed FOR U 3S 4S ...

Page 17: ...17 Issued 08 01 2008 4 Fold the tiller down 3 Locking the tiller 2 Removing the battery case 1 Remove the seat Transporting the FOR U 4 2 Brief instructions FOR U 3S 4S ...

Page 18: ...1 2008 The FOR U dismantled 1 Chassis 2 Drive unit 3 Battery case 4 Seat unit Reassembling the FOR U Stages 6 to 1 5 Unlockthedriveunit 1 tilt the drive unit away 2 Brief instructions 6 Remove the chassis FOR U 3S 4S ...

Page 19: ...rwards Removing the seat Removing the seat Adjusting the seat height NOTE The seat must be removed from the FOR U in order to adjust the seat height You should try to get help from a second person if possible or contact your dealer 5 1 Setting up the FOR U The following passage describes how to set up your FOR U in order to ensure that you have a comfortable and safe drive 5 0 Adjusting the seat h...

Page 20: ... seat support 5 Hold the clamping bolt 2 with a ring spanner size 12 mm and unscrew the self locking nut 3 with the other ring spanner size 12 mm Tools required 2 x ring spanner size 12 mm Adjusting the seat height Adjusting the seat height Removing the clamping bolt FOR U 3S 4S ...

Page 21: ...mm tighten the clamping bolt Pull the seat support 5 out as far as the required height until the correct hole B1 B5 appears in the seat tube hole 6 Push the clamping bolts 2 with the form shim 4 into the seat tube 6 from the front Adjusting the seat support The seat height h is adjusted using the five holes B1 B5 in the seat support Adjusting the seat height FOR U 3S 4S ...

Page 22: ...he seat Inserting the seat Pull the seat lock a and guide the seat into the seat support from above Let go off the seat lock and engage the rotational adjustment by turning the seat a little one way then the other Reinserting the battery case Insert the battery case into the FOR U chassis the seat position Reinserting the battery case Adjusting FOR U 3S 4S ...

Page 23: ...est height Adjusting the bachrest Adjusting the backrest height 5 2 2 CAUTION Do not pull the armrests further out than the marking a for maximum armrest width Loosen both clamping screws 1 Pull both armrests 2 simultaneously to the required width Secure the armrests by tightening the clamping screws Adjusting the armrest width 5 2 1 Adjusting the armrest width Adjusting the seat position 5 2 the ...

Page 24: ...ing the tiller 1 Loosen the clamping screw 2 Push the tiller forwards or backwards into the required position 3 Tighten the clamping screw Ensure that the tiller is engaged properly by moving slightly forwards and backwards Accident hazard due to non engaged tiller Ensure that the tiller is properly engaged after adjustment by pushing it slightly forwards and then backwards 24 Issued 08 01 2008 ...

Page 25: ... always reduce the speed when you are driving through unclear areas narrow gaps tight curves inclines ramps take a trial run with the FOR U in an area with no pedestrians or in a closed off area always steer the FOR U using both hands on the handlebars always keep your feet in the foot area while driving the FOR U 6 1 Driving up inclines and down slopes The FOR U can climb up inclines of up to 6 3...

Page 26: ...re forward position you lean your upper body slightly forwards see sketch Increased tipping safety Avoid driving across an incline always try to drive in the direction of the incline decline There is an increased danger of tipping when climbing or descending gradients if the FOR U is loaded at the back and additionally you lean your upper body backwards see sketch information Tipping hazard Drivin...

Page 27: ...bstacle at a right angle try to clear the obstacle in one go DO NOT try to climb an obstacle when on an incline don t try to drive over obstacles which are too high example kerbstones remedy always climb up kerbstones at lowered entry areas such as driveways Please observe the following points to make sure that your FOR U doesn t tip over while climbing obstacles information Driving FOR U 3S 4S ...

Page 28: ...wheel hit the kerb Adjust the speed controller to maximum speed Adjust the speed controller Stop approximately 0 5 Meter 19 inches in front of the kerb Stop in front of the kerb Approach the kerb at a right angle Approach at a right angle Driving Information Overcoming kerbs Risk of accidents Neogating kerbs needs practice Please observe the maximum obstacle heights of 5 cm Please start practicing...

Page 29: ...it to cool down for a few minutes Switch the scooter on again and reverse away from the obstacle such as kerbstone and then try again at a lower point be careful turning the scooter around on inclines and always reverse away very slowly Tipping hazard There is an increased tipping hazard if the incline is very steep Try to get help from a second person when turning your scooter around Accident haz...

Page 30: ... If the vehicle is under heavier loading for example heavy acceleration driving up hills the pointer can sometimes go to the red area of the display This is not critical and does not indicate the actual charging state of the batteries If the pointer has gone into the red area of the display after the journey it will often show green after the FOR U has been turned off for a long period This does n...

Page 31: ...en speed do not accelerate or brake unnecessarily The driving range will be decreased if you drive in cold weather drive in hilly regions NOTE please see the information about batteries in the Appendix 6 4 3 Overdischarge protection battery protection In order to protect the batteries from over discharging the control unit switches the FOR U off This takes place when the battery voltage falls belo...

Page 32: ...rning lock 1 on the seat forwards Turn the seat 90 towards you 2 and engage The FOR U must be standing on firm level and non slippery ground The engaging lever for push mode must be in the drive position chapter 8 0 Turn the FOR U off and remove the key Tilt the steering column forwards chapter 5 3 When getting in and out ensure that your clothing does not get caught on the drive lever Turning the...

Page 33: ...t closer 1 at right angles to the seat belt Adjust the length by pulling the appropriate belt side a shortening the belt length b lengthening the belt length Tension the loose seatbelt end by pulling the belt holder 2 7 2 NOTE If you feel you are safe enough you can of course get onto the FOR U without turning the seat round You can lift up the armrest on the side where you are standing and then g...

Page 34: ...located on the dashboard Insert the key into the switch and turn it to the right to switch the FOR U on 7 4 Turning the seat Pull the turning lock 1 turn the seat in the required direction or position 2 and engage Accident hazard due to incorrect seat position Always turn the seat to face forwards and engage it before driving If the seat has been turned the possibility of tipping is increased Befo...

Page 35: ...NOTE Use the controller to adjust the speed to suit local conditions Select a lower speed if you are driving through narrow gaps on inclines or through crowds 7 6 Before driving Checks before driving Are the batteries charged Check the display in working order Are the brakes working To check drive slowly and stop again in working order Are the tyres and wheels undamaged Visual check of tyres and w...

Page 36: ...or to brake 7 8 Reverse Forwards 1 Standstill brake engaged Standstill brake engaged The drive lever position controls the speed variably right up to maximum driving speed driving in reverse driving forwards Handle Handle Hold the tiller firmly in both hands Press the drive lever 1 in the direction of travel until the required speed has been reached Driving Accident hazard due to locked tiller Bef...

Page 37: ...g the horn 7 10 Switching off parking the FOR U Turn the key to the left to switch the FOR U off Always turn the FOR U off using the keyswitch 1 if you want to get on or off intend to stop for long periods Always remove the key from the keyswitch if you want to park the FOR U and get off Switching the FOR U off 37 Issued 08 01 2008 ...

Page 38: ...age securely at the limit position Do not disengage the motor when on an incline Attaching the shopping basket Push the shopping basket 1 from above into the basket holder receptacles 2 on the tiller NOTE Use the shopping basket only for small loading Driving b Pushing a Switch the FOR U off Push the disengaging lever 1 forwards as far as the stop limit position Disengaging the drive Pushing the F...

Page 39: ...f device which prevents overcharging the batteries Do not leave the battery charger connected to the scooter for more than 24 hours The batteries can be charged overnight Switch the FOR U off before charging the batteries When is charging required the battery charge display is in the red area after the final journey of the day at least once per week Charging times Between 8 and 14 hours depending ...

Page 40: ...rging socket The jack socket 3 for connecting the battery charger is located on the tiller Connecting the battery charger It is imperative that you observe the sequence for connecting and disconnecting the battery charger Switch the FOR U off Engage the engaging lever for push mode into the drive position Engaging Switchingoff 10 2 1 Charging the batteries in the FOR U via the tiller 10 2 Charging...

Page 41: ...se charging socket It is imperative that you observe the sequence for connecting and disconnecting the battery charger The jack socket 2 for connecting the battery charger is located on the rear of the battery case Connecting the battery charger Remove the battery case upwards out of the FOR U chassis Removing the battery case 10 2 2 Charging the batteries in the battery case when removed from the...

Page 42: ... charger 1 Switch off and remove the battery charger plug from the mains socket After charging 10 3 Removing the mains plug b orange charging in progress Green charging complete battery completely Meaning battery charger LED Colour a Red LED 10 2 3 LED information at battery charger during charging the Charging FOR U 3S 4S ...

Page 43: ...eat The batteries used in the FOR U are known as batteries for cyclic use Only enclosed maintenance free deep cycle batteries are used The battery case is fitted with its own charging socket This means that it is possible to charge the batteries when separated from the FOR U Chapter 10 2 2 11 2 Since no charging current is flowing when the batteries are full the batteries cannot be overloaded more...

Page 44: ...heels 11 5 Drive unit The drive unit The complete drive unit is located in the rear of the FOR U and consists of the following main components the battery case 1 the control unit and the drive motor with rear axle 2 NOTE The control unit and its cabling is protected by a shroud 3 11 4 The auto switch off The auto switch off automatically switches the FOR U off after 20 minutes at a standstill This...

Page 45: ...n braked by the drive motor When the FOR U is at a standstill or has been switched off it is braked by a magnetic brake 11 9 Wheels and tyres The FOR U is fitted with puncture proof tyres 11 8 Wheels and tyres Anti tipping wheels The anti tipping wheels 4 reduce the danger of tipping during extreme manoeuvres when fixed to the rear of the FOR U It is not permitted to drive the FOR U without anti t...

Page 46: ...ou must be aware of the risks involved to both yourself and others It is recommended that you take out third party insurance to cover you against any possible claims Advice and policies are available from insurance companies or alternatively ask your scooter supplier for details 11 12 Driver s licence Not required 11 11 The tiller lock The handlebar of the FOR U can be locked in the straight ahead...

Page 47: ... are permitted to sit on the scooter during transport Drive or push the FOR U up a ramp into the vehicle Switch the engaging lever to drive mode Secure the FOR U against tipping over by fastening it to the transport vehicle with transport straps 12 2 Transport information Depending on the size of the transport vehicle the FOR U can be dismantled in a few steps so that it can also be easily transpo...

Page 48: ...le pulling the seat lock a out of the seat support Removing the seat 12 3 1 Working step summary 1 Remove the seat 2 Remove the battery case 3 Locking the tiller 4 Fold the tiller down 5 Disengage the drive unit from the chassis In just a few steps you can dismantle the FOR U down to the following components to make it ready for transport 1 Chassis 2 Drive unit 3 Battery case Transporting the FOR ...

Page 49: ...ning slightly forwards and backwards 12 3 5 Folding the tiller down Folding the tiller down NOTE In the case of the 4 wheel FOR U turn the steering column to the side and then lock 1 Push the locking lever into the drilling a of the steering lock and 2 turn it through 45 Turn the tiller to face straight ahead 12 3 4 Locking the tiller Transporting the FOR U Locking the tiller FOR U 3S 4S ...

Page 50: ...Remove the chassis upwards from the drive unit Separating the chassis 1 Pull the locking device a and 2 tilt drive unit to the rear onto the anti tip wheels Tilt the drive unit away 12 3 6 Disengaging the drive unit from the chassis Transporting the FOR U FOR U 3S 4S ...

Page 51: ... adjustments in Chapter 16 7 Repairs Clamping and crushing hazard Pay particular attention to hazards caused by trapping and crushing while carrying out this work 2 Fold the drive unit forwards Folding the drive unit in 12 4 1 Engaging the drive unit to the chassis 1 Locate the chassis holding bolts 1 into the guides 2 at the drive unit Connectingthe chassis 12 4 After Transport Reassembly Working...

Page 52: ...he tiller Unlocking the tiller Accident hazard due to non engaged tiller Ensure that the tiller is properly engaged after adjustment by pushing it slightly forwards and then backwards 1 Loosen the clamping bolt 2 Fold the tiller into the required position 3 Tighten the clamping bolt Ensure that the tiller is engaged properly by moving slightly forwards and backwards 12 4 2 Folding the tiller up Tr...

Page 53: ...seat 12 4 5 Fitting the seat Pull the seat lock a and guide the seat into the seat support from above Let go off the seat lock and engage the rotational adjustment by turning the seat a little one way then the other NOTE If after inserting the seat it is not possible to turn the seat or to pull the seatlock the seat is not properly locked 53 Issued 08 01 2008 ...

Page 54: ...d with damp cloths and slightly soapy water Heavy soiling can best be removed with damp cloths and slightly soapy water Use a dry cloth to dry the scooter off after cleaning Use a dry cloth to dry the scooter off after cleaning All lacquered surfaces can be cleaned and preserved using car polish All lacquered surfaces can be cleaned and preserved using car polish 14 0 Maintenance and Inspection 14...

Page 55: ...Defective OK Seatbelt no damage fixed securely can be easily adjusted closed securely Armrest padding no damage fixed securely Armrest folding mechanism no play in joint functions easily Armrests width adjustment no damage functions easily Backrest upholstery no damage fixed securely Backrest adjustment no play in joint functions easily Seat upholstery no damage fixed securely Seat and back frames...

Page 56: ...vice engages securely Unlocking mechanics runs freely Frames no damage no corrosion Reflectors no damage Panelling no damage Component chassis Tiller folding mechanism no play in joint functions easily Grip rubbers no damage fixed securely Panelling no damage fixed securely Component Tiller Assessment Defective OK Description Component inspection for 56 Issued 08 01 2008 and inspection Maintenance...

Page 57: ...from any position Secure blockage of magnetic brakes when lever is in central position FOR U can not be pushed Dashboard switches no damage safe function Dashboard displays no damage safe function Indicator lamps no damage safe function Charger jack socket no damage Batteries no damage fixed securely Check battery voltage 12 14 Volt per battery Check battery capacity Control unit no damage fixed s...

Page 58: ...e error should occur again you can find information about troubleshooting and appropriate remedies in the lists in sections 15 2 and 15 3 58 Issued 08 01 2008 Description Component inspection for Assessment Engaging lever no damage functions easily lever engaged lever remains engaged Motor magnetic brake holding force OK FOR U can not be pushed with engaging lever in drive position Motor drive no ...

Page 59: ...battery Charge the batteries charge display chapter 10 0 battery discharged Scooter does not run Batteries Replace batteries defective dealer Batteries Charge the discharged batteries chapter 10 0 Check fuse in power supply to tiller head chapter 16 8 Check the battery fuses chapter 16 8 Battery not pluged in Power supply interrupted Scooter not Switch the scooter switched on on chapter 7 4 Scoote...

Page 60: ...er 10 0 Battery charge display moves rapidly to discharged during journey Motor jerks during driving Main fuses blow frequently Batteries defective Motor defective Fault in control Visit your dealer unit Short circuit in electrical equipment Fault Cause Remedy 60 Issued 08 01 2008 battery cable Defective fuse in Visit your dealer Motor defective Batteries defective Visit your dealer Troubleshootin...

Page 61: ...tery terminals for tight fit Chapt 16 9 2 Check battery connection to chassis Chapt 12 4 4 Weak power supply from the battery Discharged battery Charge the batteries Chapt 10 0 1 x blink 61 Issued 08 01 2008 15 3 2 Error message blink sequences 15 3 1 Blink 15 3 Operation indicator blink codes The operation indicator 1 on the dashboard is also designed as a display for error messages Various fault...

Page 62: ...tery charger Chapt 10 3 7 x blink Drive lever pressed down Switch off the Scooter while switching on release the drive lever and switch on again 8 x blink Fault in control unit Have all cable connections checked specialist dealer 9 x blink 9 x blink Bad connection to motor Have all cable brake connections checked specialist dealer Bad connection of the Clean the contacts 4 pol contact between chas...

Page 63: ... particular attention to hazards caused by clamping and crushing while carrying out any repair work This applies particularly to all rotating and adjustable parts of the scooter such as around the steering wheels The FOR U must be lifted in order to carry out certain work such as removing the wheels Before you lift the FOR U make sure you prevent it rolling away by wedging it securely Make sure th...

Page 64: ...ing the front wheel Secure the FOR U against rolling away Lift the front end of the FOR U and support it see chapter 17 0 Remove the wheel fixing protective cap 1 with a screwdriver Hold the axle 2 with a ring spanner size 14 mm and remove the self locking nut 3 size 17 mm Pull the axle out of the steering fork and the wheel Remove the wheel and spacer bushes from the steering fork Front wheel Rem...

Page 65: ...heel Front wheel removal and replacement 4 wheel version Tools required Front wheel 1 x socket spanner size 10 mm Removing the front wheel Loosen the fixing screw 1 for the wheel fastening size 10 mm Secure the FOR U against rolling away Lift the FOR U and support it see chapter 17 0 Remove the fixing screw for the wheel fastening Pull the wheel off the stem NOTE Do not use force to remove the whe...

Page 66: ...he axle key Fitting the rear wheel NOTE Do not use force to remove the wheels from the axles Your specialist dealer has the necessary special tools Rear wheel Loosen the fixing screw 1 for the wheel fastening size 12 mm Secure the Strider against rolling away Lift the FOR U and support it see chapter 17 0 Remove the fixing screw for the wheel fastening Pull the wheel off the stem Rear wheels remov...

Page 67: ... a socket spanner size 12 mm and remove together with the lock washers 2 Separate the wheel hub 3 from the wheel rim Remove the inner wheel rim 4 from the tyre Remove the outer wheel rim 5 from the tyre components of the FOR U wheel Replacing the tyre Remove the damaged wheel Dismantling the wheel rims 16 6 Provide the fixing bolt with a washer 5 screw in and tighten Lower the FOR U Retighten the ...

Page 68: ...E Check the locking device function by connecting chassis and drive unit during adjustment several times Separate chassis and drive unit Chapter 12 3 Release locknut 1 on stop bolt 2 Adjust the lock counterstop a Unscrew the stop bolt until the locking device no longer engages b Screw the stop bolt back in in stages until the locking device engages again Adjusting lock counterstop Adjusting lock c...

Page 69: ...ut fuse and replace it 30 A fusible fuse in battery positive cable 1 Battery fuse 3 A resetable fuse power supply to tiller head and charging socket The FOR U is fitted with the following fuses Wiring diagram Fuses 16 8 Repairs fuses FOR U 3S 4S ...

Page 70: ... used or damaged batteries back to your dealer He will ensure that they are properly disposed of BATTERIES ARE HAZARDOUSWASTE Used and defective batteries must be properly disposed of and only handed over to the correct disposal points 16 9 1 Disposal of used or damaged batteries Caution acid Observe safety information in chapter 1 6 Risk of accidents Refitting the battery may only be carried out ...

Page 71: ...le fromthe battery negative terminal 2 Then remove the cable from the battery positive terminal Loosening the battery cable Remove all four fixing bolts 1 on the bottom of the battery case Put the battery case down on its bottom side and open it Remove the battery case from the FOR U as described in chapter 12 3 3 Opening the battery case 16 9 2 Replacing the batteries Fire and burn hazard if batt...

Page 72: ...port Front support 4 wheel Care during storage Recharge the batteries once a month see chapter 10 0 Remove soiling and dust Charge the batteries completely Place the FOR U on supports Lift the FOR U high enough so that the tyres are no longer touching the floor Front support 3 wheel 17 0 Temporary storage If you are not intending to use your FOR U for longer periods e g over the winter you should ...

Page 73: ... 12 5 kg 3S 14 5 kg 4S Maximum working load user weight 115 kg 18 stone Tyre size front 7 x 1 3 4 3S 200 x 50 4S rear 200 x 50 Working voltage battery voltage 24 Volt Batteries see chapter 16 9 Storage temperature 40 C to 65 C Ambient temperature 25 C to 50 C Theoretical range is calculated under test conditions in accordance with European standards Actual range in normal use will depend on many f...

Page 74: ...FOR U 3S 4S Appendix 18 2 2 Dimensions 3 wheel version 74 Issued 08 01 2008 ...

Page 75: ...FOR U 3S 4S Appendix 18 2 3 Dimensions 4 wheel version 75 Issued 08 01 2008 ...

Page 76: ...arately at these depots Please enquire about disposal depots with your local authority Should you require further advice please contact your supplier or nearest dealer Disposing of the scooter To comply with national law the following instructions are guidelines for the disposal of your product at the end of its life or when it ceases to function economically Recent legislation on electrical equip...

Page 77: ...ear and items subjected to misuse Unauthorized changes or modifications will forfeit your warranty If a defect or fault is discovered KUMCO supplier dealer from whom the scooter was purchased should be notified immediately Limitation of liability The warranty does not extend to the consequential costs resulting from fault clearence in particular freight and travel costs loss of earnings expenses e...

Page 78: ...ignature Date Dealer s stamp Signature Date Dealer s stamp Signature Date Dealer s stamp Signature Date Dealer s stamp Signature Date Dealer s stamp Signature Date Dealer s stamp Signature 78 Issued 08 01 2008 carried inspections 20 0 Annual FOR U 3S 4S ...

Page 79: ......

Page 80: ... Dealer s stamp KWANG YANG MOTOR CO LTD No 35 Wan Hsing Street San Min Distrist Kaohsiung Taiwan Republic of PROC Telephone 886 7 3822526 FAX 886 7 3950021 ...

Reviews: