English
Español
INSTALLATION INSTRUCTIONS
INSTRUCCIONES DE INSTALACIÓN
In case of pressures over 5 BAR (~75 PSI), we
recommend to use a pressure reducer.
Before proceeding with the assembly, purge the hot
and cold water pipes so as to avoid the accumulation
of dirt and impurities that could affect the function of
the faucet.
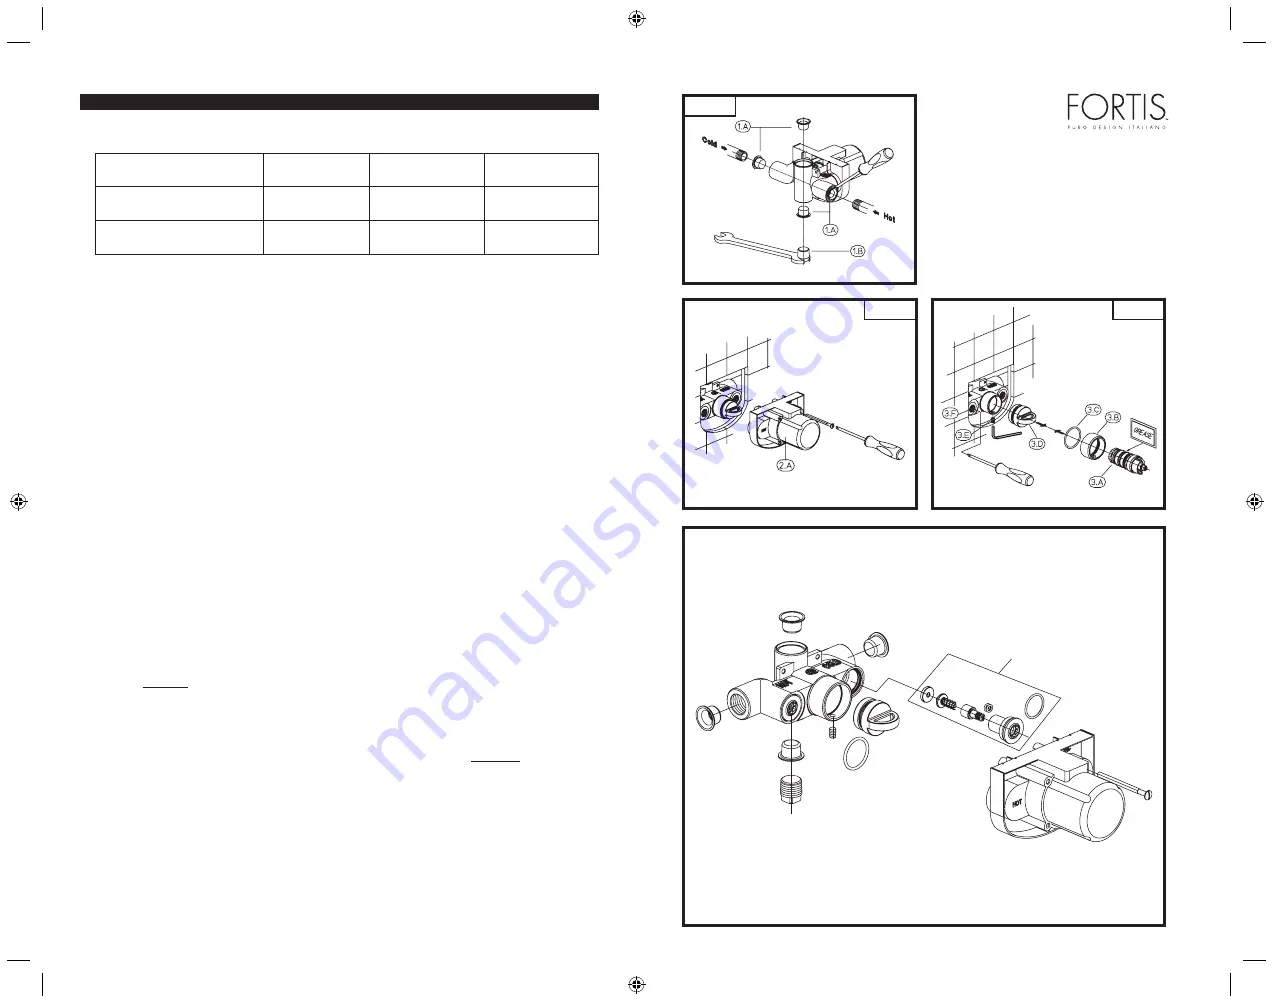
FIG. 01
Remove the protection covers (1.A) using a
screwdriver. Use the plug (1.B) if necessary.
FIG. 02
Fit the faucet body to the wall with the shower outlet
pointing upwards, connect the hot water supply to
the left inlet and the cold water supply to the right
one.
The depth of the wall niche must correspond (
wall
coating included
) to the tolerance given by the MIN/
MAX references given on the plastic cover (2.A).
Once all connections have been carried out, activate
the faucet at the working pressure (we recommend
maintaining the water flow for a few minutes so as to
purge the system from any debris and/or dirt inside
the piping). Temporarily remove the protection cover
(2.A) to check if there are leakages and if the system
works regularly, reinstall the protection cover (2.A)
and finish the external wall surface.
FIG. 03
Remove the protection cover (2.A) as shown in
FIG. 02. With a screwdriver turn the stop cocks
(3.F) clockwise, loosen the fitting screw (3.E) using
the proper wrench and pull out the test plug (3.D).
Install the o-ring (3.C) and the sleeve (3.B) on the
thermostatic body. Use a small quantity of the special
grease included to lightly lubricate the o-rings of the
thermostatic cartridge (3.A). Insert the cartridge in the
faucet housing carefully aligning the positioning hole
with the housing of the fitting screw (3.E), then tighten
the latter.
Warning!
, Do not force the screw (3.E).
Excessive tightening can affect the correct function of
the system or damage it. The thermostatic cartridge
is equipped with a safety anti-scalding retainer set
at 100°F (38°C). For higher temperatures push the
button on the adjustment handle. In case of hot or
cold water pressure failure, the flow will automatically
stop. With a screwdriver loosen the stop cocks (3.F)
in anti-clockwise direction.
Based on its policy of steady development Fortis reserves the right to change the characteristics
of the products without notice and therefore the images and data contained in this catalogue may vary.
Por su política de continuo desarrollo, Fortis se reserva el derecho de modificar las características de los productos sin ningún aviso
previo; por tanto, las imágenes y los datos contenidos en el presente catálogo deben considerarse a título indicativo.
En caso de presiones de funcionamiento superiores
a 5 bares (~75 PSI), se aconseja el uso de un
reductor de presión. Antes de efectuar el montaje,
se aconseja purgar las tuberías del agua caliente y
fría para evitar que suciedad y pequeñas impurezas
afecten el funcionamiento del grifo.
FIG. 01
Quitar los tapones de protección (1.A) con la ayuda
de un destornillador. Utilizar, si es necesario, el
tapón (1.B).
FIG. 02
Colocar a pared el cuerpo del grifo con la salida
de la ducha hacia arriba, conectar la alimentación
del agua caliente con la entrada izquierda y la
alimentación del agua fría con la entrada derecha.
La profundidad de empotramiento en la pared debe
respetar (
incluido el revestimiento
) la tolerancia de
las indicaciones MIN/MAX que se encuentran en la
protección de plástico (2.A).
Cuando todas las conexiones han sido efectuadas
alimentar el grifo con la presión de funcionamiento
(es recomendable prolongar esta fase por algunos
minutos para purgar la instalación de los inevitables
residuos y/o suciedad presentes en las tuberías).
Retirar momentáneamente la protección (2.A) para
comprobar posibles pérdidas; si no se encuentran
anomalías montar nuevamente la protección (2.A) y
realizar el acabado de la superficie externa de la
pared.
FIG. 03
Retirar la protección (2.A) como se indica en la
FIG. 02. Atornillar las llaves de interrupción (3.F) en
sentido horario con la ayuda de un destornillador,
destornillar el tornillo de fijación (3.E) utilizando la
adecuada llave y extraer el tapón de prueba (3.D)
tirándolo hacia el exterior. Introducir el o-ring (3.C)
y el manguito (3.B) en el cuerpo del termostático.
Luego utilizar la grasa especial en dotación para
lubricar ligeramente los o-rings del cartucho
termostático (3.A). Introducirlo en el específico
alojamiento del grifo prestando atención para
hacer coincidir el orificio de posicionamiento con
el alojamiento del tornillo de fijación (3.E), luego
atornillar este último.
¡Atención!
, Evitar apretar
enérgicamente el tornillo (3.E). Un apriete excesivo
podría causar malfuncionamientos o roturas. El
cartucho termostático está dotado de dispositivo
de parada de seguridad antiquemaduras regulado
en 100°F (38°C), para obtener temperaturas más
elevadas es necesario presionar el botón que se
encuentra en la maneta de regulación. En caso
de que cese la presión del agua caliente o fría el
flujo se interrumpe automáticamente. Destornillar en
sentido antihorario las llaves de interrupción (3.F)
con la ayuda de un destornillador.
Water Supply
Alimentación
Recommended
Recomendada
Maximum
Máxima
Minimum
Mínima
Hot Water Temperature
Temperatura agua caliente
65 C° (~150F)
80 C° (~175F)
15 C° (~60F)
Working Pressure
Presión de funcionamiento
3 BARES (~45PSI)
5 BARES (~75PSI)
0.5 BARES (~7PSI)
FIG. 01
FIG. 02
FIG. 03
FR3TCC690VTVAM
Istruz. art. VALVE711.indd 3-4
02/05/11 10:00


