

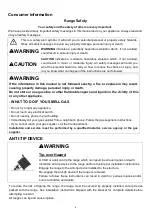


WARNING
KEEP FLAMMABLE MATERIAL AWAY FROM THE RANGE
Failure to do so may result in fire or personal injury.
Do not store or use flammable materials in an oven or near the cooktop, including paper, plastic, pot
holders, linens, wall coverings, curtains, drapes and gasoline or other flammable vapors and liquids.
Never wear loose-fitting or hanging garments while using the appliance. These garments may ignite if they
contact hot surfaces causing severe burns.
Do not let cooking grease or other flammable materials accumulate in or near the range. Grease in the
oven or on the cooktop may ignite.
WARNING
IN THE EVENT OF A FIRE, TAKE THE FOLLOWING STEP TO PREVENT
INJURY AND FIRE SPREADING.
Do not use water on grease fires. Never pick up a flaming pan. Turn the controls off. Smother a flaming
pan on a surface unit by covering the pan completely with a well-fitting lid, cookie sheet or flat tray. Use a
multi-purpose dry chemical or foam-type fire extinguisher.
If there is a fire in the oven during baking, smother the fire by closing the oven door and turning the oven
off or by using a multi-purpose dry chemical or foam-type fire extinguisher. If there is a fire in the oven
during self-clean, turn the oven off and wait for the fire to go out. Do not force the door open.
Introduction of fresh air at self-clean temperatures may lead to a burst of flame from the oven. Failure to
follow this instruction may result in severe burns.
WARNING
Cook food thoroughly to help protect against foodborne illness. Minimum safe food
temperature recommendations can be found at www.IsItDoneYet.gov and www.fsis.usda.gov. Use a food
thermometer to take food temperatures and check several locations.
Do not allow anyone to climb, stand or hang on the oven door, drawer or cooktop. They could damage the
range or tip it over causing severe injury or death.
Keep the ventilator hood and grease filter clean to maintain good venting and to avoid grease fires. Turn the
ventilator OFF in case of a fire or when intentionally "flaming" liquor or other spirits on the cooktop. The
blower if in operation, could spread the flames.
7
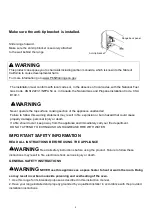
WARNING
DO NOT carry or lift the cooking range by the oven door handle or the control panel!
CORRECT
INCORRECT
INCORRET
WARNING
Never pour cold water to hot surfaces in a hot oven. The steam created could
cause serious burns or scalding and the sudden change in temperature can damage the enamel in the oven.
Summary of Contents for FFSGS6156-30
Page 1: ...FFSGS6156 30 FFSGS6156 36 FFSGS6156 48 09 03 21 dd mm yy...
Page 28: ...Wire Diagram 28...
Page 29: ...29...
Page 30: ...30...