background image

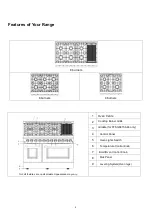
Opening width 

30" Model 

30" (762mm)   

36" Model 

36" (914mm)   

48" Model 

48" (1219mm) 

Exhaust Hood Installation

The bottom of the hood should be 30" min. to 36" above the 
countertop. This would typically result in the bottom of the hood 
being 66" to 72" above the floor. These dimensions provide 
safe and efficient operation of the hood.   
After Installation:   
1. Check ignition of cooktop burners.
2. Check the air shutter adjustment – sharp blue flame, with no
yellow tipping or lifting flames. 
3. Check ignition of oven burner.
4. Visually check tubular burner (oven burner) re-ignition to be
sure both rows of burner ports are relighting each time. 
5. Check for gas leaks at all gas connections (using a gas
detector, never a flame). 
6. Check oven bake and convection bake function.

Gas Conversion Operation

This cooking range can be used with LP gas and NG gas. It is shipped from the factory adjusted for use with 
NG(Nature Gas). Injector for LP gas are included. Follow the instruction shown below for gas conversion. 

WARNING 

Gas conversion shall be conducted by a factory- trained professional. Call

the customer service hotline to identify a factory-trained professional near your home.


Minimum to cabinets on either sides of the range 

W


Opening width 

Min.


To wall either side


Maximum depth for cabinets above countertop 

Front edge of 

the range side 

panel forward 
from cabinet 

To countertops 
below cooktop and 
at the range back 

16

Summary of Contents for FFSGS6156-30

Page 1: ...FFSGS6156 30 FFSGS6156 36 FFSGS6156 48 09 03 21 dd mm yy...

Page 2: ...ion Oven Rack Rail Installation Electrical Gas Supply Pressure Regulator Gas Shut off Valve not included Product Dimensions and Cabinets Exhaust Hood Installation Gas Conversion Operation Cooktop Oper...

Page 3: ...ler or builder that sold you the cooking range Date of Purchase Purchase Address Phone Save time and money Before you call for service check the Troubleshooting Guide It lists the causes of minor oper...

Page 4: ...mediately call your gas supplier from a neighbor s phone Follow the gas supplier s instructions If you cannot reach your gas supplier call the fire department Installation and service must be performe...

Page 5: ...by a qualified installer in accordance with the provided installation instructions Anti tip bracket Range back panel WARNING This product can expose you to chemicals including carbon monoxide which i...

Page 6: ...to the unit or the floor Failure to follow this advice may result in damage or personal injury 8 Be sure all packing materials are removed from the range before operating to prevent ignition of these...

Page 7: ...ical or foam type fire extinguisher If there is a fire in the oven during self clean turn the oven off and wait for the fire to go out Do not force the door open Introduction of fresh air at self clea...

Page 8: ...urners Do not use a wok with a round metal support ring The ring may trap heat and block air to the burner resulting in a carbon monoxide hazard Do not attempt to lift the cooktop Doing so may damage...

Page 9: ...t all features are on all models Appearance may vary 1 Oven Vents 2 Cooktop Burner Grills 3 Griddle for FFSGS6156 48 only 4 Control Panel 5 Oven Lights Switch 6 Temperature Control Knob 7 Broil Oven C...

Page 10: ...ddle for FFSGS6156 48 only 1 piece 1 piece Burner Cap 9000BTU FFSGS6156 30 2 sets FFSGS6156 36 2 sets FFSGS6156 48 3 sets Burner Cap 15000BTU FFSGS6156 30 2 sets FFSGS6156 36 3 sets FFSGS6156 48 4 set...

Page 11: ...iver to the hole to reach the embedded screw 3 Position the handle holder correctly to accept the screw bolt on the outside of oven door tighten the screw 4 Repeat step No 1 to 3 for the other side 5...

Page 12: ...qualified electrician ELECTRICAL REQUIREMENTS Electrical Supply FFSGS6156 30 3600W Grounded 240 VAC 60Hz FFSGS6156 36 3600W Grounded 240 VAC 60Hz FFSGS6156 48 7025W Grounded 240 VAC 60Hz Service Recep...

Page 13: ...trical supply wire L1 hot wire 2 Connect the L2 receptacle terminal to the incoming BLACK electrical supply wire L2 hot wire 3 Connect the NEUTRAL receptacle terminal to the incoming NEUTRAL WHITE ele...

Page 14: ...ssure of 0 5 psi 3 5 kPa and is set at 5 wc out let pressure Gas Shut off Valve not included The supply line must be equipped with an approved external gas shut off valve located near the range in an...

Page 15: ...toff valve during any pressure testing of the system at test pressures equal to or less than 0 5 psi 3 5 kPa Product Dimensions and Cabinets Model FFSGS6156 30 Model FFSGS6156 36 Model FFSGS6156 48 Th...

Page 16: ...relighting each time 5 Check for gas leaks at all gas connections using a gas detector never a flame 6 Check oven bake and convection bake function Gas Conversion Operation This cooking range can be u...

Page 17: ...r is located at the bottom right corner of the range a Unscrew the cap from the regulator Do not remove the spring from the regulator b Unscrew the insert from the cap and turn it over so the longer s...

Page 18: ...1 18 0 9 2 0 46 Model FFSGS6156 48 NG 1 33 1 33 1 33 1 75 LPG 0 93 0 93 0 93 1 18 NG 1 75 1 75 1 75 1 38 2 0 75 LPG 1 18 1 18 1 18 0 9 2 0 46 IMPORTANT Keep the injectors removed from the range for fu...

Page 19: ...label Place the LPG conversion label as close as possible to the existing Rating Serial label on the range Preparation Before moving the range protect any finished flooring and secure oven door s clo...

Page 20: ...he gas supply piping system at test pressure equal to or less than 0 5 psi 3 5kPa DO NOT Forget Before Getting Started Remove the exterior and interior packing Clean the range thoroughly with hot wate...

Page 21: ...oking jobs such as boiling water and cooking pasts flame intensity When you adjust the flame intensity watch the flame when you turn the knob Any flame engulf the cookware is wasted The flame should s...

Page 22: ...fter each use Oven Light The oven light is controlled by a push switch on the control panel The light can be used while cooking or cleaning the oven WARNING Check that power is disconnected from the e...

Page 23: ...oiling BROIL Two strong heat elements at the top working under this function It provides direct radiant heat onto the food To be used for broiling large quantities of food and cook faster than the nor...

Page 24: ...water Towel dry Burner pan Remove surface debris before cleaning to help speed up the cleaning process and decrease the chance of scratching the surface during cleaning Using mild abrasive cleaners or...

Page 25: ...ts Do Not Work The light bulb is defective Unscrew the light cover inside the oven replace the light with a 25 watt halogen bulb Oven Racks Are Hard To Slide Do not spray with a cooking spray or other...

Page 26: ...ure is back to normal Condensation Or Fogging On The Inside of the Door Glass Condensation or fogging on the inside of the oven door glass is normal during the preheating of the oven and will evaporat...

Page 27: ...withcare For better Broil efficiency pre heat to 500F for 8 Minutes and turn the knob to broil until you see the flame and wait 3 to 4 seconds beforereleasing Cooking tips 1 Pizza Place rack on bottom...

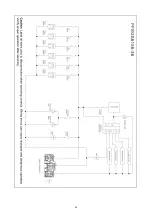
Page 28: ...Wire Diagram 28...

Page 29: ...29...

Page 30: ...30...

Reviews: