background image

Fig. 11

Skew Adjuster

9.

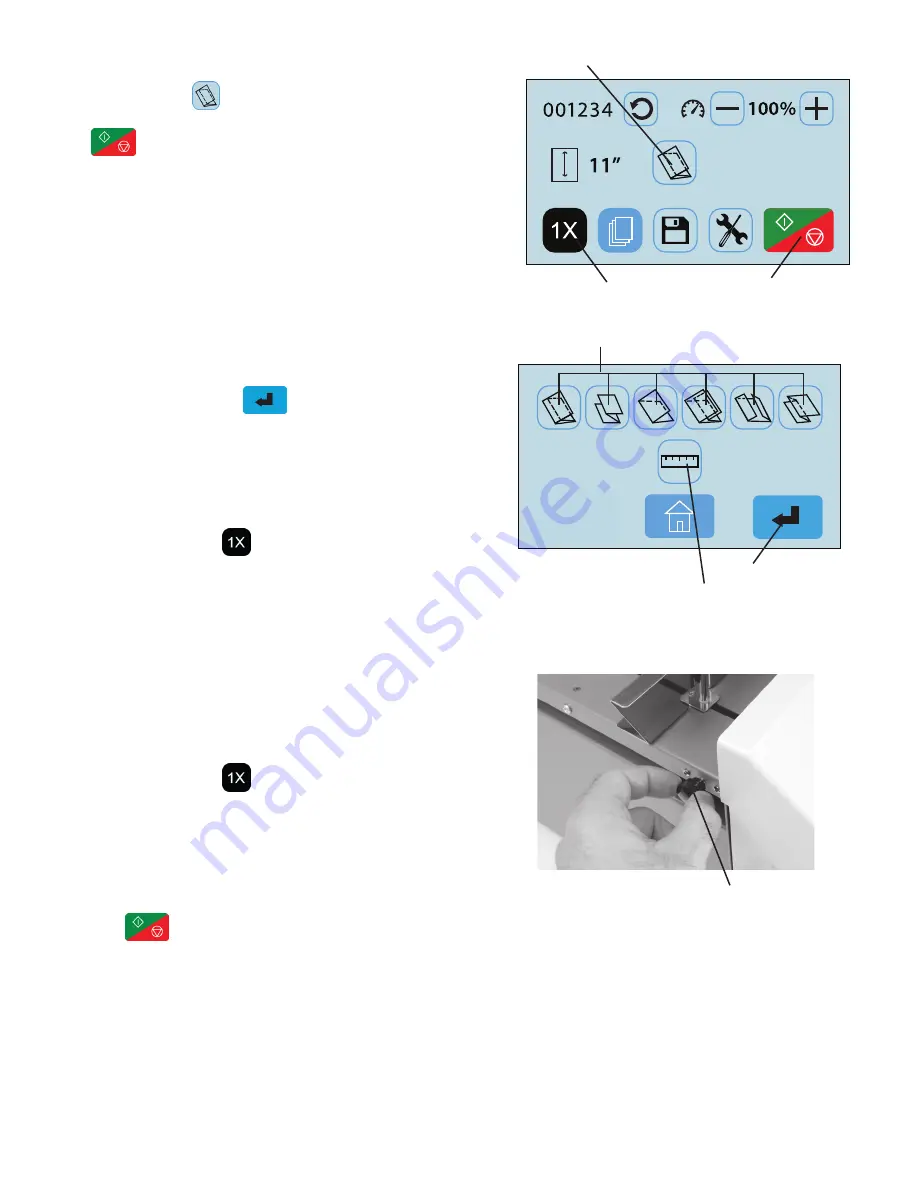
Select the type of fold desired by pressing the fold 
selection icon          (Fig. 9).  Note: 

If the fold selection 

icon shows the desired fold press the “Start/Stop” icon                       
           (Fig. 9) to begin folding.

10. Select the standard fold type needed (Fig. 10) and 

press the “Enter” icon             to set the fold stop 
positions.  
When the fold stops are set the folder will return to the 
home screen.  The selected fold icon should now be 
displayed. 

Press the test icon         to check the fold.  

11. If the fold is skewed, remove paper, lower the infeed 

tray extension and turn the skew adjustment knob left 
or right to make corrections (Fig. 11).

Press the test icon         to check the fold.  

12.

When satisfied with the test fold, 

press the “Start/Stop” 

icon            to begin folding. Press the same icon to 
stop.

13.  Press the “-” or “+” icons (Fig. 9) to adjust machine 

speed to desired level.

Fig. 9

Fold selection icon

6

Fig. 10

Standard folds selection icons

Custom fold setup icon

Enter icon

1.

2.

3.

1.

2.

3.

Invoice

Flyer

Brochure

“Start/Stop” icon

Test Button

Summary of Contents for FD 386

Page 1: ...FD 38Xi FD 386 Document Folder OPERATOR MANUAL FIRST EDITION 8 2020 ...

Page 2: ......

Page 3: ...SURING FOLD LENGTHS 13 RECALLING EDITING DELETING CUSTOM FOLDS 14 OPERATOR SETTINGS 16 18 Metric Standard Fold Selection 16 Standard Fold Override 16 Test Sheet Setting 18 Default Settings 18 MULTI SHEET FEEDING 19 CROSS FOLDING 20 FD 386 STACKER WHEEL POSITIONING CHART 20 REMOVING INFEED TIRES 21 OPERATOR MAINTENANCE 22 ERROR SCREENS 23 TROUBLE SHOOTING 24 TABLE OF CONTENTS ...

Page 4: ......

Page 5: ...6 450 hour depending on fold type Hopper Capacity Up to 500 sheets of 20 paper 75gsm Paper size Min 3 5 X 5 88 9 W x 127 L mm Max 12 25 X 18 311 W x 457 L mm Pre programmed fold types Letter Zig Zag Single Gate Fold Out Double Parallel Custom Fold Settings 27 FD 386 36 FD 38Xi Pre Set Paper Sizes 11 14 17 A5 A4 A3 B6 B5 B4 Dimensions Closed 33 L x 20 W x 19 H 84 L x 51 W x 48 H cm Fully Extended 6...

Page 6: ... FD 386 power cord and cross fold guide are wrapped separately in the box NOTE Two people must lift the machine from the box 3 Place the folder on a solid stand Install upper and lower fold tables telescoping conveyor multi sheet feeder and power cord 1 Be sure the plates are set firmly on the locating pins Fig 1a 1b Slide each fold table in until it meets the first locating pin then push down to ...

Page 7: ... Fig 3a 3b 5 Insert the telescoping extension tray into the end of the outfeed conveyor Fig 4 6 Insert the Multi Sheet Feeder into the four slots located on the top cover Fig 5 This is standard on the FD 38Xi optional for the FD 386 7 Make sure the power switch is in the OFF position Plug the power cord into the power inlet and the wall outlet Fig 4 Fig 5 4 Slots 3 Telescoping extension tray ...

Page 8: ...of the paper in the folder 8 1X Fold Test Icon Press to test the fold selected 9 AutoBatch Mode Press to enter AutoBatch mode 10 Custom Fold Access Press to select or edit previously saved custom folds 11 Operator Settings Icon Press to enter to the operator settings screen 12 Start Stop Icon Press to start the folder Press to stop the folder 7 8 11 12 10 9 6 3 1 2 4 5 Any icon with a blue frame a...

Page 9: ...slides freely between them 5 FD 38Xi ONLY Adjust infeed tray tension lever Fig 8 for different paper weights Move the lever up towards the symbol for lighter paper and down toward the symbol for heavier paper The middle position is for standard paper weights 6 Raise the infeed tray lever to lower the infeed tray 7 Neatly stack paper on the infeed tray 8 Lower the infeed tray lever to raise the inf...

Page 10: ...d icon should now be displayed Press the test icon to check the fold 11 If the fold is skewed remove paper lower the infeed tray extension and turn the skew adjustment knob left or right to make corrections Fig 11 Press the test icon to check the fold 12 When satisfied with the test fold press the Start Stop icon to begin folding Press the same icon to stop 13 Press the or icons Fig 9 to adjust ma...

Page 11: ...delay between sets Press the to exit the keypad Fig 12c 2 Press the icon to begin folding The folder will stop when the number of sets counts down to zero 0 3 To exit the AutoBatch Mode press the icon Note Press the icon on the keypad to exit back to the Auto Batch screen Press the icon to edit the number entered Press the icon on the keypad to reset the entered number to zero 0 Invoices 7 AUTOBAT...

Page 12: ...fold the icon will flash dark gray when selected Using the touch pad key in the measurement for the first fold stop position Note the minimum position is 1 62 and the max position is 12 59 Press the enter key to enter the measurement The white box under the icon will show the measurement entered Fig 16 2 Select the lower fold plate icon Fig 16 to set the fold stop position for the second fold the ...

Page 13: ...l be saved as Fig 18 Press the letter icon to bring up the keypad to name the custom fold 5 Key in the name of the job and press the save icon in the bottom right corner Fig 19 6 Select the custom job and press the blue enter icon to set the fold stops Fig 20 When the fold stops are set the folder will return to the Home Screen with the custom job selected Press the start icon to begin folding 1 2...

Page 14: ...st fold the icon will flash dark gray when selected Using the touch pad key in the measurement for the first fold stop position Note the minimum position is 1 62 and the max position is 12 59 Press the enter key to enter the measurement The white box under the icon will show the measurement entered Fig 24 2 Select the lower fold plate icon Fig 24 to set the fold stop position for the second fold t...

Page 15: ...e to 4 87 4 Folded size to 5 30 5 Folded size to 5 73 6 Folded size to 6 16 7 Folded size to 6 60 8 Folded size to 7 03 9 Folded size to 7 46 and greater 4 With paper loaded in the feeder press the test icon Fig 26 to check that the fold settings are correct To adjust the settings repeat steps 1 3 When the folds and stacker wheels are set correctly press the save icon to name and save the custom f...

Page 16: ...cont 5 Key in the name of the job Fig 28 and press the save icon in the bottom right corner 6 Select the custom job and press the blue enter icon to set the fold stops Fig 29 When the fold stops are set the folder will return to the Home Screen with the custom job selected Press the start icon to begin folding 12 Fig 29 Fig 28 ...

Page 17: ...he lower fold table measurement Example 2 C Fold 1 Measure the length of panel A enter this number as the upper fold table measurement 2 Measure the length of panel B enter this number as the lower fold table measurement Measuring Fold Lengths Panel A Panel B Panel A Panel B Use the examples below to help determine the fold lengths for custom fold settings 13 ...

Page 18: ...31 The fold will be set and then will return to the home screen to start processing the job 3 To rename a job select the job from the list and press the letter icon Fig 31 Use the keypad to change the name and press the save icon in the lower right corner Fig 32 4 To delete a job select the job from the list and press the delete icon Fig 31 On the confirmation screen press the green box with the c...

Page 19: ...ETUP 5 To edit a previously saved job select the job from the list and press the edit icon Fig 31 From the fold setup screen use the same process as setting a custom fold to edit the job settings Fig 34 See page 13 for measuring guidelines 15 Fig 34 ...

Page 20: ... die Standardeinstellungen für Falz und Stapler an Standard Fold Override Adjust standard fold settings Anulación de plegado estándar ajuste la configuración de plegado estándar Standard Fold Override Passen Sie die Standard Fold Einstellungen an 1 2 3 1 2 3 Invoice Flyer Brochure Operator Settings Screen Operator Settings Icon Standard Metric Settings 1 From the Operator Settings screen Fig 36 pr...

Page 21: ...st standard fold and stacker settings Anulación de plegado estándar ajuste la configuración estándar de plegado y apilador Standard Fold Override Passen Sie die Standardeinstellungen für Falz und Stapler an Standard Fold Override Adjust standard fold settings Anulación de plegado estándar ajuste la configuración de plegado estándar Standard Fold Override Passen Sie die Standard Fold Einstellungen ...

Page 22: ...n Standard Fold Override Adjust standard fold settings Anulación de plegado estándar ajuste la configuración de plegado estándar Standard Fold Override Passen Sie die Standard Fold Einstellungen an mm inch Standard Fold Override Adjust standard fold and stacker settings Anulación de plegado estándar ajuste la configuración estándar de plegado y apilador Standard Fold Override Passen Sie die Standa...

Page 23: ...ide the pre collated paper set into the multi sheet feeder When feeding stapled sets the documents should be placed with the staple on the operator s side and leading Fig 47b 3 The sheets of paper will be automatically pulled into the folder there is a one second delay after the paper is placed in the feeder 4 If the fold is skewed turn the skew adjustment knob located on the back of the feeder le...

Page 24: ... firmly run your hand over the fold crease to help flatten the paper before loading 2 Attach the cross fold paper guide onto the feed tray paper guide Fig 48b and lower guide Note Cross folding ability will vary based on the paper weight and type If the paper is too heavy it may not be able to be cross folded Note The guide can be conveniently stored under the lower fold table when not in use Fig ...

Page 25: ...e cover in place Fig 15 REMOVING INFEED TIRES The infeed tires can easily be removed for cleaning and replace ment Remove the Allen screw located on the left side of the feed tire shaft Fig 16 Slide the shaft to the right to release from the side frame and remove Fig 17 Outfeed cover Thumbscrews Allen Screw Fig 49 Fig 50 Fig 51 ...

Page 26: ... not use any chemicals other than the roller cleaner rejuvenator or water 22 Fig 52 Fold Rollers 1 Make sure machine is turned off and unplugged All folders have four 4 rubber rollers Fig 18 2 Remove the upper and lower fold tables 3 Using Formax roller cleaner spray a new cotton cloth until the cloth is saturated Wipe the wet cloth in a back and forth motion making sure to clean the entire surfac...

Page 27: ... to go back to the home screen Cover Open FD 386 38Xi Touch Screen Error Screens Error screen will appear with arrow pointing to empty infeed tray Press return arrow to go back to the home screen Paper Out screen will come on if start is pressed and the is no paper in the feed tray Error screen will apear with arrow pointing to open cover with indicator to close cover Press return arrow to go back...

Page 28: ...tor and or fold rollers are dirty Clean the parts with approved roller cleaner and rejuvenator Fold is skewed Infeed tray is out of adjustment Turn skew adjuster knob to remove the skew Stacker belts do not turn Broken drive belt worn drive gear Call for service Documents are wrinkled or crunched Fold tables are not inserted correctly Piece of paper or other material is stuck in the fold table Rem...

Page 29: ......

Reviews: