background image


e.Frame


User’s


Manual


V1.1


                                                          - 12 - 


Sample


Advertising


Project


This


section


provides


step

by

step


instructions


to


complete


the


sample


advertising


project


see


below:


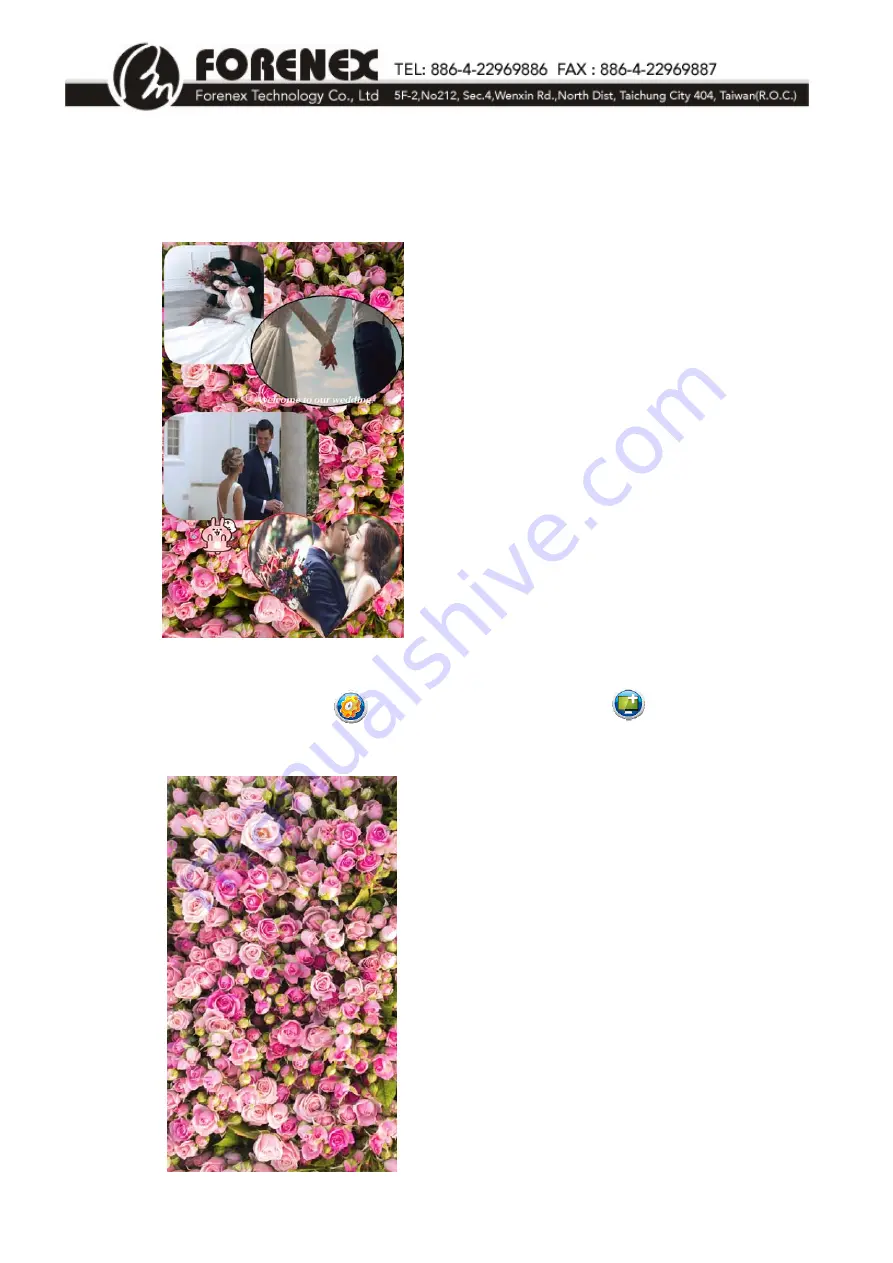
Refer


to


Figure


14

.


Step


1

Add


full


page


advertisement


background:


Click


the


System


Toolbar


button


and


click


the


Background


button


to


select


the


picture


file


(ROSE1.jpg),


to


use


as


a


background


for


advertisement.


Refer


to


Figure


15.


(Figure


15)


(Figure


14)


Summary of Contents for e.Frame C/E Series

Page 1: ...e Frame User s Manual V1 1 e Frame C E Series Digital Signage Panel User s Manual DSP133 DSP156 DSP220 ...

Page 2: ...ndows 7 1 5 Scrolling Text Mode 8 1 6 Date Time Mode 8 1 7 Enable Interactive Functions E series Only 9 1 8 Broadcast Device Synchronization 10 1 9 Set Up Scheduled Display 11 2 Sample Advertising Project 12 3 Appendix 15 3 1 Entering Edit Mode 15 3 2 File Management 15 3 3 Use Mobile Device to Edit Broadcast Content 17 3 4 Use PC to Edit Broadcast Content 18 3 5 Define Own Window Frame Style 20 3...

Page 3: ...y completed advertising project ad or display schedule lst in e Frame Pause Pause playing advertisement and enter edit mode Refer to section 3 1 File Management Tool bar Save the completed advertising project The default file name extension is ad Select and open a saved advertising project ad or display schedule lst Delete picture files in the picture gallery Refer to Section 3 2 Delete video file...

Page 4: ... Fi ID and password on device Refer to Figure 2 Set up synchronization of e Frames on the same network Refer to Section 1 8 Set up scheduled display sleep and wake up times daily Refer to Section 1 9 Increase the icon size Decrease the icon size Adjustment buttons to fine tune window position Use the and buttons to adjust the window position The position of the adjustment buttons cluster can be mo...

Page 5: ...e 3 The window size ex 475x352 is shown in lower right corner Delete the window Picture button Open new picture mode window Video button Open new video mode window Scrolling Text button Open new scrolling text mode window Date Time button Open new date time mode window Enable interactive function for each window Set up to connect to a single page ad or multiple pages lst on click Refer to Section ...

Page 6: ...or to remove pictures Click the buttons to adjust the play order Click Window Shape button to select window frame style Opacity Transparency ratio settings Decrease picture transparency background become pale Increase picture transparency enhance background Play Interval Set time interval to display each picture Decrease picture display time in seconds Increase picture display time in seconds Figu...

Page 7: ...ame style 1 4 1 Set Up Streaming Media RTSP in Video Windows In the window click the Video button to set the window as video mode firstly and then select the rtsp option below image and type the RTSP IP address after rtsp Refer to Figure 6 RTSP Real Time Streaming Protocol allows instant real time streaming of remote media allow playing one or more videos as one playlist supported file formats for...

Page 8: ...lect background for scrolling text Default background is transparent For additional fonts please contact your local e Frame agent Setting the background for scrolling text will not affect the setup in Section 1 1 for the whole advertisment background 1 6 Date Time Mode In the window click the Date Time button to set the window as date time mode Refer to Figure 8 Mode Select display date time mode ...

Page 9: ...unction has been set up the whole area of the window will function as a button When pressing the area of the window it will automatically play the content which was set up in the target link or in the text dialog Marked Target linking Set up automatically to display a single page ad or multiple pages lst after the area of the window is pressed Marked Text Dialog Automatically create a new window t...

Page 10: ...ndividual e Frame device IP addresses and Wi Fi names will be listed in the dialog box Select the Sync checkbox beside the devices to display synchronized content Click Send to begin broadcasting Synchronized content to the selected e Frame devices eFrame IP The IP address is a random address that changes in accordance with local networks When eFrame connects to a network it shows IP address autom...

Page 11: ... a single page ad into the display list or to remove single page from the list Refer to Figure 12 Click to save the completed display schedule as a lst into file Click to open the saved lst file and play it immediately Set the time to sleep display for each ad file First enter the time and then click to add a sleep point in playlist box The time set and SLEEP will be display in the playlist dialog...

Page 12: ...ions to complete the sample advertising project see below Refer to Figure 14 Step 1 Add full page advertisement background Click the System Toolbar button and click the Background button to select the picture file ROSE1 jpg to use as a background for advertisement Refer to Figure 15 Figure 15 Figure 14 ...

Page 13: ...ndow frame style e Click Drag the window to its desire position Refer to Figure 18 f Repeat steps a e for a second picture mode window Step 3 Make two video mode windows a Click Drag the left button of the mouse anywhere in e Frame from the upper left to lower right to open a new window b Click the Video button to create a new video mode window c Click to add wed mp4 weddingvideo mp4 multimedia fi...

Page 14: ...2 c Enter Welcome to our wedding as the text Select the font size color and banner scrolling speed d Click Drag the window to its desire position Refer to Figure 23 Step 5 Make an animated GIF mode windows a Click Drag the left button of the mouse anywhere in e Frame from the upper left to lower right to open a new window b Click the Picture button to create a new picture mode window c Click to ad...

Page 15: ...ck the pause button to enter edit mode 3 2 File Management Add picture video files Via USB flash device MicroSD card Plug in a USB flash device or a MicroSD card into e Frame The e Frame device will automatically read and copy all photo and video files to the correct e Frame folder Delete files To delete ad or lst files Click the Delete Project button The file list dialog will be shown on screen R...

Page 16: ...the files to delete and click the Delete button at the bottom of the picture gallery dialog to remove the pictures from the device To delete video files Click the Delete Video button The files in the video gallery will be shown on screen Refer to Figure 28 Highlight the files to delete and click the Delete button at the bottom of the video gallery dialog to remove the videos from the device ...

Page 17: ... Frame ID factory ID is FORENEX to connect to e Frame The function button placement on the eFrame mobile are similar to e Frame Refer to Section 1 Introduction of Icons and Functions for detailed description The description of some special icons are Download download the currently playing advertisement content picture video GIF etc from e Frame to begin editing immediately Upload After editing the...

Page 18: ...igure 29 2 Click Synchronized button it is shown an IP window Refer to figure 30 One to One e Frame IP IP address please refer to paragraph1 8 After typing e Frame IP click OK e frame device and PC will have the connection At PC side click System Toolbar button then click download button PC can download currently playing advertisement content from specific e frame device Figure 29 Figure 30 ...

Page 19: ...vice location for enter IP address please refer to paragraph1 8 e frame device and PC have connection e frame devices are shown on the right block Refer to figure 31 Select the chosen e frame device click System Toolbar button then click upload button update the completed content to e Frame and display immediately Figure 31 ...

Page 20: ...e as a PNG file required Add the modified PNG picture onto a USB flash drive or SD card Follow the instructions in section 3 2 File Management Add picture video files to automatically load the new frame style into e Frame Then select the new frame style for use in e Frame designs Refer to figure 34 3 6 Limitations for Creating Video Windows If displaying video at 1080p resolution video windows can...

Reviews: