background image

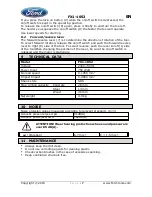
If you press the lock-on button (9) while the on/off switch is depressed, the 

on/off switch is kept in the operating position.

To release the on/off switch (8) again, press it briefly to and turn the tool off.

The harder you squeeze the on/off switch (8) the faster the tool will operate.

Use lower speeds for starting.

8.2

Forward/reverse lever


The forward/reverse lever (7) is to determine the direction of rotation of the tool.


To select forward rotation, release the on/off switch and push the forward reverse 

lever to right (R) side of the tool. To select reverse, push the lever to left (L) side 

of the toolWhen changing the position of the lever, be sure the on/off switch is 

released and the motor is stationary.


TECHNICAL DATA


Model 

FX1-1052

Voltage 

230V~50Hz
750 Watt

No load speed
Impact Impact 
Shank style

SDS

Concrete 

26 mm

Steel

13 mm

Wood

40 mm
4.9 kg

10  NOISE

Noise emission values measured according to relevant standard. (K=3) 


Acoustic pressure level LpA

91dB(A)

Acoustic pow e

r  level LwA

102dB(A)

ATTENTION! Wear hearing protection when sound pressure is 


over 85 dB(A).


aw (Vibration)

8,7 m/s²

K = 1.5 m/s²


11 MAINTENANCE 


Always keep the drill clean.


Do not use corroding agents for cleaning plastic.


Check carbon brushes in the case of excessive sparking.


Keep ventilation channels free.


FX1-1052

EN

Copyright © 2015

P a g e

|

7

www.Ford-tools.com

Power Input

0-1050 min

-1

0-4900 min

Max. drilling capacity

Net weight

-1

Summary of Contents for FX1-1052

Page 1: ...ons inside the box Use safety glasses Keep this tool away from children Ford Motor Company trademarks and trade dress used under license to Nine HKG Ltd fordmotorcompany com Sole distributor Bir Group Holdings Navana Osman Link 6th Floor 214 D Tejgaon Link Road Tejgaon I A Dhaka 1208 Bangladesh 1 YEAR WARRANTY HAMMER DRILL ...

Page 2: ...ARTING WORK 5 7 1 Fitting and changing tools Fig 1 5 7 2 Mounting Dismount the auxiliary 13mm chuck for drilling in steel wood and plastic Fig 2 5 7 3 Depth guide Fig 3 5 7 4 Dust cover Fig 4 5 7 5 Fitting the auxiliary handle Fig 5 6 7 6 Selecting the operation mode Fig 6 6 8 OPERATION 6 8 1 Switch on off Fig 6 6 8 2 Forward reverse lever 7 9 TECHNICAL DATA 7 10 NOISE 7 11 MAINTENANCE 7 12 WARRAN...

Page 3: ...ill the end of the warranty period Dispose it into your local waste disposal system afterwards WARNING Packing materials are no toys Children must not play with plastic bags Danger of suffocation 1 hammer drill 1 manual 3 SDS drill 8 10 12 x 150mm 2 chisel 14 x 250mm 1 point 1 flat 1 13mm chuck and adapter 1 dust cover 1 depth gauge 1 grease cup When parts are missing or damaged please contact you...

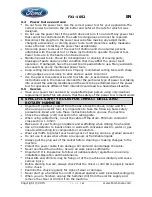
Page 4: ... the risk of electric shock When operating a power tool outdoors use an extension cord suitable for outdoor use Use of a cord suitable for outdoor use reduces the risk of electric shock If operating a power tool in a damp location is unavoidable use a residual current device RCD protected supply Use of an RCD reduces the risk of electric shock 5 3 Personal safety Stay alert watch what you are doin...

Page 5: ...air person using only identical replacement parts This will ensure that the safety of the power tool is maintained 6 SPECIFIC SAFETY RULES FOR IMPACT DRILL AND ROTARY HAMMERS Important to protect yourself from the risk of electric shock injury and fire when using an electric tool it is imperative to take the following basic safety precautions Read and note these instructions before you use the mac...

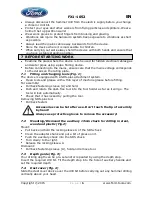
Page 6: ...in layer of machine grease before fitting For assembly Pull back fastening sleeve A and hold Push and rotate the dust free tool into the tool holder as far as it will go The tool will lock automatically Check that it has locked by pulling the tool Removing SDS plus tool Pull back fasteni Accessories can be hot after use Don t touch the tip of accerroty by hand Always use protective gloves to remov...

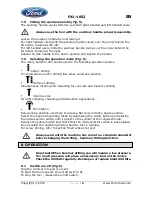
Page 7: ...t chipping chiselling and demolition applications Bit rotation Non working position used only to rotate a flat chisel into the desire position Select the required operating mode by depressing the safety button and rotating the mode selector switch until it points to the symbol of the required mode Release the safety button and check that the mode selector switch is locked place Do not select the o...

Page 8: ...hanging the position of the lever be sure the on off switch is released and the motor is stationary 9 TECHNICAL DATA Model FX1 1052 Voltage 230V 50Hz 750 Watt No load speed Impact Impact Shank style SDS Concrete 26 mm Steel 13 mm Wood 40 mm 4 9 kg 10 NOISE Noise emission values measured according to relevant standard K 3 Acoustic pressure level LpA 91dB A Acoustic pow e r level LwA 102dB A ATTENTI...

Page 9: ... by gross carelessness inappropriate usage use for purposes for which the device is not suitable incompetent usage e g not following the instructions given in the manual inexpert assembly lightning strike erroneus net voltage This list is not exhaustive Acceptance of claims under warranty can never lead to the prolongation of the warranty period nor commencement of a new warranty period in case of...

Reviews: