background image

DE-14

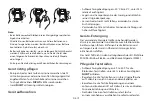
Wichtig!

Unter Umständen gehören die gebrauchte Lanzette 

und der Teststreifen zu biologisch gefährlichen Abfällen. 

Bitte fragen Sie Ihren medizinischen Berater nach 

einer ordnungsgemäßen, den örtlichen Vorschriften 

entsprechenden Entsorgung.

Testergebnisse abrufen

Ihr Ger.t speichert die 450 neuesten Testergebnisse 

zusammen mit den entsprechenden Daten und Uhrzeiten. 

Zum Abrufen des Gerätespeichers muss das Gerät zunächst 

abgeschaltet sein.

Um alle Testergebnisse zu überprüfen, gehen Sie bitte 

wie folgt vor:

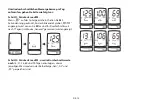
Schritt 1: Drücken Sie auf M. 

„   “

 erscheint auf der Anzeige. Drücken Sie erneut auf 

M


und das erste Ergebnis wird angezeigt. Es ist das Ergebnis 

der letzten Blutzuckermessung mit Uhrzeit, Datum und 

Messmodus.

Schritt 2: Drücken Sie auf M, 

um mit jedem Tastendruck

nacheinander die im Messgerät gespeicherten Ergebnisse 

abzurufen. 

Schritt 3: Beenden Sie die Anzeige des Speichers.  

Drücken Sie nach den letzten Messergebnissen erneut auf 

M

Das Messgerät wird ausgeschaltet.


Summary of Contents for COMFORT plus G30a

Page 1: ...ing System Blutzucker U berwachungsssystem Syste me de contro le de la glyce mie Sistema per il monitoraggio della glicemia COMFORT plus G30a Owner s Manual Bedienungsanleitung Manuel de l utilisateur...

Page 2: ......

Page 3: ...instrument in close proximity to sources of strong electromagnetic radiation as these may interfere with the correct operation Proper maintenance as well as timely calibration of the device together...

Page 4: ...al current generated by the reaction of glucose with the reagent of the strip The meter measures the current calculates the blood glucose level and displays the result The strength of the current prod...

Page 5: ...Strip Ejector 7 SET Button Screen Display 12 11 13 14 1 4 3 2 8 6 7 5 9 10 1 Low Battery Symbol 2 Test Strip Symbol 3 Blood Drop Symbol 4 Test Result 5 Face Low High Symbol 6 Memory Symbol 7 Alarm Sym...

Page 6: ...ter BATTERY SET Step 1 Setting the date With the year flashing press M until the correct year appears Press SET With the month flashing press M until the correct month appears Press SET With the day f...

Page 7: ...emory then press SET to skip To delete all the results press M and select YES Then press SET button to delete all memory OK is displayed in the meter which indicates that all data stored is deleted BA...

Page 8: ...d for a blood glucose test beforehand Do a control solution test when 9 9 you first receive the device 9 9 you begin using a new vial of test strips 9 9 you suspect the device or test strips are not w...

Page 9: ...Shake the control solution vial thoroughly before use Squeeze out a drop and wipe it off then squeeze out another drop and place it on the tip of the vial cap Hold the meter to move the absorbent hol...

Page 10: ...e front side of test strip with FORA Logo should face up when inserting test strip Test results might be wrong if the contact bar is not fully inserted into the test slot CODE 109 165 Note Do NOT test...

Page 11: ...ncets and the lancing device Preparing the Lancing Device 1 Remove the cap 2 Insert a new lancet firmly into the white lancet holder cup 3 Remove the protective disk on the lancet Hold the lancet firm...

Page 12: ...health care professional before you begin AST We strongly recommend that you perform AST ONLY at the following times During a pre meal or fasting state more than 2 hours since the last meal Two hours...

Page 13: ...ng with control solution 3 Obtain a blood sample Use the pre set lancing device to puncture your desired site After penetration discard the first drop of blood with a clean tissue or cotton Gently squ...

Page 14: ...8 single beeps 8 1 single pause 2 single beeps 2 For mmol L meters the tens are always announced even when the result is below 10 The decimal point is represented by 1 quick beep Examples 6 0 mmol L...

Page 15: ...see is the last blood glucose result along with date time and the measuring mode Step 2 Press M to recall the test results stored in the meter each time you press Step 3 Exit the meter memory After t...

Page 16: ...EN 14 Step 2 Press M to review 14 21 28 60 and 90 day average results stored in each measuring mode in the order of Gen AC then PC...

Page 17: ...e meter on you will first hear the Long Beep which stands for power on and then the most recent result Only the average for the last 7 days is announced acoustically If the 7 day average cannot be cal...

Page 18: ...tically switch off WARNING While the meter is connecting to the PC it will be unable to perform a blood glucose test Maintenance Battery Your meter comes with one 3V CR2032 lithium battery Low Battery...

Page 19: ...dispose of the battery according to your local environmental regulations Caring for Your Device To clean the exterior of the device wipe it with a cloth moistened with tap water or a mild cleaning ag...

Page 20: ...rtant Control Solution Information Use only our control solutions with your device Do not use the control solution beyond the expiry date or 3 months after first opening Write the opening date on the...

Page 21: ...Storage Transportation humidity limitation 3V 3 Volts DC Battery Model number Troubleshooting If you follow the recommended steps but the problem persists or error messages other than the ones below...

Page 22: ...ration range is 10 C to 40 C 50 F to 104 F Repeat the test after the meter and test strip are in the above temperature range Appears when ambient temperature is above system operation range Announceme...

Page 23: ...tic switch off 2 minutes after last user action Repeat the test with a new test strip Apply sample only when flashing appears on the display Defective meter Please contact customer services 3 If the c...

Page 24: ...om defects in material and workmanship and when used for the purposes and indications described on the labeling is fit for the purposes and indications described on the labeling All warranties for a p...

Page 25: ...EN 23 supplies not furnished by ForaCare Suisse...

Page 26: ...enen Kunststoffe vorhanden sind Kleidung Teppiche usw aus Kunststoff kann die elektrostatische Entladung zu fehlerhaften Messergebnissen f hren Verwenden Sie das Ger t NICHT in unmittelbarer N he von...

Page 27: ...t den Strom berechnet den Blutzuckerwert und zeigt das Ergebnis an Die durch die Reaktion erzeugte Stromsta rke ha ngt von der Menge an Zucker in der Blutprobe ab Sollten Sie Symptome aufweisen die ni...

Page 28: ...te 7 Einstelltaste SET Display 12 11 13 14 1 4 3 2 8 6 7 5 9 10 1 Symbol f r schwache Batterie 2 Teststreifensymbol 3 Blutstropfensymbol 4 Messergebnis 5 Symbol mit gl cklichem ungl cklichem Gesicht 6...

Page 29: ...ie Jahresangabe blinkt dr cken Sie auf M bis das richtige Jahr angezeigt wird Dr cken Sie auf SET W hrend die Monatsangabe blinkt dr cken Sie auf M bis der richtige Monat angezeigt wird Dr cken Sie au...

Page 30: ...n auf SET um diesen Schritt zu berspringen Um alle Ergebnisse zu l schen dr cken Sie auf M und w hlen Sie YES Ja aus Dr cken Sie danach auf die SET Taste um alle Ergebnisse zu l schen Auf dem Messger...

Page 31: ...as Messger t ein akustisches Signal ab und schaltet sich automatisch ein Sie k nnen auf M dr cken um den Alarm stummzuschalten und einen Teststreifen f r die Messung einf hren Wenn Sie nicht auf M dr...

Page 32: ...ht im Set enthalten bitte pru fen Sie den Lieferumfang Ihres Produktkartons Sie ko nnen separat erworben werden Bitte stellen Sie vorab sicher dass Sie die fu r einen Blutzuckertest erforderlichen Art...

Page 33: ...nisbereich der auf dem Teststreifenbeh lter angegeben ist Das Ergebnis sollte innerhalb dieses Bereichs liegen Liegt das Ergebnis nicht in diesem Bereich lesen Sie bitte die Anweisungen noch einmal du...

Page 34: ...t vollst ndig in die Teststreifenaufnahme eingef hrt wird Einf hren eines Teststreifens F hren Sie den Teststreifen in den Schlitz ein Wichtig Die Vorderseite des Teststreifens muss beim Einf hren des...

Page 35: ...etaste erscheint Blutprobenentnahme Befolgen Sie bitte die folgende Anleitung bevor Sie einen Tropfen Blut entnehmen Bevor Sie beginnen waschen und trocknen Sie Ihre H nde ab W hlen Sie die Einstichst...

Page 36: ...NICHT verwenden Wenn Sie vermuten dass Ihr Blutzucker zu niedrig ist wenn Sie gegebenenfalls nicht merken wu rden wenn eine Hypoglyka mie vorliegt wenn Ihre AST Messergebnisse nicht mit Ihrem Befinde...

Page 37: ...e um einen Einstich an der gew nschten Stelle durchzuf hren Wischen Sie den ersten Bluttropfen mit einem sauberen Wattest bchen weg Dr cken Sie sanft auf die Einstichstelle um einen weiteren Tropfen B...

Page 38: ...sgegeben als 1 einzelner Piepton 1 Unterbrechung 8 einzelne Piept ne 8 Unterbrechung 2 einzelne Piept ne 2 Bei mmol L Messern werden die Zehner immer angesagt auch wenn das Ergebnis unter 10 liegt Der...

Page 39: ...nd Uhrzeiten Zum Abrufen des Ger tespeichers muss das Ger t zun chst abgeschaltet sein Um alle Testergebnisse zu berpr fen gehen Sie bitte wie folgt vor Schritt 1 Dr cken Sie auf M erscheint auf der A...

Page 40: ...int halten Sie M 3 Sekunden lang gedr ckt bis das blinkende Symbol angezeigt wird Lassen Sie M los und Ihr Durchschnittswert nach 7 Tagen im Modus General gemessen wird angezeigt Schritt 2 Dr cken Sie...

Page 41: ...t tigen Sie das Ger t 3 Minuten lang nicht Daraufhin schaltet sich das Messger t automatisch aus Die Ergebnisse von Tests mit Kontrolll sung sind NICHT in den angezeigten Durchschnittswerten erhalten...

Page 42: ...es Messger ts an Auf der Anzeige des Messger ts erscheint PC um anzuzeigen dass sich das Messger t im Kommunikationsmodus befindet Ansage der gespeicherten Ergebnisse durch Universal Tone Nur das letz...

Page 43: ...e korrekt eingesetzt wurde h ren Sie daraufhin ein akustisches Signal Schritt 3 Daten bertragung Befolgen Sie die Anweisungen in der Software um Daten zu bertragen Die Ergebnisse werden mit Datum und...

Page 44: ...ieren Sie das Ger t grunds tzlich in seiner Originalverpackung Lassen Sie das Ger t nicht fallen vermeiden Sie starke Ersch tterungen Vermeiden Sie Orte mit direkter Sonneneinstrahlung und hoher Luftf...

Page 45: ...reifen mit sauberen und trockenen H nden an Verwenden Sie jeden Teststreifen sofort nach seiner Entnahme aus der Flasche Schreiben Sie das Datum an dem Sie die Flasche mit den Teststreifen ge ffnet ha...

Page 46: ...Einschra nkung Entsorgen Sie die Verpackung nach Gebrauch ordnungsgem 3V 3 Volt DC Gleichstrom Batterien Modell Nr Probleml sung Falls die empfohlenen Abhilfema nahmen nicht funktionieren oder andere...

Page 47: ...driger als der Betriebsbereich des Systems ist Der Betriebsbereich des Systems ist 10 C bis 40 C 50 F bis 104 F Wiederholen Sie die Messung wenn das Messger t und der Teststreifen den oben angegebenen...

Page 48: ...ei Minuten nach der letzten Bedienaktion Wiederholen Sie den Test mit einem neuen Teststreifen Tragen Sie die Blutprobe nur auf wenn auf der Anzeige blinkt Messger t defekt Bitte wenden Sie sich an de...

Page 49: ...des von ForaCare Suisse hergestellte Standardprodukt keinerlei Material und Herstellungsfehler aufweist und bei Anwendung gem Anleitung Angaben am Produkt oder auf der Verpackung die beschriebenen Lei...

Page 50: ...DE 25 g nzlich oder teilweise durch Einsatz von Komponenten Zubeh r Teilen oder sonstigen Materialien entstehen die nicht von ForaCare Suisse zur Verf gung gestellt werden...

Page 51: ...imit de sources de rayonnement lectromagn tique intense car elles peuvent interf rer avec le fonctionnement Gr ce un entretien appropri et un calibrage ad quat avec la solution de contr le la long vit...

Page 52: ...st de glucose sanguin est base sur la mesure du courant e lectrique ge ne re par la re action du glucose sanguin avec le re actif de la bandelette L appareil mesure le courant calcule le niveau de glu...

Page 53: ...e SET Affichage l cran 12 11 13 14 1 4 3 2 8 6 7 5 9 10 1 Symbole batterie faible 2 Symbole bandelette r active 3 Symbole repr sentant une goutte de sang 4 R sultat du test 5 Symbole visage Low High b...

Page 54: ...Avant la premi re utilisation du lecteur ou en cas de changement de la pile v rifiez les param tres du lecteur et mettez les ventuelle ment jour Suivez la proc dure ci dessous et assurez vous que les...

Page 55: ...pour garder les r sultats en m moire puis sur le bouton SET pour passer directement l tape suivante To delete all the results press M and select YES Pour effacer tous les r sultats appuyez sur le bout...

Page 56: ...ins rez une bandelette r active pour proc der au test Si vous n appuyez pas sur le bouton M le lecteur sonne pendant 2 mi nutes puis se met hors tension Si vous ne souhaitez pas proc der au test ce m...

Page 57: ...s r sultats ne sont pas exacts 9 9 vous avez laiss tomber l appareil ou pensez que vous pourriez l avoir endommag Pour effectuer le test avec la solution de contr le proc dez comme suit tape 1 Ins rez...

Page 58: ...aire lisez nouveau les instructions et proc dez de nouveau au test CODE 109 165 Remarque Ne PAS tester votre propre sang La plage de la solution de contr le imprim e sur le flacon de bandelettes de te...

Page 59: ...n d une bandelette de test Ins rez la bandelette de test dans la fente Important La face avant de la bandelette de test doit tre tourn e vers le haut lors de l insertion de la bandelette de test Les r...

Page 60: ...ever une goutte de sang Lavez et s chez vos mains avant de commencer Se lectionnez la partie du corps soit le bout d un doigt ou une autre partie du corps Frottez l endroit de la ponction pendant envi...

Page 61: ...les re sultats de vos tests de glyce mie ont ge ne ralement tendance a fluctuer Pour obtenir un chantillon de sang sur un site alternatif massez le site de ponction pendant environ 20 secondes 1 Reme...

Page 62: ...e chantillon de sang Placez la goutte de sang sur la partie absorbante de la bandelette re active Le sang est aspire Une fois la fene tre de confirmation totalement remplie un compte a rebours s affic...

Page 63: ...0 Remarque Les informations et les avertissements affiche s en me me temps que les re sultats sous forme de symboles ne sont pas annonce s au niveau acoustique jectez la bandelette r active usag e et...

Page 64: ...m moire du lecteur Chaque pression du bouton permet de passer au r sultat suivant 110 mg dL 6 1 mmol L tape 3 Quittez la m moire du lecteur Apr s les derniers r sultats du test appuyez nouveau sur M...

Page 65: ...FR 15 tape 2 Appuyez sur le bouton M pour afficher les moyennes sur 14 21 28 60 et 90 jours enregistr es pour chaque mode de mesure dans l ordre mode g n ral mode AC puis mode PC...

Page 66: ...nce sous forme acoustique Si vous appuyez sur MAIN pour allumer l appareil vous entendez d abord un bip long qui signifie que l appareil est allume suivi du re sultat le plus re cent Seule la moyenne...

Page 67: ...lecteur se met automatiquement hors tension MISE EN GARDE Lorsque le lecteur est reli au PC il est impossible de proc der un test de la glyc mie Entretien Pile LelecteurestfourniavecunepileaulithiumCR...

Page 68: ...par exemple 3 mois ou plus Mettez la pile au rebut conform ment la r glementation locale en mati re de protection de l environnement Prendre soin de votre appareil Pour nettoyer l ext rieur de l appa...

Page 69: ...e fa on Gardez le flacon de bandelettes hors de la port e des enfants car le bouchon et la bandelette de test peuvent poser un risque d touffement En cas d ingestion consultez imm diatement un m decin...

Page 70: ...r vous Informations sur les symboles Symbole R f rence Symbole R f rence Pour utilisation d un diagnostique in vitro Ne pas r utiliser Consulter les instructions d utilisation Limitation de la temp ra...

Page 71: ...dL 3 9 6 6 mmol L 130 239 mg dL 7 2 13 3 mmol L 180 239 mg dL 9 9 13 3mmol L 120 239 mg dL 6 7 13 3 mmol L 240 mg dL 13 3 mmol L 600 mg dL 33 3 mmol L Message d erreur MESSAGE SIGNIFICATION ACTION RE...

Page 72: ...lume Autres erreurs les autres messages d erreur sont annonce s par 2 bips rapides quatre fois de suite D pannage 1 Si aucun message ne s affiche apr s insertion de la bandelette r active CAUSE PROBAB...

Page 73: ...re 95 Unit s de mesure mg dL ou mmol L Plage de valeurs normales 20 600mg dL 1 1 33 3 mmol L 3 Si le r sultat du test r alis l aide de la solution de contr le est en dehors de la plage attendue CAUSE...

Page 74: ...ie ForaCare Suisse ne s applique pas lorsque I Un produit n est pas utilise conforme ment aux instructions ou s il est utilise a des fins non indique es sur l e tiquette ii des re parations des modifi...

Page 75: ...nose con conseguenti risultati errati NON utilizzare lo strumento in prossimit di fonti di forti radiazioni elettromagnetiche in quanto potrebbero interferire con il corretto funzionamento Una corrett...

Page 76: ...in ambiente clinico quale ausilio per monitorare l efficacia del controllo del diabete Deve essere utilizzato per la misurazione quantitativa di glucosio zucchero in campioni di sangue intero fresco c...

Page 77: ...Pulsante SET Display 12 11 13 14 1 4 3 2 8 6 7 5 9 10 1 Simbolo batteria scarica 2 Simbolo striscia reattiva 3 Simbolo goccia di sangue 4 Risultati del test 5 Simbolo faccina basso alto 6 Simbolo mem...

Page 78: ...isuratore BATTERY SET Fase 1 Impostazione della data Quando l anno lampeggia premere M finch non compare l anno corretto Premere SET Quando il mese lampeggia premere M finch non compare il mese corret...

Page 79: ...i i risultati premere M e selezionare YES Quindi premere il pulsante SET per eliminare tutti i risultati dalla memoria OK sar visualizzato sul misuratore a indicare che tutti i dati archiviati sono st...

Page 80: ...il misuratore ripete tutte le impostazioni selezionate Congratulazioni Tutte le impostazioni sono state completate NOTA Questi parametri possono essere modificati ONLY nella modalit di impostazione Se...

Page 81: ...rovescia si azzera i risultati del test con soluzione di controllo saranno visualizzati sul display Verificare che questi risultati rientrino nella gamma riportata casi 9 9 la prima volta che si rice...

Page 82: ...uano a essere al di fuori del range riportato sul flacone delle strisce reattive potrebbe significare che il misuratore e le strisce non funzionano correttamente Controllo della glicemia Aspetto della...

Page 83: ...ano a contatto con lozioni per le mani olio sporcizia o rifiuti Preparazione del dispositivo pungidito 1 Rimuovere il cappuccio 2 Inserire saldamente una nuova lancetta nella coppa bianca di supporto...

Page 84: ...iti diversi dal polpastrello Si prega di consultare il proprio medico prima di iniziare l AST Si consiglia vivamente di utilizzare il metodo AST ESCLUSIVAMENTE nelle seguenti circostanze Prima dei pas...

Page 85: ...i qualsiasi ora del giorno indipendentemente dall ora dell ultimo pasto AC nessun consumo di cibo per almeno 8 ore PC 2 ore dopo i pasti QC test con soluzione di controllo 3 Ottenere un campione di sa...

Page 86: ...isultato inferiore a 100 Esempi 80 mg dl corrisponde a 1 beep lungo 0 1 pausa 8 beep 8 1 pausa 1 beep lungo 0 182 mg dl corrisponde a 1 beep 1 1 pausa 8 beep 8 1 pausa 2 beep 2 Nella misurazione in mm...

Page 87: ...li ultimi 450 risultati del test con la rispettiva data e ora Per accedere alla memoria del dispositivo verificare che il dispositivo sia spento Per analizzare tutti i risultati dei test procedere com...

Page 88: ...y mantenere M premuto per tre secondi finch non appare lampeggiando Rilasciare M e i risultati medi su sette giorni misurati in modalit generale compariranno sul display Fase 2 Premere M per consultar...

Page 89: ...emuto per cinque secondi o lasciare il dispositivo inattivo per tre minuti Il misuratore si spegner automaticamente I risultati dei test con soluzione di controllo NON sono inclusi nella media giornal...

Page 90: ...tware System o per acquistare un cavo interfaccia separatamente rivolgersi al servizio di assistenza clienti locale o al rivenditore Trasmissione dei dati via cavo RS 232 Fase 1 Procurarsi il cavo ric...

Page 91: ...eria scarica Quando le batterie saranno presto esaurite 2 bip veloci sono annunciati tre volte di seguito Questo avvertimento suonato quando lo strumento acceso Sostituzione della batteria Prima di so...

Page 92: ...potrebbe comportare un rischio di infezione durante la misurazione Le batterie del misuratore usato vanno tolte e il dispositivo va smaltito in conformit alle disposizioni locali vigenti in materia I...

Page 93: ...da 68 F a 77 F Assicurarsi che la soluzione di controllo il dispositivo e le strisce reattive siano nell intervallo di temperatura specificato prima di procedere con il controllo Agitare il flacone p...

Page 94: ...a Limite di umidit di conservazione trasporto Raccolta di apparecchi elettrici ed elettronici 3V 3 V DC Batteria N modello Risoluzione dei problemi Se si effettua l operazione consigliata ma il proble...

Page 95: ...tema La gamma operativa del sistema 10 C a 40 C 50 F a 104 F Ripetere il test quando il misuratore e la striscia reattiva si trovano in questa gamma di temperatura Compare quando la temperatura ambien...

Page 96: ...ente Ripetere il test con una striscia nuova Applicare il campione solo quando il display inizia a lampeggiare Misuratore difettoso Rivolgersi al servizio di assistenza clienti 3 Se i risultati del te...

Page 97: ...ZIA Per quanto riguarda i prodotti monouso ForaCare Suisse garantisce all acquirente originale che al momento della consegna ogni prodotto standard fabbricato da ForaCare Suisse e privo di difetti nei...

Page 98: ...onformita alle raccomandazioni scritte applicabili di ForaCare Suisse La garanzia qui fornita non si applica ai danni per prodotti acquistati conseguenti in toto o in parte all uso di componenti acces...

Page 99: ......

Page 100: ...e contro le de la glyce mie Sistema per il monitoraggio della glicemia ForaCare Suisse AG Neugasse 55 9000 St Gallen Switzerland www foracare ch For self testing F r Selbsttests Pour auto mesure Per a...

Reviews: