background image

31


9. Optional Functions 

9-1. MV-160OUT (DVI/VGA Output) 

The DVI output and VGA output are available when the DVI/VGA output option (MV-160OUT) is 
installed. The DVI and VGA outputs are the same output as the HD/SD OUT (OUTPUT1 and 2). 


9-2. Selecting Resolution 

In the SYSTEM menu, the resolution of DVI and VGA can be selected. The setting made in the 
DVI menu is applied to both DVI and VGA. 

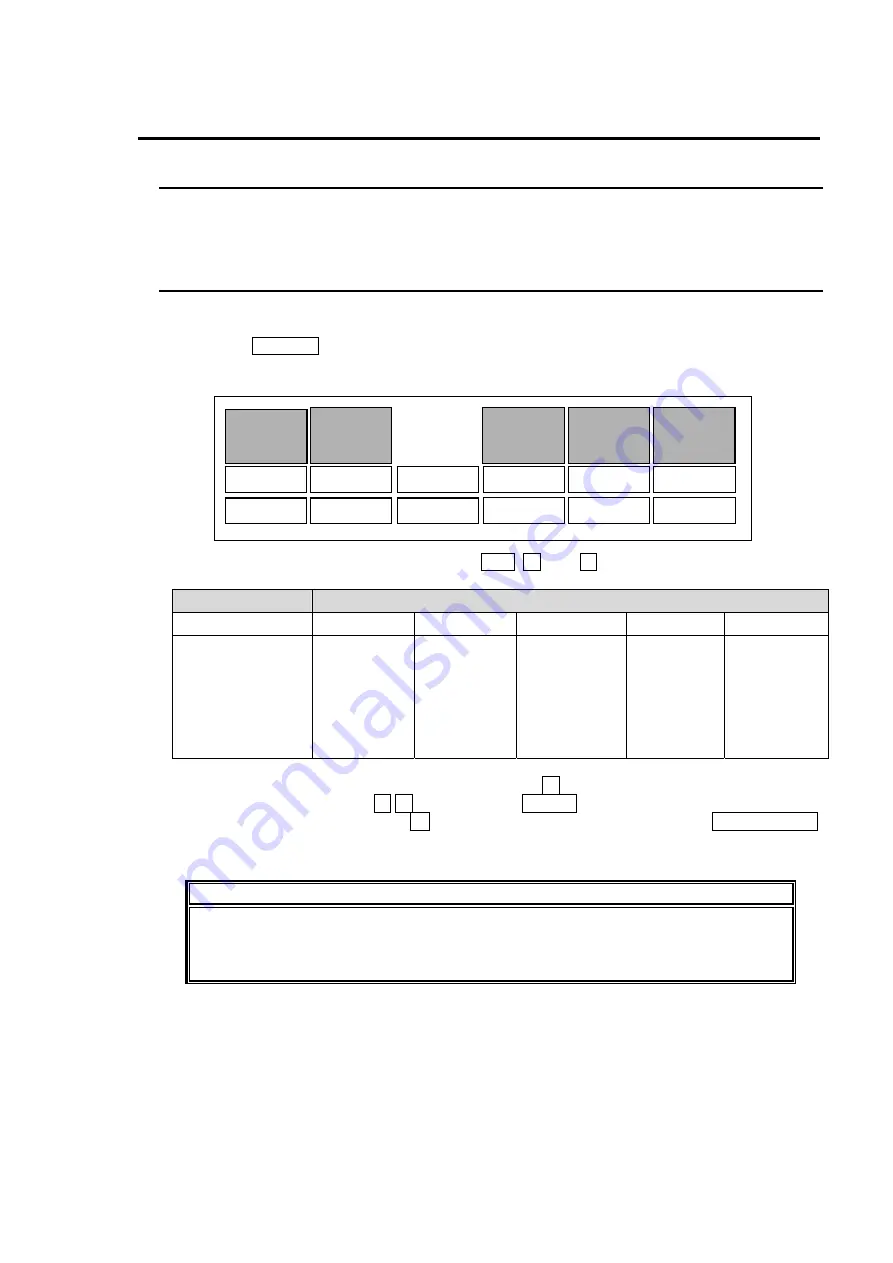
1) Press SYSTEM button. SYSTEM menu will be displayed on the output screen. 


2)  Move the cursor to the DVI menu by using 

, and 

 buttons. 


Item 

Setting options 

RES (Resolution) 

UXGA 

SXGA 

WXGA 

XGA 

SVGA 

Input video 

format 

1080/60i 

1080/59.94i

1080/50i 

720/59.94p

720/60p 

525/60 

625/50 

1080/60i 

1080/59.94i

1080/50i 

720/59.94p

720/60p 

525/60 

625/50 

1080/60i 

1080/59.94i

1080/50i 

720/59.94p 

720/60p 


1080/60i 

1080/59.94i 

1080/50i 

720/59.94p 

720/60p 

525/60 

625/50 

525/60 

625/50 

 
3)  Place cursor on the selected menu item, and press  

  button. 

4)  Change the value by using 


 buttons. Press ENTER button to confirm the change. 

5)  After completing settings, press  

  button to move into other menu. Press MENU CLEAR 

button to exit menu and go back to video display.


IMPORTANT 

The frame conversion from HD/SD SDI input to DVI/VGA output is not supported. 

The repeat frame or drop frame may occur due to the frame rate difference of input 
and output videos. 


FMT 

VIDEO 

RES 

REF IN 

1080i 

UXGA 

B.B. 

INIT ANCI GLINK 

EN 

EN 

EN 

OFF 

OFF 

OFF 

DVI 

[SYSTEM menu]

Summary of Contents for MV-160HS Multi Viewer

Page 1: ...MV 160HS Multi Viewer 2nd Edition OPERATION MANUAL...

Page 2: ......

Page 3: ...nsure power cord is firmly plugged into AC outlet Operation Do not operate unit in hazardous or potentially explosive atmospheres Doing so could result in fire explosion or other dangerous results Do...

Page 4: ...iately and disconnect power cord to avoid potentially hazardous conditions If problems similar to above occur contact authorized service representative before attempting to again operate unit Consumab...

Page 5: ...settings Check your received items against the packing lists below ITEM QTY REMARKS MV 160HS 1 Rack Mount Brackets 1 set AC Cable 1 AC Cable fook 1 Operation Manual 1 set This manual Option ITEM QTY...

Page 6: ......

Page 7: ...9 4 4 Assigning Input Video to Window 10 4 5 Setting Window Display 11 4 5 1 Adding Title 11 4 5 2 Adding Frame Marker 13 4 5 3 Adding Audio Level Meter 13 4 5 4 Using Copy Function 14 4 6 Tally Setti...

Page 8: ...EMOTE 27 7 3 Control via RS 232C 29 8 System Block Diagram 30 9 Optional Functions 31 9 1 MV 160OUT DVI VGA Output 31 9 2 Selecting Resolution 31 9 3 DVI Output 32 9 4 VGA Output 33 10 Specifications...

Page 9: ...is not present It also supports 7 preset display patterns including 16 split screen These features make MV 160HS the most ideal for monitoring HD SD SDI video signals and audio signals Features Accep...

Page 10: ...ions Before connecting or operating your unit read this operation manual thoroughly to ensure you understand the product After reading it is important to keep this manual in a safe place and available...

Page 11: ...creen pattern WINDOW NUMBER Used to display not display the window numbers in the each split screen 3 1 4 2 4 3 7 WINDOW 1 16 Used to select a display window in the full screen mode Used to enter WIND...

Page 12: ...gnal Available when the optional MV 160OUT is installed 9 5 DVI OUT 24 pin DVI D female Used to output Digital signal Available when the optional MV 160OUT is installed 9 6 REF IN Loopthrough Used to...

Page 13: ...split screens See section 4 8 2 GROUP Window Full Quad Display Settings Regarding group see section 3 2 Group Output Window positions both in groups and split screen are fixed The assignments of input...

Page 14: ...tput When quad screen split screen consists of 4 groups is selected output signals at HD SD OUT 1 HD SD OUT 2 and FULL QUAD 1 to 4 are as below HD SD OUT 1 2 Menu displays GRP1 GRP2 GRP3 GRP4 FULL QUA...

Page 15: ...Default setting is MODE 2 IN1 IN2 IN5 IN6 MODE1 Displays Title and Marker outside video frame IN1 IN2 IN5 IN6 Sign marker Right left tally display See section 4 6 Tally Settings See section 6 1 WINDOW...

Page 16: ...Screen 1 Press full screen display button on the front panel 2 Press the desired WINDOW button 1 to 16 to display in full screen POWER 1 WINDOW SPLIT MENU ON OFF POWER 2 ON OFF USER FAN ALAR M POW E...

Page 17: ...d screen Output screen 16 split screen Split screen patterns and windows The following split screen patterns are available The numbers in each window are window numbers Window layouts are fixed Press...

Page 18: ...EAR button to close menu screen IMPORTANT See section 6 1 WINDOW Menu for details on WINDOW menu Menu display is not available in full screen mode and or on GROUP outputs NOTE In quad screen mode wind...

Page 19: ...rocedure to set a title CAMERA1 to window 1 in red 1 Press WINDOW button 1 to enter WINDOW menu 2 Press button and move the cursor to TITLE The menu as below will be displayed 3 Press button and move...

Page 20: ...aracter Maximum of 8 characters 0 9 A Z Used to select title color 16 colors EN ON WHITE YELLOW1 2 GREEN1 2 CYAN1 2 RED1 2 MAGENTA1 2 BLUE1 2 GRAY1 2 BLACK COLOR Used to select tally relay title color...

Page 21: ...ENU CLEAR button to exit WINDOW menu and go back to video display 4 5 3 Adding Audio Level Meter The followings are the procedure to display an audio level meter on window 1 1 Press WINDOW button 1 to...

Page 22: ...ress button and move the cursor to the box below SCREN Select 2 by using buttons 4 Press ENTER button WINDOW 1 settings are copied to WINDOW 2 5 Press WINDOW button 2 and enter WINDOW menu 6 Move the...

Page 23: ...colors for right and left markers at the same time Select a color from RED GREEN or UMBER for the menu item LEFT of SIGN menu Also select a color for the menu item RIGHT in the same manner Tally Relay...

Page 24: ...ing buttons 4 Change the value OFF to ON by using buttons 5 Press ENTER button The split screen settings stored in USER2 is applied to the current output screen 4 8 GROUP Menu Settings GROUP menu is u...

Page 25: ...button 4 Change the value FULL to QUAD by using buttons 5 Window display in GRP2 is changed to quad window as figure below GRP1 No 1 GRP4 No 11 GRP2 No 3 GRP3 No 9 GRP1 No 1 GRP4 No 11 GRP2 GRP3 No 9...

Page 26: ...orders are displayed in all GROUP outputs For example in quad screen if all four groups are set in quad display borders are displayed on all boundaries between every window as figure below However bor...

Page 27: ...in full window mode 2 Press WINDOW button 1 GROUP WINDOW menu for GRP1 is displayed To open GROUP WINDOW menu for GRP2 press 3 For GRP3 press 9 and for GRP4 press 11 Complete the settings for the titl...

Page 28: ...CLEAR button to exit menu and go back to video display 5 2 System Initialization Menu settings can be initialized 1 Press SYSTEM button SYSTEM menu will be displayed on the output screen 2 Move the cu...

Page 29: ...lay ON OFF or tally Set left tally Select frame marker display ON OFF and tally link unlink Select audio level meter display ON OFF Select destination to copy data ALL WINDOW1 16 GRP1 4 Enter title ch...

Page 30: ...5 1 Adding Title WINDOW SIGN MARKER menu Item Description Default Options LEFT Set left marker RED OFF RED GREEN UMBER SIGN RIGHT Set right marker GREEN OFF RED GREEN UMBER WINDOW FRAME MARKER menu It...

Page 31: ...No GROUP GROUP GRP1 Select MODE1 or MODE2 GRP2 Select MODE1 or MODE2 GRP3 Select MODE1 or MODE2 GRP4 Select MODE1 or MODE2 IN1 Title and Marker appears outside the video frame MODE1 IN1 Title and Mark...

Page 32: ...be made SYSTEM VIDEO FMT FORMAT RATE INIT EN ENABLE REFIN See the list below See the list below To initialize select ON and press ENTER button Select B B Black burst or TRI tri level sync ANCI EN ENAB...

Page 33: ...Make contact or Active low for INPUT10 TALLY RED display 11 IN11 TALLY RED Make contact or Active low for INPUT11 TALLY RED display 12 IN12 TALLY RED Make contact or Active low for INPUT12 TALLY RED...

Page 34: ...TALLY UMBER display 37 IN4 TALLY UMBER Make contact or Active low for INPUT4 TALLY UMBER display 38 IN5 TALLY UMBER Make contact or Active low for INPUT5 TALLY UMBER display 39 IN6 TALLY UMBER Make c...

Page 35: ...contact or Active low for assigning INPUT9 to full screen 10 Remote control 10 Make contact or Active low for assigning INPUT10 to full screen 11 Remote control 11 Make contact or Active low for assi...

Page 36: ...e control 29 Make contact or Active low for setting format to 720 59 94p 30 Remote control 30 Make contact or Active low for setting format to 720 60p 31 Remote control 31 Make contact or Active low f...

Page 37: ...ignal In Out Description 1 DCD Unassigned 2 TXD Output Transmit data 3 RXD Input Receive data 4 DSR Input Data set ready 5 GND Signal ground 6 DTR Output Data terminal ready 7 CTS Input Clear to send...

Page 38: ...IFO S P FIFO S P FIFO S P FIFO S P FIFO S P FIFO P S MULTI VIEWER 1 4 SPLIT or FULL MULTI VIEWER 2 4 SPLIT or FULL MULTI VIEWER 3 4 SPLIT or FULL MULTI VIEWER 4 4 SPLIT or FULL P S P S P S P S CONVERT...

Page 39: ...60i 1080 59 94i 1080 50i 720 59 94p 720 60p 525 60 625 50 1080 60i 1080 59 94i 1080 50i 720 59 94p 720 60p 525 60 625 50 1080 60i 1080 59 94i 1080 50i 720 59 94p 720 60p 1080 60i 1080 59 94i 1080 50i...

Page 40: ...4 NC Unassigned 5 NC Unassigned 6 NC Unassigned 7 NC Unassigned 8 NC Unassigned 9 T M D S data 1 Digital green 10 T M DS data 1 Digital green 11 T M D S data1 Shield Signal ground 12 NC Unassigned 13...

Page 41: ...15 pin D sub female Pin no Signal Description 1 Red Red signal 2 Green Green signal 3 Blue Blue signal 4 NC Unassigned 5 GND Ground 6 Red GND Signal ground 7 Green GND Signal ground 8 Blue GND Signal...

Page 42: ...UXGA Resolution 1600 x 1200 Horizontal scanning frequency 75 000kHz Vertical scanning frequency 60 00Hz SXGA Resolution 1280 x 1024 Horizontal scanning frequency 63 981kHz Vertical scanning frequency...

Page 43: ...D GREEN and UMBER 16 inputs ea TTL negative logic level or make contact Remote 37 pin D sub female inch screws 1 port TTL negative logic level or make contact Power 100VAC to 240VAC 10 50Hz 60Hz Redun...

Page 44: ...ALARM POWER 1 1 1 5 STEP MULTI VIEW ER 2 3 6 7 8 9 4 10 1 1 12 13 14 1 5 16 CLE AR POWER 2 ENTER 2 MV 160HS OPERATE LOCK MENU GROUP SYSTEM NUMBER WINDOW H D SD IN CPU AC100 240V 50 60Hz IN 2 1 VGA OUT...

Page 45: ...MV 160HS Multi Viewer 4th Edition RS 232C COMMAND...

Page 46: ......

Page 47: ...Command 3 2 4 USER Data Load Command 4 2 5 WINDOW Copy Command 4 2 6 System Initialize Command 4 3 Controls over Menus 5 3 1 Command Format 5 3 2 Response Message Format 6 3 3 Video Format Command 6...

Page 48: ......

Page 49: ...ake and send message commands The command format is shown below Command Format Command code Command parameter CR LF 2 bytes Number of designated bytes Works without LF as well e g When sending a comma...

Page 50: ...d after normal reception and processing Byte Parameter Message Description 1 O 2 Message code K OK 3 CR 4 End code LF Abnormal end If something such as menu is being displayed on the output screen pre...

Page 51: ...2 Group Output Split Screen Display Command Used to set the window display mode for each Group window Byte Parameter Command Description 1 S 2 Command code G 1 GROUP1 window setting 2 GROUP2 window s...

Page 52: ...3 4 Command parameter 1 Window no setting 01 20 Selecting a Window no to make a copy of See WINDOW No setting details 5 6 Command parameter 2 Window no setting 01 20 Selecting a Window no to make a co...

Page 53: ...ormat is shown below Command format MN Menu code Command parameter CR LF 2 bytes 1 byte see below Number of designated bytes The menu codes are as follows Menu Code Description Reference V Video forma...

Page 54: ...something such as menu is being displayed on the output screen prevents commands from being issued normally messages in the following format are returned Byte Parameter Message Description 1 E 2 R 3...

Page 55: ...3 4 REF IN Command Used to select external reference input Byte Parameter Command Description 1 M 2 Command code N 3 Menu code R REF IN setting 0 B B 4 Command parameter 1 Tri sync 5 CR 6 End code LF...

Page 56: ...and Description 1 M 2 Command code N 3 Menu code W Window mode setting 0 Mode 1 4 Command parameter Group1 setting 1 Mode 2 0 Mode 1 5 Command parameter Group2 setting 1 Mode 2 0 Mode 1 6 Command para...

Page 57: ...rameter COLOR setting 01 16 See Color Setting Details 2 bytes 7 CR 8 End code LF COLOR Setting Details Byte Byte 5 6 COLOR 5 6 COLOR 0 1 White 0 9 Red 2 0 2 Yellow 1 1 0 Magenta 1 0 3 Yellow 2 1 1 Mag...

Page 58: ...and parameter WindowG2 setting 01 16 Select input channel IN1 16 40 41 Command parameter WindowG3 setting 01 16 Select input channel IN1 16 42 43 Command parameter WindowG4 setting 01 16 Select input...

Page 59: ...Small 1 Medium 2 Large 10 Command parameter 5 POS X setting 1 8 Set horizontal position 1 to 8 left to right 11 Command parameter 6 POS Y setting 1 8 Set vertical position 1 to 8 low to high 12 CR 13...

Page 60: ...2 TITLE setting ASCII code See Character code chart 1st 2nd Set the 8th character from the left 14 CR 15 End code LF WINDOW No setting details WINDOW No 1 2 3 4 5 6 7 8 9 10 11 12 13 14 15 16 G1 G2 G...

Page 61: ...umber See WINDOW No setting details 6 Command parameter 2 LEFT marker setting 0 3 Select function 0 OFF 1 RED 2 GREEN 3 UMBER 7 Command parameter 3 RIGHT marker setting 0 3 Select function 0 OFF 1 RED...

Page 62: ...OFF TALLY ON 3 FRAME ON TALLY ON 7 8 Command parameter 3 Color setting 01 16 Select Frame color See COLOR setting details 9 Command parameter 4 Width setting 0 4 Select Frame width 0 OFF 1 to 4 Narrow...

Page 63: ...CH setting 0 5 Select channels to display level meter 0 1 2 1 3 4 2 5 6 3 7 8 4 1 to 4 5 7 to 8 8 CR 9 End code LF WINDOW No setting details WINDOW No 1 2 3 4 5 6 7 8 9 10 11 12 13 14 15 16 G1 G2 G3...

Page 64: ......

Page 65: ...n the equipment is operated in a commercial environment This equipment generates uses and can radiate radio frequency energy and if not installed and used in accordance with the instruction manual may...

Page 66: ...352 378 5320 FOR A Corporation of Canada 346A Queen Street West Toronto Ontario M5V 2A2 Canada Phone 1 416 977 0343 Fax 1 416 977 0657 FOR A Latin America the Caribbean 5200 Blue lagoon Drive Suite 76...

Reviews: