background image

TEKN0

93

πάρα πολύ ογκώδη ρούχα.  Πάρα πολύ ογκώδη ρούχα μπορεί να οδηγήσουν στην εσφαλμένη 

ρύθμιση  των  τιραντών.  Σε  περίπτωση  ατυχήματος  το  μωρό  μπορεί  να  μην  συγκρατηθεί 

σωστά από τις τιράντες. 

ΠΡΟΕΙΔΟΠΟΙΗΣΗ:  Η  άμεση  έκθεση  στις  ηλιακές  ακτίνες  επιφέρει  την  αύξηση  της 

θερμοκρασίας στο εσωτερικό των οχημάτων.  Για το λόγο αυτό είναι σκόπιμο να καλύψετε 

το  καρεκλάκι  για  μωρά  όταν  είναι  άδειο,  έτσι  ώστε  να  αποφευχθεί  η  υπερθέρμανση 

των  διαφόρων  στοιχείων,  ιδιαίτερα  των  διατάξεων  στερέωσης,  και  να  μην  προκληθούν 

εγκαύματα στο μωρό.

ΠΡΟΕΙΔΟΠΟΙΗΣΗ: Οι αποσκευές και τα άλλα βαριά ή αιχμηρά αντικείμενα πρέπει να είναι 

στερεωμένα στο εσωτερικό του αυτοκινήτου. 

Τα μη στερεωμένα αντικείμενα μπορεί να τραυματίσουν το μωρό σε περίπτωση ατυχήματος.

ΖΩΝΗ ΑΣΦΑΛΕΙΑΣ

ΠΡΟΕΙΔΟΠΟΙΗΣΗ:  Μη  χρησιμοποιείτε  ΠΟΤΕ  σημεία  αγκύρωσης  διαφορετικά  από  εκείνα 

που περιγράφονται στις οδηγίες και σημειώνονται με κόκκινο πάνω στο προϊόν.

ΠΡΟΕΙΔΟΠΟΙΗΣΗ:  Βεβαιωθείτε  ότι  οι  ιμάντες  πρόσδεσης  του  μικρού  καθίσματος 

αυτοκινήτου για μωρά είναι ρυθμισμένοι σωστά για το μωρό σας. 

Οι ιμάντες πρόσδεσης πρέπει να είναι αρκετά σφιχτοί, ο χώρος μεταξύ των τιραντών και 

του στήθους του μωρού δεν πρέπει να είναι ανώτερος από δύο δάχτυλα. Η κοιλιακή ζώνη 

των ιμάντων πρόσδεσης πρέπει να είναι σε όσο γίνεται περισσότερο χαμηλή θέση για να 

συγκρατεί κατάλληλα τη λεκάνη του μωρού.

ΠΡΟΕΙΔΟΠΟΙΗΣΗ:  Βεβαιωθείτε  ότι  όλοι  οι  επιβάτες  φορούν  τις  ζώνες  ασφαλείας,  σε 

περίπτωση ατυχήματος ένα άτομο χωρίς ζώνη ασφαλείας, λόγω της πρόσκρουσης μπορεί 

να χτυπήσει το καρεκλάκι.

ΠΡΟΕΙΔΟΠΟΙΗΣΗ: Μη χρησιμοποιείτε σύστημα περάσματος ζωνών διαφορετικό από εκείνο 

που ενδείκνυται στο εγχειρίδιο.

ΠΡΟΕΙΔΟΠΟΙΗΣΗ:Το μωρό πρέπει να είναι πάντα ασφαλισμένο όταν τοποθετείτε στο καρε 

κλάκι, ακόμα και για σύντομα ταξίδια.

ΠΡΟΕΙΔΟΠΟΙΗΣΗ:Να  βεβαιώνεστε  πάντα  ότι  η  ζώνη  του  οχήματος  είναι  τοποθετημένη 

σωστά και δεν είναι στριμμένη. 

ΠΡΟΕΙΔΟΠΟΙΗΣΗ:Ελέγχετε  περιοδικά  ότι  οι  ιμάντες  πρόσδεσης  δεν  παρουσιάζουν  ίχνη 

φθοράς,

ιδιαίτερα στα σημεία στερέωσης, στις ραφές και στις διατάξεις ρύθμισης

ΠΡΟΕΙΔΟΠΟΙΗΣΗ: Θυμηθείτε πάντα να ελέγχετε ότι δεν υπάρχουν υπολείμματα τροφίμων 

ή άλλου τύπου στην πόρπη των ιμάντων πρόσδεσης ή στον κεντρικό ρυθμιστή

ΠΡΟΕΙΔΟΠΟΙΗΣΗ:  Δώστε  το  καλό  παράδειγμα  στο  μωρό  σας:  δένετε  πάντα  τις  ζώνες 

ασφαλείας.

ΠΡΟΕΙΔΟΠΟΙΗΣΗ: Ελέγχετε πάντα ότι είναι δεμένη η ζώνη του οχήματος

σωστά.

Προειδοποίηση

Summary of Contents for TEKN0

Page 1: ...Gruppo Gruop Grupo Grupo 3 22 36 kg Seggiolino auto Gruppo 1 2 3 sistema di protezione laterale Groups 1 2 3 child car seat side protection system Sillita para coche Grupo 1 2 3 sistema de protecci n...

Page 2: ...e affected if you do not follow these instructions Este producto cumple con la Normativa ECE R44 04 Sillita para coche Grupo 1 2 3 Id nea para ni os de 9 kg a 36 kg desde aproximadamente 9 meses a 12...

Page 3: ...l veicolo Le seguenti condizioni di utilizzo possono rendere il prodotto non conforme e non sicuro 1 Modifiche applicate al seggiolino non autorizzate o approvati dal costruttore 2 In caso di installa...

Page 4: ...o progettato per essere utilizzato in auto AVVERTENZA Installare il sistema di ritenuta per bambini sui sedili classificati nella categoria universale nel manuale d uso del veicolo AVVERTENZA Accertar...

Page 5: ...he il seggiolino sia ben fissato al sedile e che non oscilli Se la cintura del veicolo si allentata riposizionare e installare nuovamente il seggiolino AVVERTENZA Il seggiolino auto deve sempre essere...

Page 6: ...nere adeguatamente il bacino del bambino AVVERTENZA Assicuratevi che tutti i passeggeri indossino le cinture di sicurezza in caso di incidente una persona priva della cintura di sicurezza causa l impa...

Page 7: ...iatesta al sedile passeggero quanto rimuovete il seggiolino dall auto SEGGIOLINO DI SECONDA MANO o SEGGIOLINI DANNEGGIATI AVVERTENZA Non acquistare MAI un seggiolino auto gi utilizzato di seconda mano...

Page 8: ...bretelle imbracatura Collocare il bambino nel seggiolino GRUPPO 1 da 9 a 18 kg Trasformazione per utilizzo GRUPPO 2 da 15 a 25kg e GRUPPO 3 da 22 a 36 kg Montaggio per il GRUPPO 2 da 15 a 25 kg e GRU...

Page 9: ...lia Rivestimento Bretelle Cintura addominale Fibbia e imbottitura di protezione inguinale Copertura pulsante di regolazione Maniglia per reclinare la seduta Imbottitura di protezione pettorale Fibbia...

Page 10: ...ntaggio per il GRUPPO 1 da 9 a 18 kg Schienale reclinabile in 4 posizioni Il seggiolino reclinabile in 4 posizioni diverse dalla posizione verticale alla posizione pi reclinata Premere la maniglia di...

Page 11: ...ggero Infilare la parte orizzontale cintura addominale sotto i ganci C e tensionare la cintura tirando la cintura pettorale per ridurre il gioco della stessa Far passare la cintura pettorale nel dispo...

Page 12: ...nserimento nella scocca Dopo l installazione controllate che il seggiolino sia correttamente fissato sul sedile provando a muoverlo lateralmente l oscillazione laterale deve essere minima Se riscontra...

Page 13: ...stesso Assicurarsi che le bretelle cinture pettorali siano correttamente regolate e sopra le spalle del bambino Assicuratevi di aver installato correttamente il seggiolino seguendo le indicazioni rip...

Page 14: ...ire i due connettori della fibbia inserirli nella fibbia centrale Un click indicher il corretto aggancio Tirare la cinghia di regolazione bretelle C per tensionare correttamente la cintura per il vost...

Page 15: ...eriore del seggiolino Premere il bottone A e tirare le bretelle cinture pettorali afferrandole nella parte inferiore sotto le imbottiture delle protezioni pettorali per allentarle completamente e far...

Page 16: ...anti lo schienale del seggiolino Sganciare le cinghie dell imbracatura sul retro schienale sfilando le cinghie delle protezioni pettorali dal gancio F e sfilando le due bretelle dalla staffa tendi cin...

Page 17: ...schienale e le fessure esterne L verso la parte anteriore per rimuovere l imbracatura 1 2 K L J 2 1 M Rimuovere il riduttore M sfilandolo dalla cinghia inguinale Per rimuovere la cinghia inguinale reg...

Page 18: ...ZIONE Il seggiolino auto deve sempre essere fissato al sedile con la cintura di sicurezza a 3 punti anche se il bambino non collocato nel seggiolino auto Assicurarsi di aver rimosso dal seggiolino la...

Page 19: ...cintura Assicurarsi del corretto montaggio ATTENZIONE Il seggiolino auto deve sempre essere fissato al sedile con la cintura di sicurezza a 3 punti anche se il bambino non collocato nel seggiolino au...

Page 20: ...o dalla protezione in plastica F tirare leggermente il tessuto da sotto la protezione in plastica e sfilarlo Il rivestimento ha un impatto diretto sul funzionamento del dispositivo di ritenuta in term...

Page 21: ...mento F dietro il rivestimento principale del seggiolino Regolare la seduta nella posizione pi reclinata Premere la maniglia di regolazione situata sotto la parte anteriore della seduta del seggiolino...

Page 22: ...ntura nelle asole 1 e 2 del rivestimento e attraverso le fessure esterne sulla scocca Inserire dalla parte posteriore della scocca gli anelli metallici C attraverso le fessure interne Assicurarsi del...

Page 23: ...stimento del poggiatesta e inserire le cinghie delle protezioni e le cinghie delle bretelle nella fessura I IMPORTANTE la cinghia della protezione pettorale e la cintura delle bretelle deve passare so...

Page 24: ...avato a mano con detergente delicato 2 Non stirare non utilizzare con asciugabiancheria 3 Non usare detergenti aggressivi abrasivi o solventi 4 Lasciare asciugare il rivestimento lontano da fonti di c...

Page 25: ...advised by the manufacturer 2 Any failure to fit the child car seat in strict accordance with the instructions The manufacturer accepts no liability for issues arising from unauthorised modifications...

Page 26: ...you are forced to brake suddenly Which is the safest passenger seat to fit your child car seat to THE CENTRE REAR PASSENGER SEAT If your centre rear passenger seat is fitted with a three point seatbe...

Page 27: ...s should be in the rear and the heavier occupants in the front Warning If you have no option other than to put your child car seat on a rear passenger seat next to side airbags Consult with your vehic...

Page 28: ...his problem by covering the child car seat with a sheet when not in use BACK OF THE SEAT HEADREST Warning Ensure that the child car seat is as close as possible to the backrest of the car seat Warning...

Page 29: ...Adjusting the headrest and harness height Placing your child in the seat GROUP 1 9 18kg Converting for GROUPS 2 15 25kg GROUPS 3 22 36kg Installing for GROUPS 2 15 25kg GROUPS 3 22 36kg Removing the s...

Page 30: ...handle Carry handle Seat cover Shoulder strap Waist strap Buckle pad crotch strap Adjuster button cover Recline adjuster handle Harness shoulder pads Central buckle Booster cushion insert Harness adju...

Page 31: ...as there is no active airbag in place WARNING Never use in a seat with an active airbag Installing for GROUP 1 9 18kg Four position seat recline The child car seat can be used in four different seat...

Page 32: ...assenger seat ensuring a good fit Thread the horizontal lap belt section under both hooks C and remove all the slack by pulling up on the diagonal section of seatbelt Thread the diagonal section throu...

Page 33: ...he installation bar to help work it through the shell With your child car seat now buckled in check it is secure by pulling forward from both harness straps there should be little or no movement Next...

Page 34: ...restraint system to the child s size The harness strap slots should be level with your child s shoulders Ensure that you have first installed the child car seat correctly following the steps under In...

Page 35: ...placing your child in the child car seat match the two halves of the harness buckles together and insert them into the crotch buckle Make sure the shoulder straps fit your child snugly by pulling the...

Page 36: ...egral 5 point harness Lift the fabric adjuster cover at the front of the car seat and whilst pressing button A pull forwards on the shoulder straps not the shoulder pads to completely loosen the harne...

Page 37: ...2 3 15 36kg F G H H I Pull and hold the shell forward Unhook the shoulder pad straps from shoulder pad connector F Unhook the shoulder harness straps from yoke G Pass the shoulder straps through the s...

Page 38: ...of the shell and back out the outer slots L to the front to remove the harness 1 2 K L J 2 1 M Remove the booster cushion insert M from the crotch strap To remove the crotch strap ensure the child car...

Page 39: ...eated in the child car seat or not Ensure that you have first removed the child car seat s integral 5 point harness following the steps under Converting to group 2 3 15 36kg pages 9 12 You can use the...

Page 40: ...p and diagonal sections of seatbelt WARNING The child car seat should always be strapped in using the vehicle s seatbelt whether a child is seated in the child car seat or not WARNING The cover is a s...

Page 41: ...from under the strap hooks E and from around the plastic adjuster panel F and remove the cover WARNING The cover is a safety feature Never use the child car seat without it Place the main seat cover...

Page 42: ...ch the headrest cover E over the headrest and tuck the lower part of the headrest cover F behind the main seat cover Adjust the shell to its most reclined position Pull the recline adjuster handle und...

Page 43: ...uckle With the buckle connected you will have something similar to the illustration opposite Insert waist strap retainer buckles C through the two slots 1 and 2 on the cover and out through the outer...

Page 44: ...gger H if fitted and the headrest fabric Lift up the fabric and take the straps through the shell over the metal bar I ATTENTION The shoulder pad and harness straps MUST pass over the metal bar failur...

Page 45: ...y flat away fron direct heat and sunlight 5 If the seat covers need to be replaced only use Bolenn Hug certified parts They are the only ones that are guaranteed to have been safety tested and designe...

Page 46: ...lo Las siguientes condiciones de uso pueden comprometer la conformidad y la seguridad del producto 1 Modificaciones realizadas en la sillita sin la autorizaci n o aprobaci n del fabricante 2 En el cas...

Page 47: ...veh culo ADVERTENCIA Aseg rese de que el equipaje u otros objetos que potencialmente puedan producir contusiones o heridas al pasajero de la sillita en caso de impacto est n bien fijados Qu asiento de...

Page 48: ...l fabricante ya que influye directamente en el funcionamiento del dispositivo de sujeci n ADVERTENCIA En caso de emergencia es importante desenganchar la hebilla r pidamente para dejar libre al ni o L...

Page 49: ...sistema de paso de cinturones diferente del indicado en el manual ADVERTENCIA El ni o debe estar bien asegurado cuando se coloque en la sillita incluso durante viajes cortos ADVERTENCIA Compruebe sie...

Page 50: ...PEADAS ADVERTENCIA No compre NUNCA una sillita para el coche de segunda mano Podr a tener da os o roturas por dentro que no se ven IMPORTANTE La garant a del fabricante est dirigida exclusivamente al...

Page 51: ...de seguridad arn s Coloque al ni o en la sillita GRUPO 1 de 9 a 18 kg Transformaci n para usar el GRUPO 2 de 15 a 25 kg y el GRUPO 3 de 22 a 36 kg Montaje para el GRUPO 2 de 15 a 25 kg y para el GRUPO...

Page 52: ...egulaci n del reposacabezas Asa Revestimiento Cinturones pectorales de seguridad Cintur n abdominal Hebilla y acolchado de protecci n para la zona interior de las piernas Tapa del pulsador de regulaci...

Page 53: ...ara el GRUPO 1 de 9 a 18 kg Respaldo abatible en 4 posiciones La sillita puede abatirse en 4 posiciones diferentes desde la posici n vertical a la posici n m s reclinada Presione la manija de regulaci...

Page 54: ...nto del pasajero Pase la parte horizontal cintur n abdominal por debajo de los ganchos C y tense el cintur n tirando del cintur n pectoral para reducir la holgura del mismo Haga pasar el cintur n pect...

Page 55: ...itar de esta manera la introducci n en el bastidor Tras la instalaci n controle que la sillita est bien fijada en el asiento movi ndola lateralmente la oscilaci n lateral debe ser m nima Si observa un...

Page 56: ...i o Aseg rese de que el cintur n pectoral est bien regulado y situado por encima de los hombros del ni o Aseg rese de haber instalado correctamente la sillita siguiendo las indicaciones incluidas en e...

Page 57: ...os conectores de la hebilla e introd zcalos en la hebilla central Un clic le indicar el enganche correcto Tire de la correa de regulaci n del cintur n pectoral C para tensar correctamente el cintur n...

Page 58: ...one el bot n A y tire del cintur n cintur n pectoral sujet ndolo por la parte inferior justo por debajo de los acolchados de las protecciones pectorales para aflojar completamente e introducir lo m xi...

Page 59: ...e la sillita Desenganche las correas del arn s por la parte trasera del respaldo soltando las correas de las protecciones pectorales del gancho F y soltando los dos cinturones pectorales del estribo d...

Page 60: ...a del respaldo y las ranuras externas L hacia la parte delantera para quitar el arn s 1 2 K L J 2 1 M Quite el reductor M desliz ndolo por la correa entre las piernas Para quitar la correa de la entre...

Page 61: ...h culo ATENCI N La sillita para coche siempre se debe fijar en el asiento del veh culo con el cintur n de seguridad de 3 puntos aunque el ni o no est sentado en la sillita Aseg rese de haber quitado d...

Page 62: ...NCI N La sillita para coche debe estar siempre fijada en el asiento con el cintur n de seguridad de 3 puntos aunque el ni o no est sentado en la sillita para coches El revestimiento influye directamen...

Page 63: ...tar el tejido de la protecci n de pl stico F tire ligeramente del tejido por debajo de la protecci n de pl stico y su ltelo El revestimiento influye directamente en elfuncionamiento del dispositivo de...

Page 64: ...revestimiento principal de la sillita Regule el asiento en la posici n m s reclinada Presione la manija de regulaci n situada debajo de la parte frontal del asiento de la sillita y manteni ndola pres...

Page 65: ...cintur n en las gu as 1 y 2 del revestimiento y a trav s de las ranuras externas en el bastidor Introduzca por la parte trasera del bastidor los anillos met licos C a trav s de las ranuras internas A...

Page 66: ...reposacabezas e introduzca las correas de las protecciones y las correas del cintur n pectoral en la ranura 1 IMPORTANTE la correa de la protecci n pectoral y el cintur n pectoral deben pasar por enci...

Page 67: ...te delicado 2 No planche el revestimiento ni lo seque con m quinas secadoras 3 No use detergentes agresivos abrasivos o disolventes 4 Deje secar el revestimiento lejos de fuentes de calor o de la luz...

Page 68: ...l por danos ou marcas causadas aos bancos do ve culo As seguintes condi es de utiliza o podem tornar o produto n o em conformidade e n o seguro 1 Modifica es feitas cadeira n o autorizadas ou aprovada...

Page 69: ...ategoria universal no manual de utiliza o do ve culo ADVERT NCIA Certificar se que as bagagens ou outros objetos potencialmente capazes de causar contus es ou feridas ao ocupante da cadeira em caso de...

Page 70: ...r e instalar novamente a cadeira ADVERT NCIA A cadeira para autom vel deve estar sempre fixada ao banco mesmo se n o estiver a ser utilizada ADVERT NCIA N o utilizar o dispositivo de reten o para cria...

Page 71: ...is me caso de acidente uma pessoa sem cinto de seguran a devido ao impacto poder chocar contra a cadeira ADVERT NCIA N o utilizar um sistema de passagem dos cintos de seguran a diferente daquele indic...

Page 72: ...A M O ou CADEIRAS DANIFICADAS ADVERT NCIA NUNCA comprar uma cadeira para autom vel em segunda m o Poder ter danos ou roturas internas n o vis veis a olho nu IMPORTANTE A garantia do fabricante exclusi...

Page 73: ...altura dos arneses Colocar a crian a na cadeira GRUPO 1 de 9 a 18 kg Transforma o para utiliza o GRUPO 2 de 15 a 25kg e GRUPO 3 de 22 a 36 kg Montagem para o GRUPO 2 de 15 a 25 kg e GRUPO 3 de 22 a 3...

Page 74: ...rma o frontal Passante cinto GR2 e GR3 Manipulo de regula o do apoio de cabe a Man pulo Revestimento Arneses Cinto abdominal Fecho e estofo de prote o inguinal Cobertura do bot o de regula o Manipulo...

Page 75: ...nco com AIRBAG ativo Montagem para o GRUPO 1 de 9 a 18 kg Encosto reclin vel em 4 posi es A cadeira pode ser reclinada em 4 posi es diferentes da posi o vertical posi o mais deitada Pressionar o manip...

Page 76: ...o banco do passageiro Inserir a parte horizontal o cinto abdominal sob os ganchos C e esticar o cinto esticando o cinto peitoral para reduzir a folga do mesma Fazer passar o cinto peitoral pelo dispos...

Page 77: ...sere facilitando deste modo a inser o na arma o Ap s a instala o certificar se que a cadeira esteja corretamente fixada no banco tentando mov la lateralmente a oscila o lateral dever ser m nima Se for...

Page 78: ...ao crescimento da crian a Certificar se que os arneses cintos peitorais estejam corretamente regulados e sobre as costas da crian a Certificar se de ter instalado corretamente a cadeira seguindo as in...

Page 79: ...os r gidos na cadeira Unir os dois conectores do fecho inserindo os no fecho central Um clique indicar a fixa o correta Puxar a correia de regula o de arneses C para esticar corretamente o cinto para...

Page 80: ...bot o de regula o na parte frontal da cadeira Pressionar o bot o A e puxar os arneses cintos peitorais segurando os pela parte inferior debaixo dos estofos das prote es peitorais para solt las complet...

Page 81: ...ara a frente o encosto da cadeira Soltar as correia do arn s na parte traseira do encosto removendo as as correias das prote es peitorais do gancho F e retirando os dois arneses do suporte tensor de c...

Page 82: ...dire o parte traseira do encosto e as aberturas externas L em dire o parte frontal para remover o arn s 1 2 K L J 2 1 M Remover o reduto M retirando o da correia inguinal Para remover a correia ingui...

Page 83: ...ira para autom vel deve estar sempre fixada ao assento com o cinto de seguran a com 3 pontos mesmo se a crian a n o est colocada no assento do carro Certificar se de ter removido da cadeira o cinto co...

Page 84: ...lga do cinto ATEN O A cadeira do carro deve estar sempre fixada ao banco com o cinto de seguran a com 3 pontos mesmo se a crian a n o estiver sentada na cadeira para autom vel O revestimento tem um im...

Page 85: ...Para remover o tecido da prote o em pl stico F puxar ligeiramente o tecido dedebaixo da prote o em pl stico e retir lo O revestimento tem um impacto direto no funcionamento do dispositivo de reten o e...

Page 86: ...rior do revestimento F atr s do revestimento principal da cadeira Regular o assento na posi o mais reclinada Pressionar o man pulo de regula o situado sob a parte frontal do assento da cadeira e mante...

Page 87: ...turas 1 e 2 do revestimento e atrav s das aberturas externas na arma o Inserir na parte traseira da arma o os an is met licos C atrav s das aberturas internas Certificar se que estejam corretamente in...

Page 88: ...as correias das prote es e as correias dos arneses na abertura I IMPORTANTE a correia da prote o peitoral e o cinto dos arneses deve passar sobre a barra de metal Se inserida de modo errado a instala...

Page 89: ...cado 2 N o passar a ferro n o utilizar com uma m quina de secar roupa 3 N o usar detergentes agressivos abrasivos ou solventes 4 Deixar secar o revestimento longe de fontes de calor ou da luz direta d...

Page 90: ...90 TEKN0 44 04 ECE R44 04 3 UN ECE 16 1 2...

Page 91: ...TEKN0 91 3 ECE R16 3 3 2 3...

Page 92: ...92 TEKN0 SRS...

Page 93: ...TEKN0 93...

Page 94: ...94 TEKN0...

Page 95: ...TEKN0 95 4 1 9 18 kg 1 9 18 kg 2 15 25kg 3 22 36 kg 2 15 25 kg 3 22 36 kg 96 96 97 97 97 100 100 102 105 106 107 108 111...

Page 96: ...96 TEKN0 1 12 13 9 10 11 2 3 4 5 6 7 8 14 15 16 17 18 19 20 21 22 24 23 1 2 3 4 5 6 7 8 9 10 11 12 13 14 15 16 17 18 19 20 21 22 23 24 2 3 SPS 1 2 3 1 2 3...

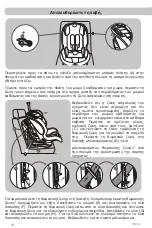
Page 97: ...TEKN0 97 3 2 3 1 9 18 kg 4 4 verticale reclinato A B A A B A verticale reclinato A B A...

Page 98: ...98 TEKN0 B A E F G H C D C D F G B A E F G H C D...

Page 99: ...TEKN0 99 1 9 18 kg J buckle crunch buckle crunch J I K J I K...

Page 100: ...100 TEKN0 1 9 18 kg A B A B 1 9 18 kg...

Page 101: ...TEKN0 101 1 9 18 kg C 1cm C 1cm...

Page 102: ...102 TEKN0 2 3 15 36kg 5 1 1 9 18kg 2 15 25 kg 3 22 36 kg 5 C D A B C D E A B C D E...

Page 103: ...TEKN0 103 2 3 15 36kg F G H H I F G...

Page 104: ...104 TEKN0 1 2 K L J 2 1 M 2 3 15 36kg J 1 2 L 1 2 K L J 2 1 M 1 2...

Page 105: ...TEKN0 105 2 3 15 36kg 0 3 5 2 3 15 36kg N O N O 2 15 25kg 3 22 36kg...

Page 106: ...106 TEKN0 3 2 15 25 kg A 3 22 36 kg 3 2 15 25 kg A 3 22 36 kg 3 5 2 3 15 36kg 2 15 25 kg 3 22 36 kg B A B C 2 15 25kg 3 22 36kg A B A B C Gruppo2 15 25kg Gruppo3 22 36kg A...

Page 107: ...TEKN0 107 C D F A C C D E C F C A B C B...

Page 108: ...108 TEKN0 E F A B D D F F E F A B D...

Page 109: ...TEKN0 109 5 C 1 2 C 3 2 1 3 C D C...

Page 110: ...110 TEKN0 G G F E I H J K 1 2 F G 1 2 I J G G F E I H J K 1 2...

Page 111: ...TEKN0 111 M L L 1 2 3 4 1 2 3 4 5 1 2 3 1 2 6...

Page 112: ...Tekno R1 Importato da Imported by Foppa Pedretti S p A via Volta 11 24064 Grumello del Monte Bergamo Italy tel 39 035 830497 fax 39 035 831283 www foppapedretti it...

Reviews: