


19
Problem
Solution
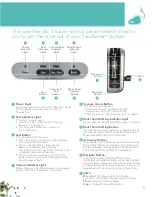
No lights on the
control panel
•
Make sure unit is plugged in.
•
Make sure wall outlet is functional.
•
Make sure lid is all the way down, and the Latch is in the On
position.
Nothing happens
when Latch is
closed and Button
is pressed
•
Make sure unit is plugged in.
•
Make sure wall outlet is functional.
•
Open Latch, make sure lid is all the way down, re-latch lid.
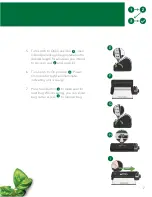
Cannot
insert bag into
machine
•
Make sure there is enough bag material to reach center of drip
tray. Always allow 7.5cm extra space to allow the bag to seal
tightly around food contents.
•
Gently stretch bag flat while inserting. Insert bag curl down
into Vacuum Channel.
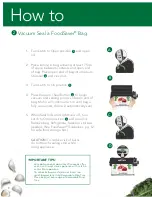
Air was removed
from the bag,
but now air has
re-entered
•
Examine the seal. A wrinkle along the seal may cause air to
re-enter the bag. To prevent wrinkles in the seal, gently stretch
bag flat while inserting bag into Vacuum Channel.
•
Sometimes moisture or food material (such as juices, grease,
crumbs, powders, etc.) along seal prevents bag from sealing
properly. Cut bag open, wipe top inside of bag and re-seal.
•
Sharp food items may have punctured bag. Use a new bag if
there is a hole. Cover sharp food items with a soft cushioning
material, such as a paper towel, and re-seal.
•
Fermentation or the release of natural gases from inside the
foods may have occurred. When this happens, food may have
begun to spoil and should be discarded.
•
Faulty bag. Bag could be punctured. Try another bag.
Bag melts
•
Sealing Strip may have become too hot. Always wait at least 20
seconds for appliance to cool down before you vacuum seal
another item.
•
Use FoodSaver
®
brand bags. Our FoodSaver
®
Bags and Rolls
are specially designed for FoodSaver
®
units.
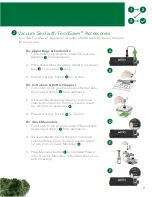
Container does
not vacuum
•
The lid of the container must be correctly placed on and
aligned to the container.
•
Make sure you press the Accessory Button.
•
Make sure lid is closed securely on all 4 sides.
•
Make sure rubber gasket on inside of lid is free from
food residues.
•
Examine rim of container for cracks or scratches. Make sure
container valve is clean.
If you need
further
assistance:
•
Call Customer service team.
•
For additional tips and answers to frequently asked questions,
go to www.foodsaver.com and click the “Service & Support”
tab.
1
1
1
1
1
1
1
1
9
9
9
1
9
19
9
9
1
1
9
9
9
9
19
9
1
1
1
1
9
9
9
9
9
9
9
9
9
9
9
9
9
1
9
9
9
9
9
9
9
1
1
9
9
9
19
9
19
9
19
1
1
1
1
9
19
9
19
9
9
9
19
19
9
9
9
1
1
1
1
9
9
19
9
9
9
19
9
9
9
9
1
1
19
1
9
9
19
19
9
19
19
19
9
9
9
9
1
1
1
9
19
19
19
9
9
9
9
9
9
9
1
1
1
1
9
9
9
19
9
9
9
9
9
9
9
9
1
1
9
9
9
19
9
9
19
9
9
9
9
9
9
9
1
1
9
9
9
9
9
9
9
9
9
1
1
1
1
1
1
9
9
9
9
9
9
19
9
9
9
9
1
1
1
9
9
9
1
1
1
1
1
1
1
1
19
1
1
1
1
1
1
1
1
1
1
1
1
9
1
1
1
1
1
1
1
1
9
1
1
1
1
1
1
1
1
1
1
1
1
1
1
1
1
1
1
1
1
9
1
1
1
1
1
1
1
9
9
1
9
9
9
9
1
1
9
9
9
9
1
1
9
1
1
1
1
1
1
1
19
9
1
1
1
1
1
9
9
9
9
1
1
1
1
1
9
9
9
9
1
1
1
1
1
1
9
9
9
s.
lid is free from
ratches. Make sure
ntly asked questions,
“Service & Support”
y
q
,
y
q
If y
furt
y
as
a
a
a
sist
Summary of Contents for VS7850
Page 1: ...VS7850 User Guide...
Page 2: ...www FoodSaver com...
Page 22: ...20 Notes...
Page 23: ...21...


