background image

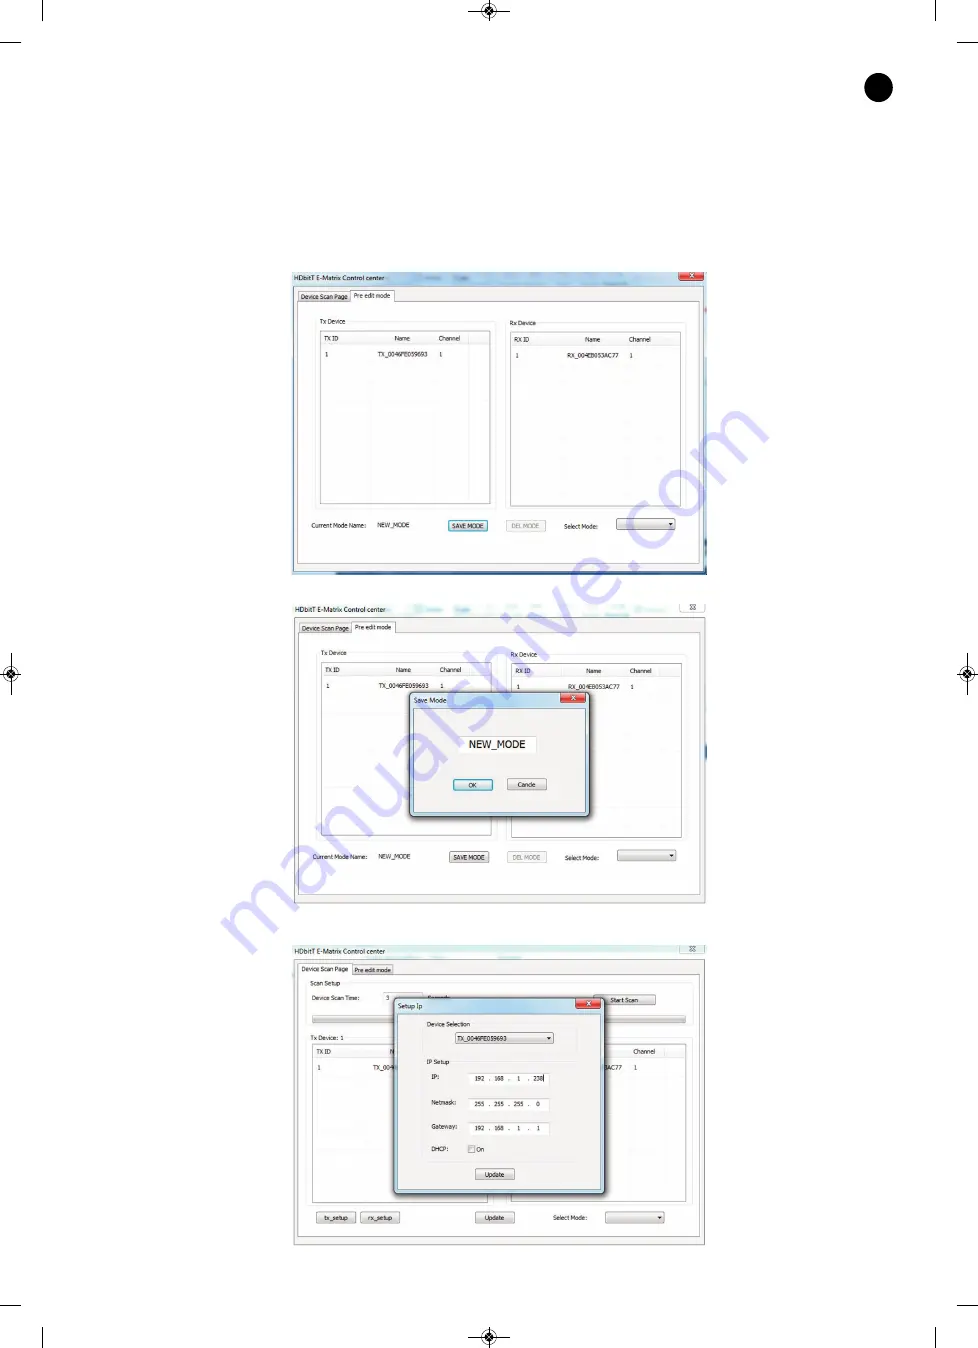
1.-  Press the Start Scan to display the connected devices.

2.- Select the transmitter/receiver ID.

3.- Change the name of the transmitter/receiver device for one that is easy to identify.

4.- Select the transmitter/receiver channel.

5.- Pre edit.

Select the transmitter/receiver channels and press “SAVE MODE”.

Name the saved PRESET and press “OK”.

6.- IP editing in the transmitter/receiver.

- 9 -

EN

FO-457M_FO-458MR_MANUAL_(EN)_20200113.qxp_Maquetación 1  13/1/20  8:19  Página 9

Summary of Contents for FO-457M

Page 1: ...FO 457M FO 458MR HDMI EXTENSION MATRIX OVER TCP IP ETHERNET INSTRUCTION MANUAL FO 457M_FO 458MR_MANUAL_ EN _20200113 qxp_Maquetación 1 13 1 20 8 19 Página 1 ...

Page 2: ...t heat sources and excessive dust Do not place the machine near magnetic fields or static electricity Do not use surfaces which vibrate or receive impact Do not pile machines on top of one another VENTILATION Never block or cover the ventilation slits on the machine Do not expose it to direct sunlight or place it near sources of heat PERIODS OF INACTIVITY When the machine is not going to be used fo...

Page 3: ...d of it must be done properly placing it in a special selective electronic and electrical equipment container or through a dealer when purchasing a similar product at no additional cost It also shows that the machine was put on the market after 13th August 2005 European Community Directive 2002 96 CE of Electrical and Electronic recycling and its Spanish equivalent R D 208 2005 In accordance with ...

Page 4: ...l IF receiver 2 LED power indicator 3 10 increases the channel in increments of 10 4 CHANNEL selected channel display 01 99 through which the transmitter transmits 5 1 increases the channel by 1 unit 6 RESET press and hold this button for 5 seconds to restore the transmitter s IP to the factory default settings 7 5V DC power supply for mains adapter provided 8 LED data transmission indicator 9 HD ...

Page 5: ...hannel display 01 99 8 1 increases the tuned channel by 1 unit 9 RESET press and hold this button for 5 seconds to restore the transmitter s IP address to the factory default settings 10 5V DC power supply for mains adapter provided 11 LED data transmission indicator 12 HD RX receiver input RJ 45 connector 13 LED connection status indicator 14 IR IN remote control receiver connection input 15 HDMI...

Page 6: ...B standard Use Cat 5e 6 cable of up to 120 meters to connect the switch and the receiver according to the IEEE 568B standard Power the FO 457M transmitters and the FO 458MR receivers with the mains adapters provided Switch on the digital A V source and the televisions Note this configuration allows up to 100 transmitters and as many receivers as you require to be connected In each receiver select t...

Page 7: ... the computer must have an IP address within the same range as the installation devices If this is not the case follow the steps below 1 In your computer press Start Control Panel Open Network and Sharing Center 2 Select the option Change Adapter Settings and then select the Ethernet network card With the right button open the Options menu and select Properties 7 EN FO 457M_FO 458MR_MANUAL_ EN _20...

Page 8: ...255 0 Finally press Accept to save the configuration CONTROL SOFTWARE FOR PC HDbit T E MATRIX Control Center To download the software software access our WEBSITE fonestarpro com look for the product FO 457M o FO 458MR Then open the Software tab to download the file in your computer and install the software 8 EN FO 457M_FO 458MR_MANUAL_ EN _20200113 qxp_Maquetación 1 13 1 20 8 19 Página 8 ...

Page 9: ...tter receiver device for one that is easy to identify 4 Select the transmitter receiver channel 5 Pre edit Select the transmitter receiver channels and press SAVE MODE Name the saved PRESET and press OK 6 IP editing in the transmitter receiver 9 EN FO 457M_FO 458MR_MANUAL_ EN _20200113 qxp_Maquetación 1 13 1 20 8 19 Página 9 ...

Page 10: ...ownload the file in your computer and install the APP in your Android device 1 Press the SCAN button to display the connected devices 2 Edit the ID and the transmitter receiver channel Note the same channel must be selected in the receiver as in the transmitter you wish to display 10 EN FO 457M_FO 458MR_MANUAL_ EN _20200113 qxp_Maquetación 1 13 1 20 8 19 Página 10 ...

Page 11: ...ia Cat 5e 6 cable Controls channel selection RECEIVER Input 1 RJ 45 ethernet HDMI extension via Cat 5e 6 cable Output 1 female HDMI Controls channel selection POWER SUPPLY Transmitter and receiver 5 V DC 2 A with adapter included DIMENSIONS Transmitter and receiver 134 x 24 x 84 mm depth ACCESSORIES Remote control cable extender Assembly mounts FO 458MR CHARACTERISTICS HDMI extension matrix over T...

Page 12: ...eneral any use that is unrelated to the nature and purpose of the product If any service is needed during the warranty period because of lack of conformity please contact the business or distributor where the product was purchased in no more than 2 months after being conscious of the problem It is only necessary to contact FONESTAR if it is impossible or imposes an undue burden for them to solve i...

Reviews: