9
L•TV Portable Pro
L•TV Portable Pro
8
P
ART
T
WO
: H
ARDWARE
I
NSTALLATION
Follow these steps for hardware installation:
1. Power down your computer and L•TV Portable Pro. Make your con-
nections with all power off to avoid possible static damage to your
computer and video equipment.
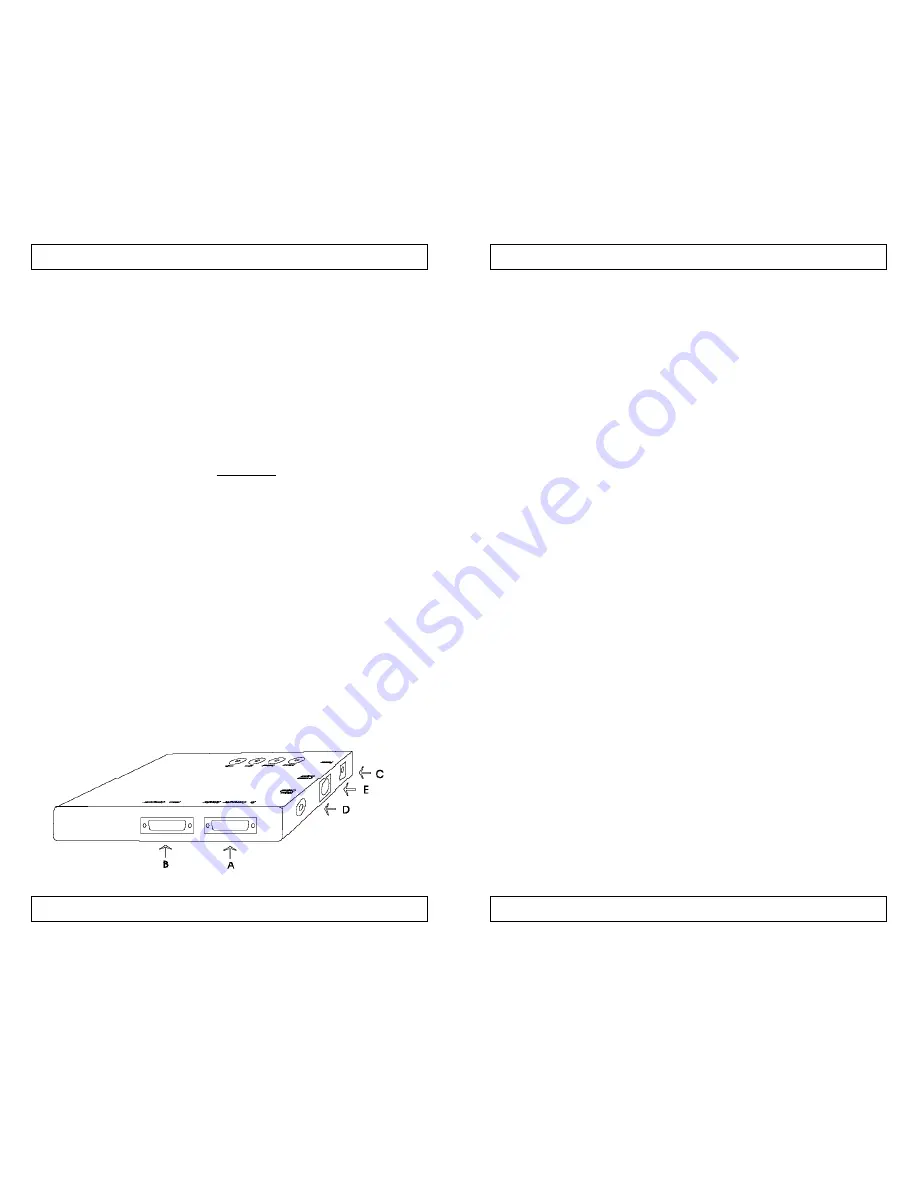
2. Connect the short cable provided to the L•TVPortable Pro module at
the connection labeled "To Computer Monitor" (A). Disconnect the
current monitor cable from the computer's display card and connect it
to the short cable that you just connected to the L•TVPortable Pro.
Important Note: On a Macintosh, you must use the supplied
cables. The connectors look the same, but an adapter cable is nec -
essary. L•TV Portable Pro will not work if you plug the monitor or
computer directly into L•TV Portable Pro.
3. Connect the special cable supplied with your L•TVPortable Pro mod-
ule from your computer’s display card to L•TVPortable Pro. One end
will plug into the remaining connection labeled “From Computer” (B)
while the other end will connect to your display card.
Important Note: Macintosh users, please note that one end of
the supplied cable is labeled "Mac". This end connects to the
Macintosh while the opposite end connects to the
L•TV Portable Pro.
4. Attach the A/C power adapter. It's best to connect the A/C power
adapter into L•TV Portable Pro first, then plug it into the wall. A red
light will illuminate on the L•TV Portable Pro.
5. Connect your composite monitor or video recorder to the “Video
Output” connector (D). The Composite Video Out connector is a stan-
dard RCAjack, common to most camcorders, VCR’s, and composite
monitors.
If you have a monitor or video recorder that accepts S-video, attach it to
the connection labeled “S-video” (E) instead. Use either or both connectors
(you can have L•TV Portable Pro drive two video devices simultaneously,
one composite and one S-video, in addition to your computer monitor). S-
video is a higher quality connection that is available on most Hi8 and S-VHS
video devices.
If you’re connecting to a VCR or television, it’s possible that you’ll have
to change the VCR’s settings to accept video from L•TVPortable Pro. TV’s
may have to be set to a certain channel. Other TV models require that you
specify input through the TV’s on-screen programming feature. It’s a simi-
lar situation on a VCR. You may have to set a switch on the front of the
VCR, use the VCR’s on-screen programming, or press the proper button on
the remote to ensure that it will accept video through the Video Input con -
nector. Typically, you’ll see a button on the VCR remote labeled ”Input
Select“ or ”Input.“ If you’re not sure how to set your TV or VCR to accept
external video, check the owners manual.
Remember, LINE IN and VIDEO IN are not the same as ANT IN. The
connection used by cable TVcompanies to bring 127 stations to your home
(usually labeled ANT) uses a different type of video than L•TVPortable Pro.
Therefore, do not connect L•TV Portable Pro directly to ANT IN of either
your TV or VCR. If your TV is only capable of receiving antenna signals,
you can purchase an RF modulator at your local electronics store (such as
Radio Shack), but you will lose image quality on the output. You can also
send it through a VCR as described in Part Six of this manual.
Laptop and Notebook Video
There are a couple of things to keep in mind before using L•TVPortable
Pro with a laptop:
IBM PC Laptops
• Most laptops and notebooks require you to turn on the external video
connector, either through a special key press, or through the BIOS
setup program. A popular laptop, for example, uses FN + ESC to
access the external monitor controls. It’s best to consult your laptop
owners manual to determine how to turn on external video with your
laptop. You may need to attach L•TV Portable Pro before you boot
your laptop so that it may sense the presence of an external monitor.
• It’s best to have your laptop or notebook using A/C power when using
L•TVPortable Pro. In fact, for most laptops, it’s necessary.


