


3
INSTRUKTION / INSTRUCTION
FMM 9000E
Rev. 004 – 11.04. FMM nr 100 19 72
SVENSKA
MONTERING
Vi rekommenderar att du anlitar professionell VVS-installatör.
OBS! Vid installation måste ledningarna fram till blandarna renspolas, innan
blandaren monteras. OBS! Vid koppling av anslutningsslang (Soft PEX-rör) ska
matarledningens anslutningskoppling vara fast fixerad. Till Soft PEX-rör med
slät anslutningsände behövs ingen stödhylsa.
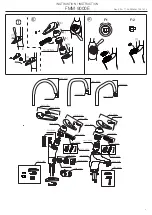
A
-
B
Montera blandaren i utförd ordning [1]–[5].
B:1 Köksblandare:
Mon-
tera pipen med önskad pipspärr 60°, 85°, 110° eller 360°. Pipspärren ska vara
centrerad framåt med klacken uppåt [3].
B:2 Tvättränneblandare FMM8118:
Montera pipen med den fasta pipspärren med medföljande skruv, 1-3.
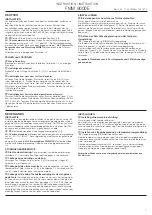
FELSÖKNING/SERVICE
A
Dåligt flöde:
Skräp i strålsamlaren: Skruva loss strålsamlaren 1-2 och
gör ren insatsen från vattenföroreningar.
c
Läckage vid pipanslutning:
Byte av o-ringar: Utför [1]–[3], byt o-ringar [3]. Smörj med silikonfett.
d
Läckage i disk/tvättmaskinsavstängninen:
Byt insatsen: Stäng först av inkommande vatten. Utför [1]–[3]. I utförd ordning
1-4: Vrid disk-maskinsvredet till vänster. Sätt skruvmejsel i markering och vrid
tills vredet snäpper loss. Byt insats [3]. OBS! Repa ej ytan.
e
Läckage ur pip eller spakinfästningen när blandaren är
stängd:
Byt keramikinsatsen: Stäng först av inkommande vatten. Utför i ordning
[1]–[6]. Vid [5]: Bytet kräver FM Mattssons specialverktyg (Art.nr. 6077-0000).
Vid [6]: Byt hela keramikinsatsen. Vid behov rengör sätet där keramikinsatsens
tre packningar tätar. OBS! Repa ej ytan.
INSTÄLLNINGAR
d
Inställning disk/tvättmaskinsavstängning:
Varmt eller kallt vatten till diskmaskin:
Blandaren är fabriksinställd på kallt. För varmt vatten demontera vredet enligt
[1]. Skjut sedan på vredet en aning på spindeln och vrid spindel medurs till
stopp. Montera tillbaka vredet med markeringen rakt upp.
f
Inställning av flödesbegränsning och temperaturspärr:
[
F:1
] Temperaturring [
F:2
] Flödesställare
Genom att kugga om temperaturringen regleras temperaturspärren. Ju mer
den vrids mot minus desto större blir varmvattenbegränsningen.
Genom att vrida flödesställaren 4x90° kan fyra olika flöden ställas in. Vänd
önskad klack mot stoppklacken [1]. Ju större klack desto mindre flöde.
Uttjänta produkter kan återlämnas till FM Mattsson för återvinning.
ENGLISH
INSTALLATION
We recommend that you engage a professional (licensed) plumber.
Please note: When the mixer is installed, the main supply pipework must be
rinsed before the inlet tails are connected. NB: When attaching the connection
tube (soft PEX pipe), the connector coupling to the infeed pipe must be firmly
fixed into place. No supporting bush is required for PEX pipes with a smooth
coupling end.
A
-
B
Install the mixer in the specified order [1]–[4].
Alt.1 Kitchen Mixer:
Fit
the spout with the desired swivel restrictor, 60°, 85°, 110° or 360°. The spout
swivel restrictor must be centered forwards with the lug upwards [3].
Alt.2
Bar Mixer FMM 8118:
Attach the spout with the fixed spout lock, using the
enclosed
screw, 1–3.
TROUBLESHOOTING/SERVICE
A
Poor flow:
Clogged aerator: Dismount the aerator 1-2 and clean the insert from water
impurities.
c
Leakage from spout connection:
Replace O-rings. Perform [1]–[3], replace O-rings [3].
Lubricate with silicone grease.
d
Leakage from dishwasher connection:
Replace the cartridge: First turn off the main supply. Perform [1]–[3]. In the
order 1-4: Turn the on/off valve to the left. Put the screwdriver in the slot and
turn until the handle comes loose. Replace the cartridge [3]. Do not use sharp
objects.
e
Leakage from spout or lever bracket when the mixer is clo-
sed:
Replace ceramic cartridge: First turn off the main supply. Perform sequences
in order [1]–[6]. At [5]: The switch demands FM Mattsson special tool (Item No
6077-0000). At [6]: Replace the complete ceramic cartridge.
If necessary clean the seats where the three packnings in the cartridge seal
against the body. Do not use sharp objects.
SETTINGS
d
Setting the dishwasher isolator:
Hot or cold water supply to the dishwasher:
The mixer is factory configured to supply cold water. For hot water, dismantle
the lever as described in [1]. Then push the lever slightly onto the spindle and
twist the spindle clockwise to the stop point. Reassemble the lever with the
marking pointing straight upwards.
f
Setting the flow and temperature restrictors:
[
F:1
] Temperature restricting ring [
F:2
] Flow restrictor
The maximum temperature restriction is adjusted by repositioning the tem-
perature ring. The more it is turned to minus, the lower maximum hot water
temperature.
Four different maximum flows can be obtained by turning the flow restricting
device 4 x 90°. Turn the desired lug towards the stop lug [1]. The bigger the
lug, the lower flow.
Worn out products may be returned to FM Mattsson for recycling
.


