
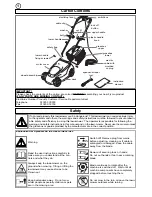


6
Fault Finding Hints
Fails to Operate
1.
Is the correct Starting procedure being followed? See
‘To Start your Lawnmower’
2.
Is the Power Turned On?
3.
Check the fuse in the plug, if blown replace.
4.
Fuse continues to blow?
Immediately disconnect from the mains electricity
supply and consult your local approved Electrolux
Outdoor Products Service Centre.
Poor Grass Collection
1.
Disconnect from the mains electricity supply.
2.
Clean the outside of the air intakes, the discharge
chute and the underside of the deck
.
3.
Raise to a higher height of cut. See Cutting Height
Adjustment.
4.
Clean Fan Blades.
5.
If poor collection persists.
Immediately disconnect from the mains electricity
supply and consult your local approved Electrolux
Outdoor Products Service Centre.
Excessive Vibration
1.
Disconnect from the mains electricity supply.
2.
Check that the blade is fitted correctly?
3.
If the blade is damaged or worn, replace it with a new one.
4.
If vibration persists, turn the blade through 180
o
by first
loosening the blade bolt, turning the blade and re-tight-
ening the blade bolt.
5.
If vibration persists?
Immediately disconnect from the mains electricity
supply and consult your local approved Electrolux
Outdoor Products Service Centre.
Lawnmower becomes heavy to push
1.
Disconnect from the mains electricity supply.
2.
In long grass or uneven ground, the height of cut
should be raised to a higher position. See Cutting
Height Adjustment.
3.
Check that the wheels can rotate freely.
4.
If problem persists?
Immediately disconnect from the mains electricity
supply and consult your local approved Electrolux
Outdoor Products Service Centre.
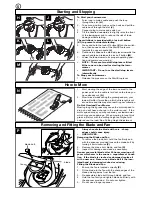
Caring for your Lawnmower
Cleaning (Q)
•
USE GLOVES
•
IMPORTANT
It is very important that you keep your lawnmower
clean. Grass clippings left in any of the air intakes
or under the deck could become a potential fire
hazard.
1.
Remove grass from under the deck with brush.
2.
Using a soft brush - remove grass clippings from all
air intakes, the discharge chute and the grass box.
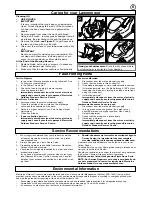
3.
Remove the blade,
see Figure P
, to gain access to
the fan and clean with a soft brush.
4.
Wipe over the surface of your lawnmower with a dry
cloth.
•
IMPORTANT
Never use water for cleaning your lawnmower. Do
not clean with chemicals, including petrol, or sol-
vents - some can destroy critical plastic parts.
At the End of the Mowing Season
1.
Replace blade, bolts, nuts or screws, if necessary.
2.
Clean your lawnmower thoroughly.
3.
Make sure that the electric cable is coiled properly.
Storing your Lawnmower:
Store in a dry place where
your lawnmower is protected from damage
Q
Service Recommendations
1.
We strongly recommend that your product is serviced
at least every twelve months, more often in a profes-
sional application.
2.
Always use genuine Flymo Spare Parts.
3.
Prepacked spares are available from most Electrolux
Outdoor Products stockists.
4.
Your product is uniquely identified by a silver and black
product rating label
5.
If you have a problem with your machine contact your
local Approved Service Centre ensuring you have full
details of your product as described on the product rat-
ing label.
6.
Should it be necessary for work to be carried out by your
Service Centre, it is important to take your complete
machine including cable and any extension cables used.
A network of specialist dealers can be found in your local
Yellow Pages.
To obtain service on your Flymo product simply telephone or
visit your local Service Centre.
Should you require service under the terms of our guarantee
the Service Centre will require proof of purchase.
All of the centres listed stock genuine Flymo Spare Parts.
NOTE: Our Service Repairers act on their own behalf and
are not empowered to commit or legally bind Electrolux
Outdoor Products in any manner whatsoever.
Environmental Information
Electrolux Outdoor Products are manufactured under an Environmental Management System (ISO 14001) using, where
practical, components manufactured in the most environmentally responsible manner, according to company procedures,
and with the potential for recycling at the end of the products’ life.
•
Packaging is recyclable and plastic components have been labelled (where practical) for categorised recycling.
•
Awareness of the environment must be considered when disposing of ‘end-of-life’ product.
•
If necessary, contact your local authority for disposal information.


