background image

3. OPERATION

WARNING! Risk of physical injury!


 Cut injury when the blade turns or the product starts 

accidentally.

v

  Wait for the blade to stop, disconnect the product from 

the mains and use gloves before you connect or transport 

the product.

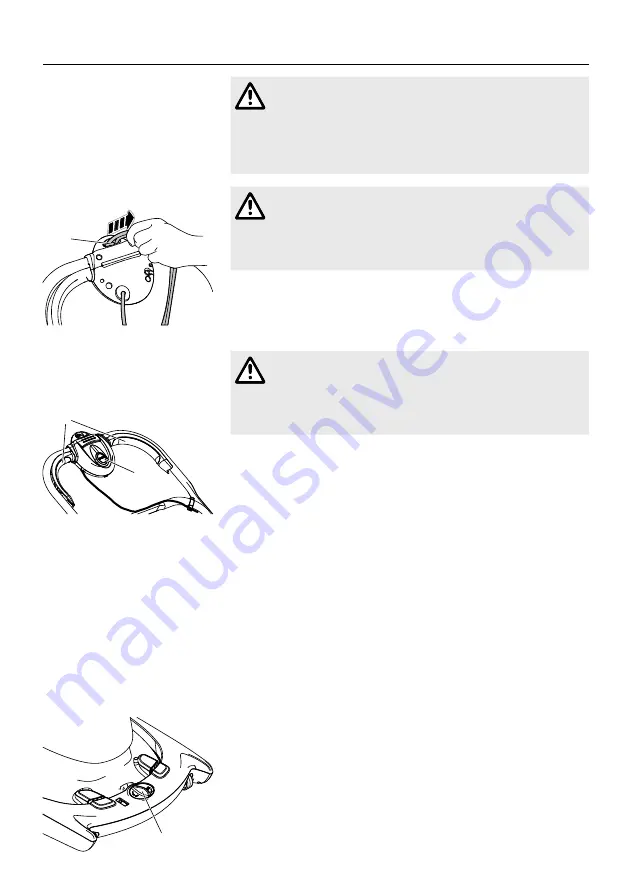
To connect the mower:

-

WARNING! Risk of electric shock!


 To avoid damage to the mains cable, the mains cable 

must be inserted into the cable lock 

(L)

.

v

  Before you operate insert the mains cable into the cable 

lock 

(L)

.

1. Loop the mains cable, insert the loop into the cable lock 

(L)

 and 

pull tight.

2. Connect the mains cable into a 230 V mains socket.

To start the mower:

(6)

(5)

WARNING! Risk of physical injury!


 Risk of injury if the product does not stop when you 

release the start lever.

v

  Do not bypass the safety devices or switches.  

For example do not attach the start lever 

(5)

 to the handle.

To start:
The product is fitted with a two-handed safety device  

(start lever 

(5)

 with safety interlock 

(6)

) to prevent the  

product from being turned on by accident.
There are two start levers 

(5)

 fitted. Either one have to be used to 

start.
1.  Connect the mains cable into a 230 V mains socket.
2.  Push the safety interlock 

(6)

 with one hand and pull the  

start lever 

(5)

 with the other hand.

3.  Release the safety interlock 

(6)

The product will start.

To stop:

v

 Release the start lever 

(5)

.

To adjust the cutting height:

(7)

The cutting height can be adjusted from 12 to 32 mm in 4 positions.
1.  Turn the adjust knob 

(7)

 counterclockwise to lower the cutting 

height.

2.  Turn the adjust knob 

(7)

 clockwise to increase the cutting height.

6

Summary of Contents for 9670908-04

Page 1: ...EN Operator s manual Electric Lawnmower Glider Compact 330AX Art 9670908 04...

Page 2: ...operator s manual carefully before use and keep for future reference Symbols on the product CAUTION If not used properly this product can be dangerous The warnings and safety instructions must be fol...

Page 3: ...your local Service Repairer or qualified electrician before the machine is used 6 A 13 Amp fuse must be fitted to the Mains Plug 7 The normal plug fuse and household fuse only protect the electrical e...

Page 4: ...nd have the cable replaced Do not use the product if the electric cables are damaged or worn Immediately disconnect from the mains if the cable is cut or the insulation is damaged Do not touch the ele...

Page 5: ...tarts accidentally v Wait for the blade to stop disconnect the product from the mains and use gloves before you do assembly To assemble the grass box 1 2 3 4 1 Push the grass box handle 2 into the gra...

Page 6: ...ct does not stop when you release the start lever v Do not bypass the safety devices or switches For example do not attach the start lever 5 to the handle To start The product is fitted with a two han...

Page 7: ...wn 1 Open the lid 3 2 Remove the grass box of the product by the handle 2 3 Close the lid 3 Tips to use the mower 1 Mow twice a week during the growing season The lawn will suffer if more than a third...

Page 8: ...water jet in particular high pressure water jet To clean the underside of the product 8 The underside is easiest to clean after you mowed Use gloves 1 Lay the product on its side carefully 2 Clean th...

Page 9: ...ether easily 4 Wind the cable around the cable hooks To release the cable pull the hook H away from the handle 5 Store the product in a dry enclosed and secure place Disposal in accordance with RL2012...

Page 10: ...d 4 Remove the bumper 11 of the mower body 4 5 Clean the bumper 11 6 Assemble the bumper see Assembly To replace the blade WARNING Risk of physical injury Cut injury when the blade turns and it is dam...

Page 11: ...e mounting is released v Have blade tightened or replaced by an authorised spe cialist dealer or the FLYMO Ser vice Blade is very dirty v Clean the mower see 4 MAINTENANCE If this does not rectify the...

Page 12: ...inty kWA dB A 91 93 1 93 Hand arm vibration avhw 1 Uncertainty ka m s2 2 5 1 5 Measuring process complying with 1 EN 60335 2 77 2 RL 2000 14 EC NOTE The stated vibration emission value has been measur...

Page 13: ...ions This service is subject to the follow ing provisions The product was used for its intended purpose as per the recommendations in the operating instructions Neither the purchaser nor a third party...

Page 14: ...armonised EN EN ISO 12100 EN 60335 1 EN 60335 2 77 Deposited Documentation GARDENA Technical Documentation M Kugler Hans Lorenser Str 40 89079 Ulm Conformity Assessment according to 2000 14 EG Procedu...

Page 15: ...39 0341 203 111 assistenza italia it husqvarna com Japan KAKUICHI Co Ltd Sumitomo Realty Development Kojimachi BLDG 8F 5 1 Nibanncyo Chiyoda ku Tokyo 102 0084 Phone 81 33 264 4721 m_ishihara kaku ich...

Reviews: