background image

3  

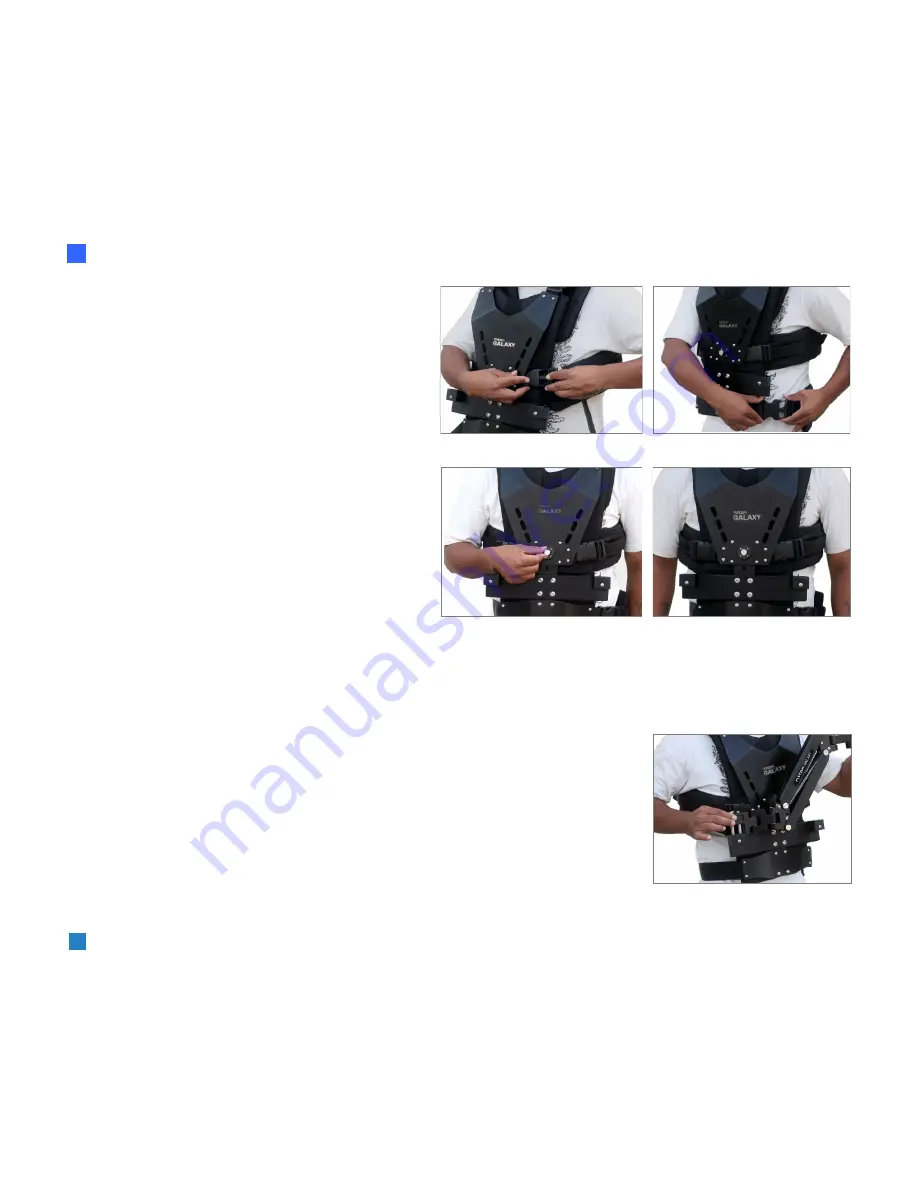
Having  put  your  vest  on,  insert  the  hooks  of
the  26’’  long  straps  into  the  appropriate
buckle.  Then  tighten  both  straps  with  Velcro
for  a  comfortable  fit  and  lock  both  with  the
buckles.

The length of the chest plate can be adjusted
according to the height of the person by using
this adjusting screw.

 Steadycam Arm & Vest

 Setup 

Loosen the knobs & insert Arm’s male socket
into female socket of vest as shown in image.
Now,  your  Galaxy  Steadycam  Arm  &  Vest
assembly is ready to use.

NOTE: 

Properly set up and custom fit, your vest should look like the provided picture. Straps are made 

of  through  nylon  and  industrial  strength  Velcro  and  can  be  easily  replaced  or  adjusted  to  suit  individual 
needs. 

The purpose of counter weight system is to match the low end of stabilizer to weight of the camera and 
accessories at the high/top end with the gimbal handle as the pivot point in between. 

The heavier camera and accessories, the more weights are required to achieve proper balance. Generally 
as you add weight to one side of central post, an equal amount has to be added to other side to maintain 
horizontal balance.  

The arm tension is adjusted for the heaviest camcorder, so when you apply the camcorder and sled on the 
arm for the first time it does not stay down. Now adjust the arm for the weight of your camcorder: 

Move the arm to the middle of its booming (up and down range) and let go. (If it stays where it is, you
are probably close to the right adjustment).

Keep  making  small  adjustments  until  the  camcorder  does  not  rise  or  fall  when  you  let  go  of  it  in  the 
middle of its booming range. 

 Arm Adjustment 

Summary of Contents for Galaxy

Page 1: ...hts reserved No part of this document may be reproduced stored in a retrieval system or transmitted by any form or by any means electronic mechanical photo copying recording or otherwise except as may be expressly permitted by the applicable copyright statutes or in writing by the Publisher Assembly Manual HD 3000 Stabilizer Galaxy Arm Table Clamp Metal Quick Release Storage Bag Galaxy Vest ...

Page 2: ...be directly attached to Head Plate Remove Head plate from 3 piece Head Assembly in order to attach it to your camera You will note a number of mounting holes that can be used to adapt various cameras Keep the camera in center of Head Plate and secure it properly Do not over tighten this adjustment as it can break the threaded insert NOTE You can also mount your camera using Quick Release Plate Add...

Page 3: ...pose of counter weight system is to match the low end of stabilizer to weight of the camera and accessories at the high top end with the gimbal handle as the pivot point in between The heavier camera and accessories the more weights are required to achieve proper balance Generally as you add weight to one side of central post an equal amount has to be added to other side to maintain horizontal bal...

Page 4: ... Vest If the unit becomes dirty use only a cloth or sponge with water and a very mild detergent to gently rub the unit clean Rinse well Storage If you are going to store your Flycam Galaxy Arm Vest for a long period of time then please store the unit up right in a dry or low to normal humidity area whenever possible If you are unable to find an environment like this then we suggest you store the u...

Reviews: