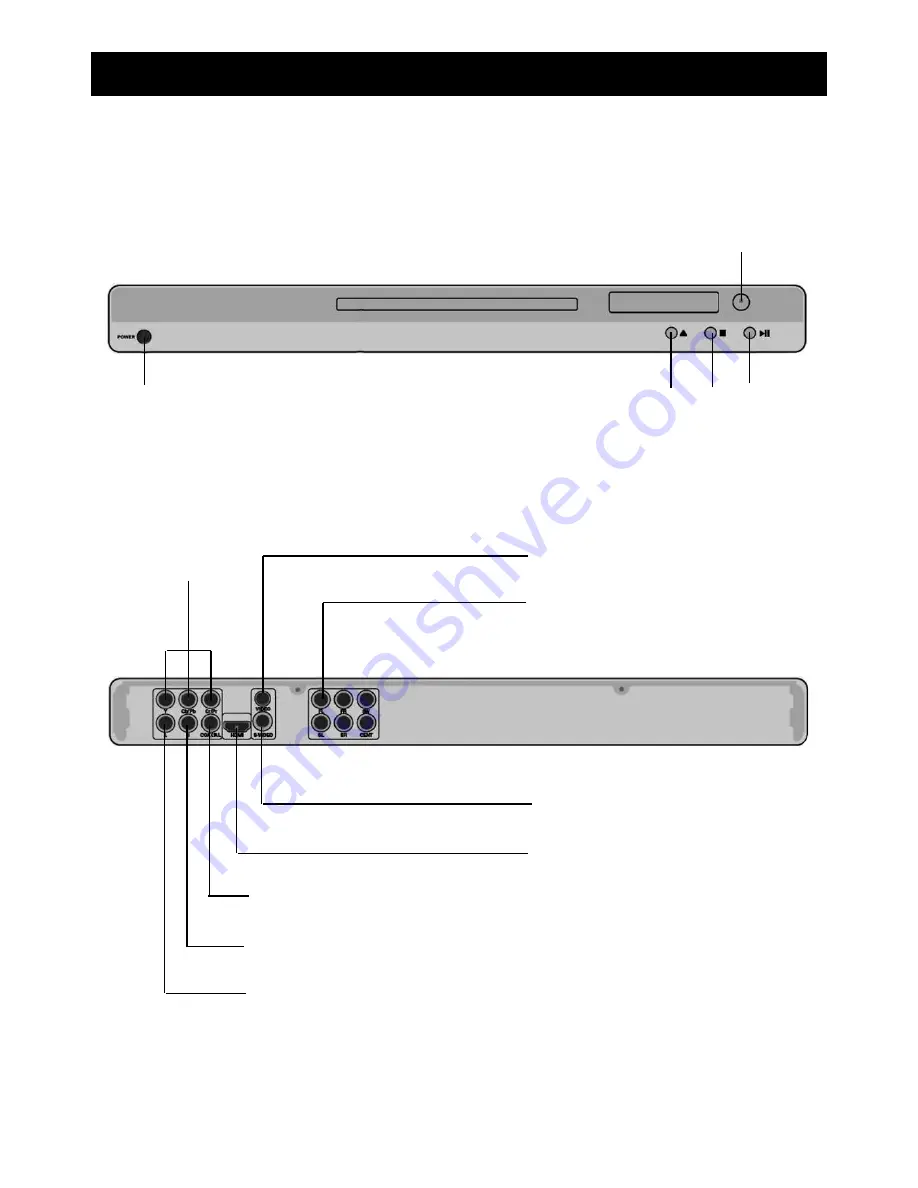
Fluid HDMI DVD PLAYER User Manual Download Page 4

Power 


DVD Tray   

Open/Close  Stop  Play/Pause


Button


Remote Sensor

2

1)

 Your DVD Player

Component Video 

Output Jacks

S-Video Output Jack

HDMI Jack

Composite Video Output Jack

5.1 CH Outputs

Digital Signal COAXIAL Audio Output Jack

Right Stereo Audio Output Jack

Left Stereo Audio Output Jack

Summary of Contents for HDMI DVD PLAYER

Page 1: ...1607000 HDMI DVD PLAYER User Guide...

Page 2: ...4 4 Everyday Use page 7 5 Advanced Use page 9 6 Adjust System Settings page 10 7 Troubleshooting page 14 8 Maintenance page 15 9 Technical Specifications page 16 10 Warnings page 17 11 Warranty page...

Page 3: ...ve high quality surround sound Please read all the safety instructions carefully before using your DVD player DVD Player Welcome Remote Control 2 x AAA batteries Component Video Connection Cable HDMI...

Page 4: ...utton Remote Sensor 2 1 Your DVD Player Component Video Output Jacks S Video Output Jack HDMI Jack Composite Video Output Jack 5 1 CH Outputs Digital Signal COAXIAL Audio Output Jack Right Stereo Audi...

Page 5: ...select HD solution 480P 576P 720P 1080I 1080P Repeat Choose whether to repeat the current Chapter Title All or None Step Advance one frame at a time with each press Slow Choose from 6 slow playing op...

Page 6: ...ion and do not cover or place anything on top of your DVD player Getting Up and Running 1 Connect your DVD to your television using the video cable If you are using the component cable match the colou...

Page 7: ...Try pressing the AV button if there is one otherwise consult the user guide for your television With the DVD player on the screen will look like this 5 To watch your first DVD press the OPEN CLOSE but...

Page 8: ...d high definition video and up to 7 1 channels of surround sound all in one cable Better Analog Component Video Splits video information into three separate signals two for colour and one for brightne...

Page 9: ...ss again to wake up the DVD player STANDBY puts the DVD player in low power mode but does not turn the power off completely Play a Disc 1 Ensure the power switch on the front of the DVD player is ON 2...

Page 10: ...ssing the Title Menu The TITLE button accesses the title menu of your DVD where available Accessing the Main Menu Press the MENU button to return to the main menu of the current DVD Showing Subtitles...

Page 11: ...the disc 2 You can scroll through the movies using the arrow buttons 3 To view the available details on the movie you are playing press the DISPLAY button on your remote control 5 Advanced Use What is...

Page 12: ...n output for your television You should consult your television manufacturers user guide for information on which format is required Options are 480P 576P 720P 1080I and 1080P TV type To adjust the DV...

Page 13: ...ench Spanish or German Audio Setup Audio out To change your audio out settings choose between three options OFF 6 Adjust System Settings want using the arrrow buttons and the ENTER key Please Note the...

Page 14: ...ing you require between 0 and 12 Hue To alter the hue select the menu item with the enter key and use the arrow buttons to select the setting you require between 6 and 6 6 Adjust System Settings Satur...

Page 15: ...puts Dynamic Range Choose the extent of the dynamic range from your television OFF 2 8 4 8 6 8 and FULL Dual Mono This changes how the left and right signals of the audio output are used The options a...

Page 16: ...el side up and seated properly in the disc tray Try cleaning the disc Remove the disc and leave the unit switched on for an hour before trying again No image or poor image quality Bad connection Wrong...

Page 17: ...nlight Always keep discs in their storage cases Cleaning Discs Before playback wipe the disc out from the center with a clean cloth Do not use any type of solvent such as thinner benzene commercial cl...

Page 18: ...alog Output level 2 0 0 0 2Vrms Load impedance 1 0k Digital Output level 0 5 0 1Vp p Load impedance 75 Output Video Composite Output level 1 0 0 1Vp p Load impedance 75 imbalance negative polarity S v...

Page 19: ...lectrical shock Do not place in or near water or in damp conditions If water gets inside the air vent openings unplug the unit and take it to an authorized service center Do not use accessories that h...

Page 20: ...the user is encouraged to try to correct the interference by one or more of the following measures 1 reorient or relocate the receiving antenna 2 increase the separation between the equipment and the...

Page 21: ...pplicable to a product purchased through ORBYX Electronics company owned stores and dealers and to a product that is presented for repair in a country where ORBYX Electronics offers the product for sa...

Reviews: