Fluid Management Customer
Service 1 . 800 . 462 . 2466
Accutinter 7000HS | 19
Getting Started
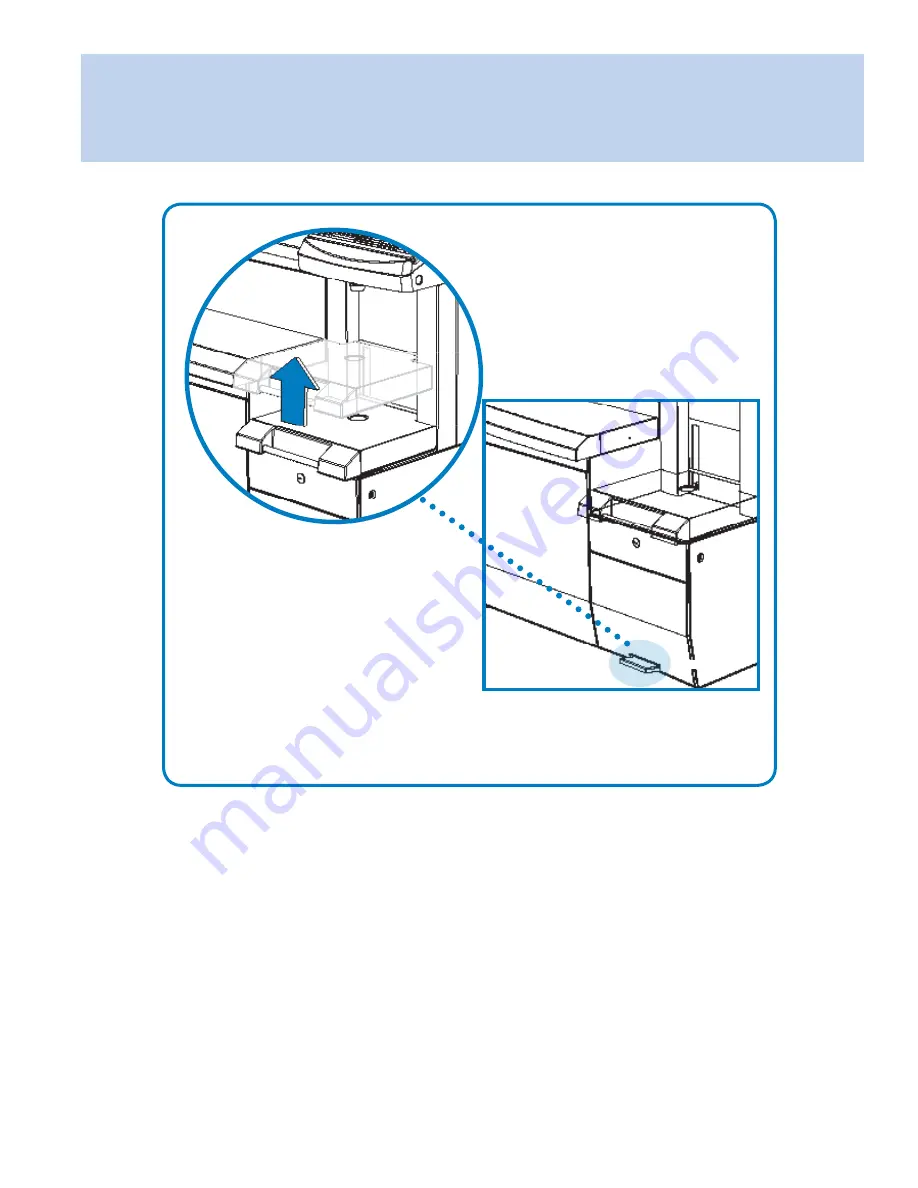
Using the adjustable shelves
Foot pedal
Press the foot pedal to adjust the shelf.
Position the container near the nozzle prior to dispense.
Page 1: ...Accutinter 7000HS End User Guide Getting Started Maintenance and Care Troubleshooting Warranty Part No 27436 Rev G 10 2020...
Page 2: ......
Page 3: ...t of a large organization while still maintaining its deep values and history As industry leaders Fluid Management provides trend setting creativity in the design products and services it offers Unite...
Page 4: ...nd state laws Fluid Management FMDirect ColorPro DVX Harbil Blendorama Accutinter Duraflow Fast Fluid Management GyroFlex GyroMixer Infina MicroTint TintMaster V1 and VR1 are trademarks of Fluid Manag...
Page 5: ...tinter 7000HS 3 Accutinter 7000HS Fluid Management Accutinter 7000HS Once you ve installed your Accutinter 7000HS Dispenser what s next In this guide you ll find more information to help you get the m...
Page 6: ...the label printer optional 14 Connecting the barcode scanner optional 16 Preparing and refilling the canisters 18 Preparing the system 19 Using the adjustable shelves Basic Operations 20 Welcome to C...
Page 7: ...are precautions you can take to avoid damage to the equipment or bodily injury before operating By carefully following the instructions in this document and the warning and maintenance labels on the...
Page 8: ...o you or minor damage to the dispenser When you see a Caution notice in this guide read it carefully and be sure you understand it before continuing General Safety Information DO NOT attempt to servic...
Page 9: ...ive cold or hot conditions can have an adverse effect on the liquid crystal display of the monitor Communication Regulation Information Safety and regulatory compliance Information See the affixed lab...
Page 10: ...rs Top Cover Adjustable Shelf Monitor Keyboard Stand Getting to Know Your Accutinter 7000HS Technical Specifications Up to 16 Canisters 44 W x 31 D x 50 H 620 lbs 281 kg Maximum power 120 volts 10 50...
Page 11: ...ontainer alignment Tips to Improve Operation Clean nozzles daily for consistent and accurate dispense Purge each colorant once a day Follow the preventative maintenance schedule for your Accutinter 70...
Page 12: ...nsers read this section for instructions on getting started and installing your machine If you are an experienced user you may already know enough to get started Be sure to look over the information i...
Page 13: ...to have access to the rear of the machine If there is not enough room routine maintenance may be difficult to perform 5 Position the monitor keyboard and computer Place the monitor and keyboard on the...
Page 14: ...Turn on machine a Locate the front panel below the nozzle closer in the center of the machine b Locate and unscrew the two Phillips head machine screws provided c Open the front panel and locate on th...
Page 15: ...e into the bottom of the printer The label printer software for the label printer is installed on the computer by Fluid Management All you need to do is connect the printer cables to the computer and...
Page 16: ...compatible with ColorPro The original packaging from the vendor includes the barcode scanner the cable and a quick start guide Follow these steps to install the barcode scanner a Unpack the barcode s...
Page 17: ...lick the Dispense button If you receive a prompt that says Please Scan the Base Barcode you have successfully enabled the bar code scanner 7a Check Print Override Base to allow operators to manually o...
Page 18: ...hen re filling canisters you will follow the same process using steps 3 8 Canisters come in varying capacities Check the label inside the top cover for capacity and colorant locations DO NOT overfill...
Page 19: ...Fill tab select All F2 5Select Fill To Top F2 button 6When prompted are you sure click Yes 7Select Done Esc to return to the Main Menu Fill Menu Use the Fill Menu to update the software after you hav...
Page 20: ...e Use Smart Purge for daily Purging This will only purge colorants that have not been recently used 1From any screen choose Maintenance F3 or F11 2 Click on the Purge tab 3 Purge colorants Click on th...
Page 21: ...ment Customer Service 1 800 462 2466 Accutinter 7000HS 19 Getting Started Using the adjustable shelves Foot pedal Press the foot pedal to adjust the shelf Position the container near the nozzle prior...
Page 22: ...atabase formulations or manually create your own colors Store customer information and color requirements so you can provide consistent service time and time again Integrates with spectrophotometer ha...
Page 23: ...Queue menus Reports Click here to run reports for a selected date range in csv file format Maintenance Click here to add colorant purge lines agitate colorants About Click here to see ColorPro and Ac...
Page 24: ...ula or to start over choose Clear Formula F9 Dispense Choose Dispense F2 to dispense the formula now When dispensing place container under nozzle Prompt will appear confirming dispense To dispense ano...
Page 25: ...e the formula later Coverage Estimator Click Coverage Estimator F8 to estimate how much paint is needed for a job Price Click here F3 to estimate the cost of a job or price for a specific formula opti...
Page 26: ...ter Amounts The colorants will be displayed under Selected Ingredients Type in the shot size of the colorant that you require Repeat the steps for each colorant in that formula Ingredients From the in...
Page 27: ...a previous order not yet dispensed Input List The Input List F4 displays all the formulas waiting to be dispensed from an external source or previously requested The number of jobs queuing is located...
Page 28: ...lected Adjust Ingredients On the Adjust Ingredients tab the original formula colorant amounts are displayed Selected Ingredients In the Change fields type the amount to add or subtract from the origin...
Page 29: ...e the original formula plus adjusted amounts Basic Operations Using color scaling On the Adjust Scaling tab the original formula colorant amounts are displayed Reset Click here F9 to return to origina...
Page 30: ...Purge for daily Purging This will only purge colorants that have not been recently used 1From any screen choose Maintenance F3 or F11 2 Click on the Purge tab 3 Purge colorants Click on the colorant t...
Page 31: ...ss bar will appear confirming agitation cycle Click Done Esc NOTE The default cycle is 30 seconds per hour Fluid Management recommends 4 minutes for manual agitation Basic Operations Stirring the colo...
Page 32: ...taining and customizing your Accutinter Safety Important safety instructions to note when operating equipment Troubleshooting Contains information regarding dispensing color tinting and other operatio...
Page 33: ...are purged and cleaned every day If you use your machine frequently Fluid Management recommends cleaning and purging the nozzle at least once a day The instructions for daily nozzle cleaning are belo...
Page 34: ...ing tool 2 Remove all excess colorant from around the nozzles see page 31 3 Purge the lines with ColorPro see page 28 4 Repeat cleaning and purging if necessary Dispense one ounce of each colorant int...
Page 35: ...anister with colorant see page 16 2 Agitate for up to three minutes 3 Purge the line If the canister is full clean the nozzle and complete a purge using ColorPro see page 28 Repeat if necessary Comple...
Page 36: ...cord is plugged in Replace the power cord is damaged Check the circuit breaker Turn on the surge protector replace if necessary The printer is not printing Is the power cord firmly connected to the co...
Page 37: ...tton Is the power cord plugged in Make sure the power cord is plugged into the rear of the computer and to a working electrical outlet The monitor screen is blank Is the power turned on and are the ca...
Page 38: ...connects the computer to the dispenser If screen savers have been installed recently they may conflict with ColorPro Uninstall the screen savers Restart the computer Press the on off button of the com...
Page 39: ...containing Call Customer Service The optional barcode scanner does not work You must have ColorPro Professional for barcoding capability Make sure the Barcode Scanning Enabled box is checked in FM_Cus...
Page 40: ...nplugged from any power source before you attempt the replacement DO NOT attempt to service a product yourself unless instructed to do so by a Customer Service Representative Use only a service provid...
Page 41: ...Warranty claims must be asserted during the warranty period While Paint Equipment is under warranty no repair or part replacement should be undertaken without first contacting Fluid Management at 800...
Page 42: ...ves determines to have been caused by or attributable to damage during or after shipment colorant in the wrong canister colorant related issues e g beads in colorant colorant contamination colorant th...
Page 43: ...ITS AUTHORIZED SERVICE REPRESENTATIVES HAVE I ANY LIABILITY FOR ANY CLAIM LOSS DAMAGE INJURY LIABILITY OBLIGATION COST OR EXPENSE THAT DIRECTLY OR INDIRECTLY RELATES TO OR ARISES OUT OF THE PERFORMANC...
Page 44: ...pense 5 8 9 11 12 16 20 26 29 DVX 8 F filling canisters 9 11 16 17 29 formulas 20 22 26 formula book 21 22 fuses 11 G grounding 7 I installation 7 10 12 K keyboard 8 10 12 14 15 36 L labels 5 6 11 13...
Page 45: ...caution around each canister so that liquids do not spill into the machine chassis Use caution around the O rings on select machines between the canisters and the top spill tray as to not damage them...
Page 46: ...Accutinter 7000 Fluid Management Inc 1023 Wheeling Road Wheeling IL 60090 p 800 462 2466 f 847 537 3221 www fluidman com...