USER INSTRUCTIONS
Experience in Motion
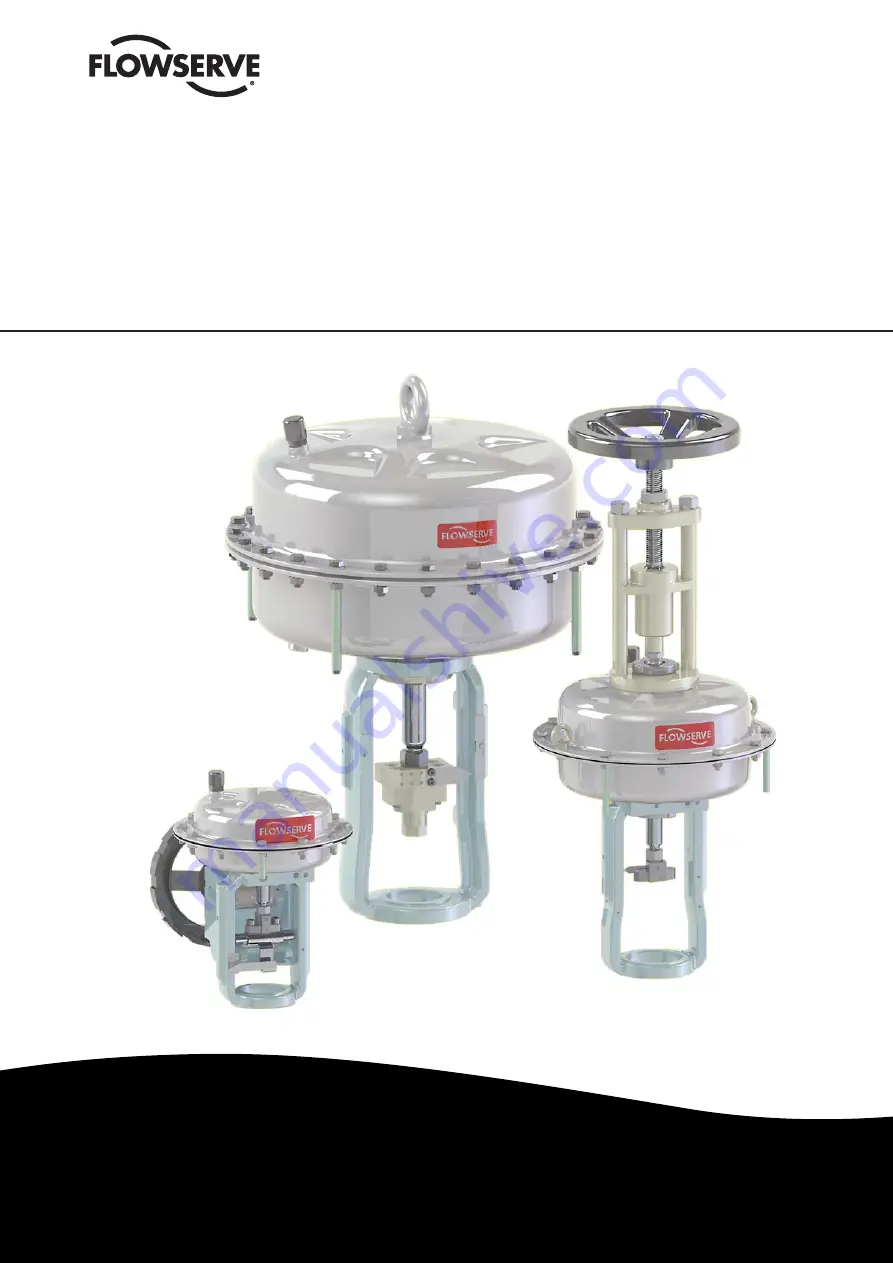
FlowAct
Diaphragm Linear Actuator
FCD VLENIMFACTA4 10/16
Installation
Operation
Maintenance
Page 1: ...USER INSTRUCTIONS Experience in Motion FlowAct Diaphragm Linear Actuator FCD VLENIMFACTA4 10 16 Installation Operation Maintenance...
Page 2: ...ocure needed documents as necessary before you begin any work on the valve User Instructions cannot deal with all possible situations and installation options It is required that only trained and qual...
Page 3: ...level of interchangeability allowing the user to assemble the great est possible number of variations from a minimum number of components to match each application There are two fail safe positions cl...
Page 4: ...t for further information request Packaging and Send ing Instructions Form L 002 Packing guidelines for export follow HPE standards Nonreturnable packaging may contain up to 90 recyclable materials 7...
Page 5: ...ion at the site Figure 4 Triple Leg Sling Example Prior to installation of the actuator we require that you check the following conditions to reduce the risk of malfunction and safety related incident...
Page 6: ...is an unused air connection ensure that it is properly sealed see page 7 The venting chamber of the pneumatic actuator is always equipped with a venting plug The pneumatic actuator types 253 503 and 7...
Page 7: ...110 25 82 140 M16 25 115 25 82 140 M16 16 115 25 82 140 M20 20 115 25 700 20 49 144 M12 54 75 20 65 105 M12 23 115 20 65 105 M12 16 95 20 82 150 M16 16 115 25 65 145 M16 59 90 20 40 82 140 M20 22 110...
Page 8: ...Flowserve trained and authorized personnel are allowed to repair disassemble and reassemble the FlowAct in haz ardous areas Actuators for oil and grease less service or oxygen service may only be disa...
Page 9: ...g hazard do not work be tween the yoke legs while the valve is in operation 6 Mount the lock nut 113 and lower coupling 345 onto the valve stem 7 Justify the plug against the seat 8 Adjust the distanc...
Page 10: ...m and oil content not to exceed 1 ppm Contaminated instrument air can damage the accessories and diaphragm linear actuator or cause them to fail 5 Do not touch the body and bonnet The tempera ture of...
Page 11: ...ky air supply diaphragm O ring immediately Preventive maintenance of the diaphragm Dependent upon results of previous maintenance see numbers 1 and 2 above or a minimum of once every 10 years 3 Visual...
Page 12: ...s and bolts are securely fastened 5 If possible stroke the valve and check for smooth full stroke operation Unsteady stem movement could indicate an internal valve problem 6 Make sure all accessory br...
Page 13: ...er instruction of the positioner manufacturer Table 8 Trouble shooting 15 Disassembly and Reassembly The FlowAct linear actuator is allowed to be disassembled and reassembled only by qualified staff p...
Page 14: ...a depres surized and ambient state Failure to do so can cause seri ous personal injury The control valve is not equipped with integral stands therefore guard against the valve from tipping over Bodily...
Page 15: ...is retracted no further action is required If the valve type is a three way valve drive the stem into center position by connecting and control air supply 5 Keep upper coupling 249 from turning by sec...
Page 16: ...pends on the valve series 5 Move the actuator to the close position and install the cap screws 240 6 Lock the lock nut 113 Keep upper coupling 249 from turning by securing with a wrench 7 If a handwhe...
Page 17: ...ithout attachments Actuator with attachments Spring to close Spring to open Spring to close Spring to open see pages 18 19 see pages 20 21 see pages 22 23 see pages 24 25 Cast yoke design acc to IEC 6...
Page 18: ...uch as scor ing and deformities Use a brass brush or similar tool to clean bolting Check for corrosion or any other damage Reassembly instruction of the actuator subas sembly NOTICE Always replace par...
Page 19: ...ck Washer 351 6 4 Hexagon Nut Table 13 Actuator parts 227 225 272 255 211 228 349 348 229 326 231 203 258 337 335 336 209 202 253 254 351 339 275 273 Figure 10 Actuator parts uniformly in a clockwise...
Page 20: ...brush or similar tool to clean bolting Check for corrosion or any other damage Reassembly instruction of the actuator subas sembly NOTICE Always replace parts showing wear with new parts 14 Lubricate...
Page 21: ...justing Plate 335 6 3 1 Hexagon Bolt short 336 6 3 2 Hexagon Bolt long 337 6 5 Plain Washer 339 6 25 Protection Sleeve 348 6 20 Special Nut 349 6 19 Lock Washer 351 6 4 Hexagon Nut Table 14 Actuator p...
Page 22: ...to clean bolting Check for corrosion or any other damage Reassembly instruction of the actuator subas sembly NOTICE Always replace parts showing wear with new parts 14 Lubricate the new O rings 275 ne...
Page 23: ...n Washer 339 6 25 Protection Sleeve 348 6 29 Stem 349 6 19 Lock Washer 351 6 4 Hexagon Nut 390 6 24 Guide Bushing Table 15 Actuator parts 336 335 337 202 276 390 254 258 326 229 273 275 339 351 202 25...
Page 24: ...se a brass brush or similar tool to clean bolting Check for corrosion or any other damage Reassembly instruction of the actuator subas sembly NOTICE Always replace parts showing wear with new parts 15...
Page 25: ...1 Hexagon Bolt short 336 6 3 2 Hexagon Bolt long 337 6 5 Plain Washer 339 6 25 Protection Sleeve 348 6 29 Stem 349 6 19 Lock Washer 351 6 4 Hexagon Nut 390 6 24 Guide Bushing Table 16 Actuator parts 3...
Page 26: ...ff and store the handwheel safely lose no parts 6 For disassemble the actuator subassembly see pages 22 23 Reassembly instruction of the handwheel subas sembly 7 Lubricate the threads of the actuator...
Page 27: ...r 6 Lift off and store the handwheel safely lose no parts 7 For disassemble the actuator subassembly see pages 24 25 Reassembly instruction of the handwheel subas sembly 8 Lubricate the threads of the...
Page 28: ...icate the threads of the actuator and handwheel parts with an appropriate lubricant 15 Place the flange 390 onto the actuator and put in line with the mark 16 Mount and tighten the lock nut 256 clockw...
Page 29: ...Nut 373 6 32 Bushing 375 6 33 Thrust Ball Bearing 380 6 36 Stem 381 6 66 Closure Screw 387 6 55 Pipe Section 388 6 57 Bearing Flange 389 6 40 Flange top 390 6 38 Flange bottom 391 6 58 Threaded Bushi...
Page 30: ...14 Lubricate the threads of the actuator and handwheel parts with an appropriate lubricant 15 Place the flange 390 onto the actuator and put in line with the mark 16 Mount and tighten the lock nut 256...
Page 31: ...llel Key 372 6 30 Hex Nut 373 6 32 Bushing 375 6 33 Thrust Ball Bearing 380 6 36 Stem 381 6 66 Closure Screw 386 6 69 Position Indicator 387 6 55 Pipe Section 388 6 57 Bearing Flange 389 6 40 Flange t...
Page 32: ...sembly 10 Lubricate the threads of the actuator and stroke limita tion parts with an appropriate lubricant 11 Mount the lock nuts 350 2x clockwise 12 Place the stroke limitation assembly 333 389 and t...
Page 33: ...her 3x 350 6 109 Lock Nut 4x 376 6 112 Plain Washer 377 6 103 Yoke Rod 3x 378 6 106 Yoke Plate 379 6 113 Hex Nut 380 6 101 Stem 381 6 111 Cover 384 6 104 Hexagon Nut 385 6 105 Stud Bolt 387 6 110 Pipe...
Page 34: ...lock nut 344 clockwise 5 We recommend you not to remove the actuator from the yoke If this is indispensable mark the position loosen the actuator locknut 256 clockwise and lift off the actuator NOTICE...
Page 35: ...Unlock the lock nut 344 counter clockwise 5 Loosen the actuator coupling 249 and lock nut 344 clockwise 6 We recommend you not to remove the actuator from the yoke If this is indispensable mark the p...
Page 36: ...upling 249 and lock nut 344 clockwise 5 We recommend you not to remove the actuator from the yoke If this is indispensable mark the position loosen the actuator locknut 256 clockwise and lift off the...
Page 37: ...nter clockwise 3 Loosen the actuator coupling 249 and lock nut 344 clockwise 4 We recommend you not to remove the actuator from the yoke If this is indispensable mark the position loosen the actuator...
Page 38: ...s 14 15 4 Unlock the lock nut 344 counter clockwise 5 Loosen the actuator coupling 249 and lock nut 344 clockwise 6 We recommend you not to remove the actuator from the yoke If this is indispensable m...
Page 39: ...39 kN see pages 48 49 Single chamber actuator without attachments Single chamber actuator with attachments Spring to close Spring to open Spring to close Spring to open see pages 40 41 see pages 42 43...
Page 40: ...tion of the actuator subas sembly NOTICE Always replace parts showing wear with new parts 13 Lubricate the new O ring 275 new scraper ring 273 with an appropriate lubricant and install into the guide...
Page 41: ...39 6 25 Protection Sleeve 4x 348 6 20 Special Nut 349 6 19 Lock Washer 351 6 4 Hexagon Nut 374 6 47 Distance Bushing 1 Alternatively hex head assembled screws with captive flat washers are used for th...
Page 42: ...ities Use a brass brush or similar tool to clean bolting Check for corrosion or any other damage Reassembly instruction of the actuator subas sembly NOTICE Always replace parts showing wear with new p...
Page 43: ...ng 4x 337 6 5 Plain Washer 24x 1 339 6 25 Protection Sleeve 348 6 20 Special Nut 349 6 19 Lock Washer 351 6 4 Hexagon Nut 374 6 47 Distance Bushing 1 Alternatively hex head assembled screws with capti...
Page 44: ...mities Use a brass brush or similar tool to clean bolting Check for corrosion or any other damage Reassembly instruction of the actuator subas sembly NOTICE Always replace parts showing wear with new...
Page 45: ...6 83 Guide Bushing 1 Alternatively hex head assembled screws with captive flat washers are used for this application 348 255 272 211 255 227 220 228 374 349 336 335 337 202 389 254 258 276 279 334 23...
Page 46: ...milar tool to clean bolting Check for corrosion or any other damage Reassembly instruction of the actuator subas sembly NOTICE Always replace parts showing wear with new parts 14 Lubricate the new O r...
Page 47: ...olt long 4x 337 6 5 Plain Washer 24x 1 339 6 25 Protection Sleeve 4x 348 6 20 Stem 349 6 19 Lock Washer 351 6 4 Hexagon Nut 24x 374 6 47 Distance Bushing 389 6 83 Guide Bushing 1 Alternatively hex hea...
Page 48: ...tuator and stroke limita tion parts with an appropriate lubricant 12 Mount the lock nuts 350 2x clockwise 13 Mount the stud bolt 385 onto the actuator 14 Arrange the yoke rods 377 3x onto the upper gu...
Page 49: ...4 6 107 Plain Washer 3x 350 6 109 Lock Nut 4x 376 6 112 Plain Washer 377 6 103 Yoke Rod 3x 378 6 106 Yoke Plate 379 6 113 Hex Nut 380 6 101 Stem 381 6 111 Cover 385 6 105 Stud Bolt 387 6 110 Pipe Sect...
Page 50: ...o parts 11 For disassemble the actuator subassembly see pages 42 49 Reassembly instruction of the handwheel subas sembly NOTICE Always replace parts showing wear with new parts 12 Lubricate the thread...
Page 51: ...he maintenance interval and the work performed 24 The actuator subassembly is ready to be mounted on the valve and the accessories attached Item Part WW EU 221 6 120 Stem Extension 256 5 11 Lock Nut 3...
Page 52: ...ts safely lose no parts 13 For disassemble the actuator subassembly see pages 42 49 Reassembly instruction of the handwheel subas sembly NOTICE Always replace parts showing wear with new parts 14 Lubr...
Page 53: ...ng in the end positions 27 Log the maintenance interval and the work performed 28 The actuator subassembly is ready to be mounted on the valve and the accessories attached Item Part WW EU 221 6 120 St...
Page 54: ...ng 249 and lock nut 344 clockwise 5 We recommend you not to remove the actuator from the yoke If this is indispensable mark the position loosen the actuator locknut 256 clockwise and lift off the actu...
Page 55: ...tuator coupling 249 and lock nut 344 clockwise 6 We recommend you not to remove the actuator from the yoke If this is indispensable mark the position loosen the actuator locknut 256 clockwise and lift...
Page 56: ...FlowAct Diaphragm Linear Actuator FCD VLENIMFACTA4 10 16 56 Space for personal notes...
Page 57: ...Limit Stop max positioning force 39 kN see pages 48 49 Single chamber actuator without attachments Single chamber actuator with attachments Spring to close Spring to open Spring to close Spring to ope...
Page 58: ...4 spacer bushing 228 disk 220 diaphragm plate 227 diaphragm 225 O ring 272 and thrust washer 255 9 Loosen the hexagon bolts 334 counterclockwise and remove the O rings 279 diaphragm casing 202 and O r...
Page 59: ...229 NOTICE The surface respectively the edges of the spring ends should be aligned to the actuators center If these will ignored the spring may touch the actuators casing and rub in rare cases 32 Inst...
Page 60: ...position 44 Fix the stem 211 with the stem clamping tool against twisting 45 Turn the special nut 348 clockwise using a suitable torque wrench see section 15 torque requirements 46 Remove the stem cl...
Page 61: ...FCD VLENIMFACTA4 10 16 61 flowserve com 380 349 374 228 227 220 272 225 255 211 336 335 337 203 258 202 276 279 334 202 373 254 258 276 279 334 351 339 273 275 229 326 231 275 202 253 254 276 279 334...
Page 62: ...nd nuts al ternatively 8 Remove the actuator springs 229 spring adjusting plate 326 and distance plate 231 9 Loosen the hexagon bolts 334 counterclockwise and remove the O rings 279 diaphragm casing 2...
Page 63: ...ng and rub in rare cases 31 Loosen and remove the diaphragm stem unit 211 380 out of the stem clamping tool Lubricate the ac tuator stem with an appropriate lubricant 32 Carefully lower the diaphragm...
Page 64: ...ly wearing hat The internal stroke stop takes over the special nut 46 Lubricate the thread of the stem extension 380 with an appropriate lubricant NOTICE The diaphragm plate should be posi tioned to t...
Page 65: ...FCD VLENIMFACTA4 10 16 65 flowserve com 275 231 326 229 275 273 202 373 254 258 276 279 334 211 255 225 272 220 227 228 374 349 380 276 202 253 254 276 279 334 339 351 374 348 334 279 202 203 258 337...
Page 66: ...ng 374 spacer bushing 228 disk 220 dia phragm plate 227 diaphragm 225 O ring 272 and thrust washer 255 9 Loosen the hexagon bolts 334 counterclockwise and remove the O rings 279 diaphragm casing 202 a...
Page 67: ...s 229 NOTICE The surface respectively the edges of the spring ends should be aligned to the actuators center If these will ignored the spring may touch the actuators casing and rub in rare cases 32 In...
Page 68: ...position 44 Fix the stem 211 with the stem clamping tool against twisting 45 Turn clockwise the stem 348 using a suitable torque wrench see section 15 torque requirements 46 Remove the stem clamping t...
Page 69: ...MFACTA4 10 16 69 flowserve com 275 231 326 229 275 273 202 373 254 258 276 279 334 211 255 225 272 220 227 228 374 349 380 202 253 254 276 279 334 339 351 374 348 334 279 276 202 202 389 254 276 279 3...
Page 70: ...s al ternatively 8 Remove the actuator springs 229 spring adjusting plate 326 and distance plate 231 9 Loosen the hexagon bolts 334 counterclockwise and remove the O rings 279 diaphragm casing 202 and...
Page 71: ...ng and rub in rare cases 31 Loosen and remove the diaphragm stem unit 211 380 out of the stem clamping tool Lubricate the ac tuator stem with an appropriate lubricant 32 Carefully lower the diaphragm...
Page 72: ...tly wearing hat The internal stroke stop takes over the special nut 46 Lubricate the thread of the stem extension 380 with an appropriate lubricant NOTICE The diaphragm plate should be posi tioned to...
Page 73: ...MFACTA4 10 16 73 flowserve com 336 335 337 202 389 254 276 279 334 202 258 279 334 348 374 276 351 339 202 253 254 276 279 334 258 380 349 374 228 227 220 272 225 255 211 202 373 254 276 279 334 273 2...
Page 74: ...ements for SPECIAL NUT STEM EXTENSION STEM 348 380 per actuator size Unit 253 503 701 1502 3002 Nm 45 110 240 ft lb 33 81 177 Torque Requirements for CASING BOLTING 335 351 and 336 351 209 per actuato...
Page 75: ...national environmental conditions for rotary actuator removal from the pipeline and cleaning Permissible limit values must be maintained to en sure suitable protective measures service personnel must...
Page 76: ...ever the purchaser or user of Flowserve products should be aware that Flowserve products might be used in numerous applications under a wide variety of industrial service conditions Although Flowserve...