www.flowfitness.com
Gebruiksaanwijzing / Manual
Page 1: ...www flowfitness com Gebruiksaanwijzing Manual...
Page 2: ...of gereproduceerd in welke vorm of op welke wijze dan ook zondervoorgaande schriftelijke toestemming van Flow Fitness All rights reserved Nothing in this instruction manual may be used or reproduced...
Page 3: ...4 Gebruik 13 4 1 Montage 13 4 2 Opbergen in gebruik nemen 16 4 3 Gebruik computer 18 4 4 Trainen met app 25 4 5 Onderhoud 26 5 Algemene informatie 28 5 1 Training schema s 28 5 2 Exploded view 30 5 3...
Page 4: ...uist functioneert In geval van storing of defect stoppen met trainen en direct contact opnemen met uw dealer Gebruik het product nooit als deze defect is Dit product is alleen bedoeld voor thuisgebrui...
Page 5: ...chuwingen en voorschriften zoals vermeld in deze gebruiksanwijzing Dit product is bedoeld voor gebruik in een schone droge omgeving Opslag in koude en of vochtige ruimtes zou tot problemen in het prod...
Page 6: ...band beschikt over uitgebreide functionaliteiten een overzichtelijk display een tablethouder n Xsorb schokdempers Deze zorgen niet alleen voor ultieme demping en loopcomfort maar voorkomen ook overbel...
Page 7: ...Aantal Specificatie Hoofdframe 1 Computerbuis afdekkap 1 Links Computerbuis afdekkap 1 Rechts Bout 2 M8x45 Bout 4 M8x15 Schroef 4 ST4 2X16 Borg ring 6 D8 Safety key 1 Aux kabel 1 Smeermiddel loopvlak...
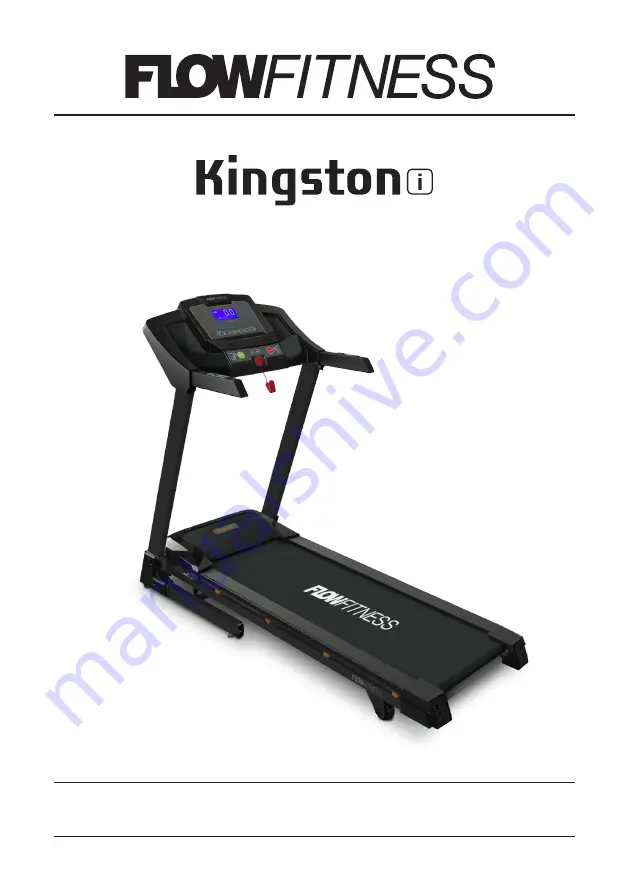
Page 8: ...8 Gebruiksaanwijzing Prestige Kingston i 2 Introductie 2 2 Belangrijke onderdelen Computer Safety key Loopvlak Motorkap XSORB schokdempers Handgrepen met sneltoetsen en hartslagsensoren...
Page 9: ...g met handsensoren Hartslagmeting via een optionele Flow Fitness hartslagband Lengte 168 cm Hoogte 128 cm Breedte 71 5 cm Techniek Motor 1 25 PK 2 5 PPK Hoekverstelling 0 12 0 12 niveaus Snelheid 1 16...
Page 10: ...ste op 60 van uw maximale hartslag trainen Wanneer uw trainingsdoel is om de conditie te verbeteren dan is dat 85 van uw maximale hartslag Het lichaam slaat energie op in twee vormen koolhydraten en v...
Page 11: ...erdeeld in twee fasen De eerste fase bestaat uit zes weken en is een goede richtlijn voor beginners of perso nen die sinds lange tijd weer gaan trainen Gedurende deze fase wordt de intensiteit van de...
Page 12: ...at uw rechterzijde wordt gestrekt Houd dit gedurende n seconde vast Ontspan en doe vervolgens dezelfde beweging met uw linker arm Herhaal dit drie tot vier keer Knee bend Plaats uw voeten op schouwder...
Page 13: ...is om de loopband te monteren Vanwege veiligheidsredenen en ter voorkoming van beschadigingen adviseren wij u om de loopband met 2 personen te monteren 1 Zet het hoofdframe op de plek waar u de loopba...
Page 14: ...2 Bevestigen van de afdekkapjes 1 Plaats de rechter computerbuis afdekkap 66 onder op de computerbuis en bevestig deze met de twee schroeven 12 2 Plaats vervolgens de linker computerbuis afdekkap 67...
Page 15: ...p 3 Fixeren van de computer en computerbuizen 1 Bevestig de bouten 15 met borg ringen 18 om de computer op de computerbuizen te fixeren Draai de bouten stevig aan 2 Plaats tot slot de safety key in de...
Page 16: ...uit te vouwen voor gebruik voert u de volgende stappen uit 1 Druk met uw handen het loopvlak omhoog 2 Ontgrendel het loopvlak door met uw voet tegen de gasveer aan te drukken 3 Laat voorzichtig het ho...
Page 17: ...langrijk voor uw veiligheid dat het netsnoer in een geaard stopcontact wordt gebruikt Veiligheidskoord De veiligheidssleutel dient op de daarvoor bestemde plek te zitten Zonder deze veiligheidssleutel...
Page 18: ...ppen gebruikt worden om een waarde in te stellen Tijdens een training sessie kan de hellingshoek aangepast worden Mode Scroll tussen de verschillende waarde op het scherm Program Voor het selecteren v...
Page 19: ...ing kan de snelheid en hellingshoek aangepast worden Dit kan met de snel toesten op de computer of met de knoppen op de handrail MANUAL Handmatig programma Met het handmatig programma kunt u een doel...
Page 20: ...r een waarschuwingssignaal klinken 1 Om het voorgeprogrammeerde programma te starten drukt u op de PROGRAM toets totdat het gewenste programma P01 P20 in het scherm verschijnt 2 Vul nu de gewenste tra...
Page 21: ...P11 Speed Incline P11 P12 Speed Incline P13 Speed Incline P14 Speed Incline P15 Speed Incline P16 Speed Incline P17 Speed Incline P18 Speed Incline P19 Speed Incline P20 Speed Incline Speed Incline P0...
Page 22: ...at alle 16 segmenten ingevuld zijn 5 Druk vervolgens op de MODE toets om de gewenste trainingstijd met de INCLINE pq SPEED pq toetsen in te stellen 6 Druk op de START toets om de training te starten D...
Page 23: ...de trainingen adviseren we gebruik van de optionele borstband 1 Selecteer het een van de hartslaggestuurde programma s HC1 HC3 met de PROGRAM toets Om te trainen op 60 van uw maximale hartslag selecte...
Page 24: ...ns op de MODE toets 5 Stel nu uw gewicht F 4 in met de INCLINE pq SPEED pq toetsen Druk vervolgens op de MODE toets 6 Grijp vervolgens de hartslag sensoren stevig vast De computer voert nu een vetmeti...
Page 25: ...ze link https www flowfitness com handleiding kinomap html iConsole Training Met de iConsole app kunt u de Kingston i met uw smartphone of tablet bedienen Uw trainingen opslaan in een logboek of virtu...
Page 26: ...en 5 km u draait Aan de achterkant van het frame zitten 2 stelbouten Hiermee kunt u de achterste roller afstellen In het geval dat de loopband naar rechts loopt dient u de stelbout aan de rechterkant...
Page 27: ...weer centreren en de stelbouten vastdraaien Schoonmaken en onderhoud Flow Fitness adviseert om eens in de zes weken de bouten en moeren van de scharnierpunten te controleren en indien nodig aan te dr...
Page 28: ...Train 5 minuten Rust 1 minuut Train 3 minuten 1 minuut rustig bewegen Cooling down 5 minuten Trainingsschema week 5 en 6 Train op 60 van uw maximale hartslag Maximaal 5 keer per week Warming up 5 10 m...
Page 29: ...der Train op 85 van uw maximale hartslag Maximaal 6 keer per week Warming up 5 10 minuten Train 10 minuten Rust 1 minuut Train 10 minuten Herhaal training 2 a 3 keer 1 minuut rustig bewegen Cooling do...
Page 30: ...dden 1000mm 1 37 Computer datakabel onder 500mm 1 38 Safety key sensor 1 39 Schroef ST4 2 45 4 40 Rail 2 41 End cap R 1 42 End cap L 1 Nr Onderdeel Aantal Nr Onderdeel Aantal 43 Bout M8 55 2 44 Achter...
Page 31: ...7 73 74 75 76 77 78 84 9 9 12 12 12 12 12 15 15 15 16 17 18 18 18 21 9 43 45 45 46 46 47 48 54 54 54 54 12 68 84 47 45 48 48 46 9 9 9 9 9 16 17 16 17 12 12 12 12 12 84 84 18 18 22 22 22 22 22 54 54 54...
Page 32: ...laar zit bij de uitgang van het netsnoer 3 Controleer de zekering bij de schakelaar Als deze is verbroken neem dan contact op met uw dealer Het display geeft weer De Safety key ontbreekt Plaats de sle...
Page 33: ...naar eigen inzicht verhelpen Indien het defect binnen het garantietermijn valt zal dit kosteloos gebeuren De garantie vervalt wanneer er gebreken zijn onstaan aan het product door een onjuiste montage...
Page 34: ...www flowfitness com en Manual...
Page 35: ...1 Assembly 45 4 2 Storage usage 48 4 3 Use of the computer 50 4 4 Training with apps 57 4 5 Maintenance 58 5 General information 60 5 1 Training schedule 60 5 2 Exploded view 62 5 3 Troubleshooting 6...
Page 36: ...s described in this instruction manual Before using this product check that the product functions as it should In case of malfunction or a defect stop training immediately and contact your vendor Do n...
Page 37: ...le for all users to be aware of the warnings and instructions as mentioned in this instruction manual This product is intended for use in a clean and dry environment Storage in cold and or moist areas...
Page 38: ...stige Kingston i Treadmill This manual contains all information necessary for the use and operation of the treadmill This user manual also contains tips and advice on how to train Flow Fitness wishes...
Page 39: ...kage Main frame Assembly set Part Quantity Specification Main frame 1 Computer post cover 1 Left Computer post cover 1 Right Bolt 2 M8x45 Bolt 4 M8x15 Screw 4 ST4 2X16 Grip lock washer 6 D8 Safety key...
Page 40: ...40 Manual Prestige Kingston i 2 Introduction 2 2 Important parts Computer Safety key Running deck Motor cover XSORB damping Handlebars with quick keys for incline speed and hand pulse sensors...
Page 41: ...3 user programs Body fat test Hand pulse sensors Heart rate receiver for optional chest belt Length 168 cm Height 128 cm Width 71 5 cm Technical Motor 1 25 2 5 HP Incline 0 12 0 12 levels Speed 1 16 K...
Page 42: ...training goal is to lose weight then the most effective training is at 60 of your maximum heart rate If your training goal is to improve your stamina then you should train at 85 of your maximum heart...
Page 43: ...our training goals The schedules are divided in two phases The first phase can be used for beginners or persons who start training after a long period of inactivity During this phase the level of inte...
Page 44: ...ight side of your torso are stretched Hold this position for one second Relax and make the same motion on the other side of your body Repeat this three or four times Knee bend Set your feet shoulder w...
Page 45: ...ill Due to safety reasons and damage prevention we advise you to assemble this product with two persons 1 Place the main frame where you have enough space to assemble the treadmill 2 Lift the computer...
Page 46: ...on i 4 Use Step 2 Assemble the computer post covers 1 Assemble the right computer post covers 66 by fastening the two screws 12 2 Then assemble the right computer post cover 67 by fastening the two sc...
Page 47: ...ix the computer with it supporting post into place 1 Fix the computer onto the computer post by fastening bolts 15 with grip lock washers 18 Tighten al bolts firmly 2 Finally add the safety key into t...
Page 48: ...upwards with your hands 2 Release the running deck by pressing the gas spring with your feet as the arrow in the drawing displays 3 Release the deck and move aside while the running deck automaticall...
Page 49: ...rame For your own safety it is important that the power cord is plugged into a grounded outlet Safety cord The safety key must be connected to the holder on the console Without this safety key the tre...
Page 50: ...cline level Mode Scroll between different values on the screen Program For selecting the training programs Start Press the START key to start a training session Stop Press the STOP key to stop the cur...
Page 51: ...ine level During the training session you are able to adjust the speed and incline This can be done with the quick keys on the computer or with the buttons in the handlebars Manual program With the ma...
Page 52: ...ograms with the PROGRAM key Press the program key until the desired program P01 P20 appears on the screen 2 Now set the desired workout duration by pressing the INCLINE pq or SPEED pq keys 3 Press the...
Page 53: ...d Incline P11 P12 Speed Incline P13 Speed Incline P14 Speed Incline P15 Speed Incline P16 Speed Incline P17 Speed Incline P18 Speed Incline P19 Speed Incline P20 Speed Incline Speed Incline P07 Speed...
Page 54: ...pq or SPEED pq keys 6 Press the START key to start your trainings session You user program will be saved automatically Start a saved user program 1 Select the desired user program U1 U3 with the PROGR...
Page 55: ...te controlled programs HC1 HC3 with the PROGRAM key For training at 60 of you maximum heart rate select HC1 for 70 select HC2 and for 80 select HC3 2 Set the duration of the exercise with the INCLINE...
Page 56: ...1 for male and 02 for female Press the MODE key to go to the next step 3 Set your age F 2 by pressing the INCLINE pq or SPEED pq keys Press the MODE key to go to the next step 4 Set your height F 3 by...
Page 57: ...sole Training The iC training app lets you control the Kingston i with your smartphone or tablet You can also log your training results or train virtually anywhere in the world using the google maps a...
Page 58: ...and 5 kph At the back of the frame there are two adjustment bolts These bolts allow you to adjust the rear roller When the belt is running towards the left side you need to turn the left adjusting bo...
Page 59: ...e the silicone lubricant evenly When you are finished you can centre the belt again by fastening the adjustment bolts of the rear roller Cleaning and maintenance The metal and plastic parts of the pro...
Page 60: ...s Rest 1 minute Train 3 minutes Calmly train 1 minute Cooling down 5 minutes Schedule week 5 and 6 Train at 60 of your maximum heart rate Max 5 times a week Warming up 5 10 minutes Train 6 minutes Res...
Page 61: ...Train at 85 of your maximum heart rate Max 6 times a week Warming up 5 10 minutes Train 10 minutes Rest 1 minute Train 10 minutes Repeat training 2 or 3 times Calmly train 1 minute Cooling down 5 min...
Page 62: ...4 2 45 4 40 Side rail 2 41 End cap R 1 42 End cap L 1 Nr Onderdeel Aantal Nr Onderdeel Aantal 43 Round head hex bolt M8 55 2 44 Rear roller 1 45 Bolt M6 40 thread L10 8 46 Side rail support 6 47 Cushi...
Page 63: ...4 75 76 77 78 84 9 9 12 12 12 12 12 15 15 15 16 17 18 18 18 21 9 43 45 45 46 46 47 48 54 54 54 54 12 68 84 47 45 48 48 46 9 9 9 9 9 16 17 16 17 12 12 12 12 12 84 84 18 18 22 22 22 22 22 54 54 54 55 55...
Page 64: ...er cable is set to ON or I 3 Check if the fuse near the switch If the fuse is broken contact your reseller The screen shows The safety key is not placed correctly Place the safety key into the designa...
Page 65: ...5 The warranty is provided by the Flow Fitness distributor of your country and the reseller where you have purchased your product Please check https www flowfitness com en dealers for contact informat...
Page 66: ...66 Prestige Kingston i Notities Notes...
Page 67: ...Prestige Kingston i 67 Notities Notes...
Page 68: ...Prestige Kingston i www flowfitness com...